
Welcome to the marsworx client support portal
Should you require further assistance, please contact support@marsworx.com
Getting Started
Achieve success with desktop and mobile experiences
This portal offers:
- Tickets - track progress of active tickets and projected date of completion
- Videos - compilation of tutorials and presentations
- Support - detailed pages of instruction on your user experience and interface with desktop and mobile applications
Find what you need via:
- The search bar on your top right
- Scroll this page top to bottom
- Access the menu on the left to dial into specific areas
- FAQs desktop, mobile, or mars rover
Legend:
📽️ - denotes there is a video tutorial included for that topic. (may also be viewed on Video page)
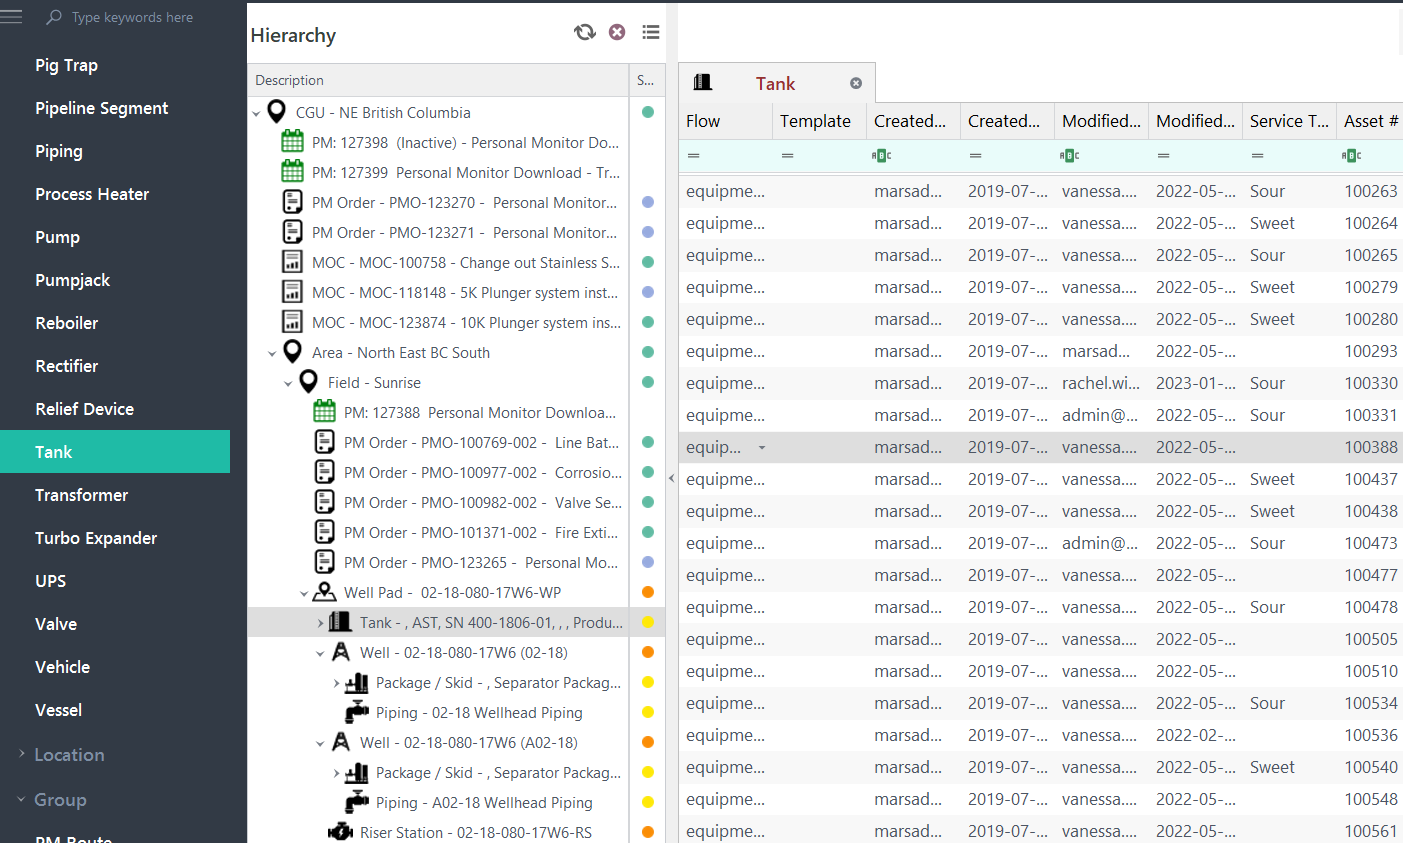
Desktop Overview
Map of most used tools on desktop.
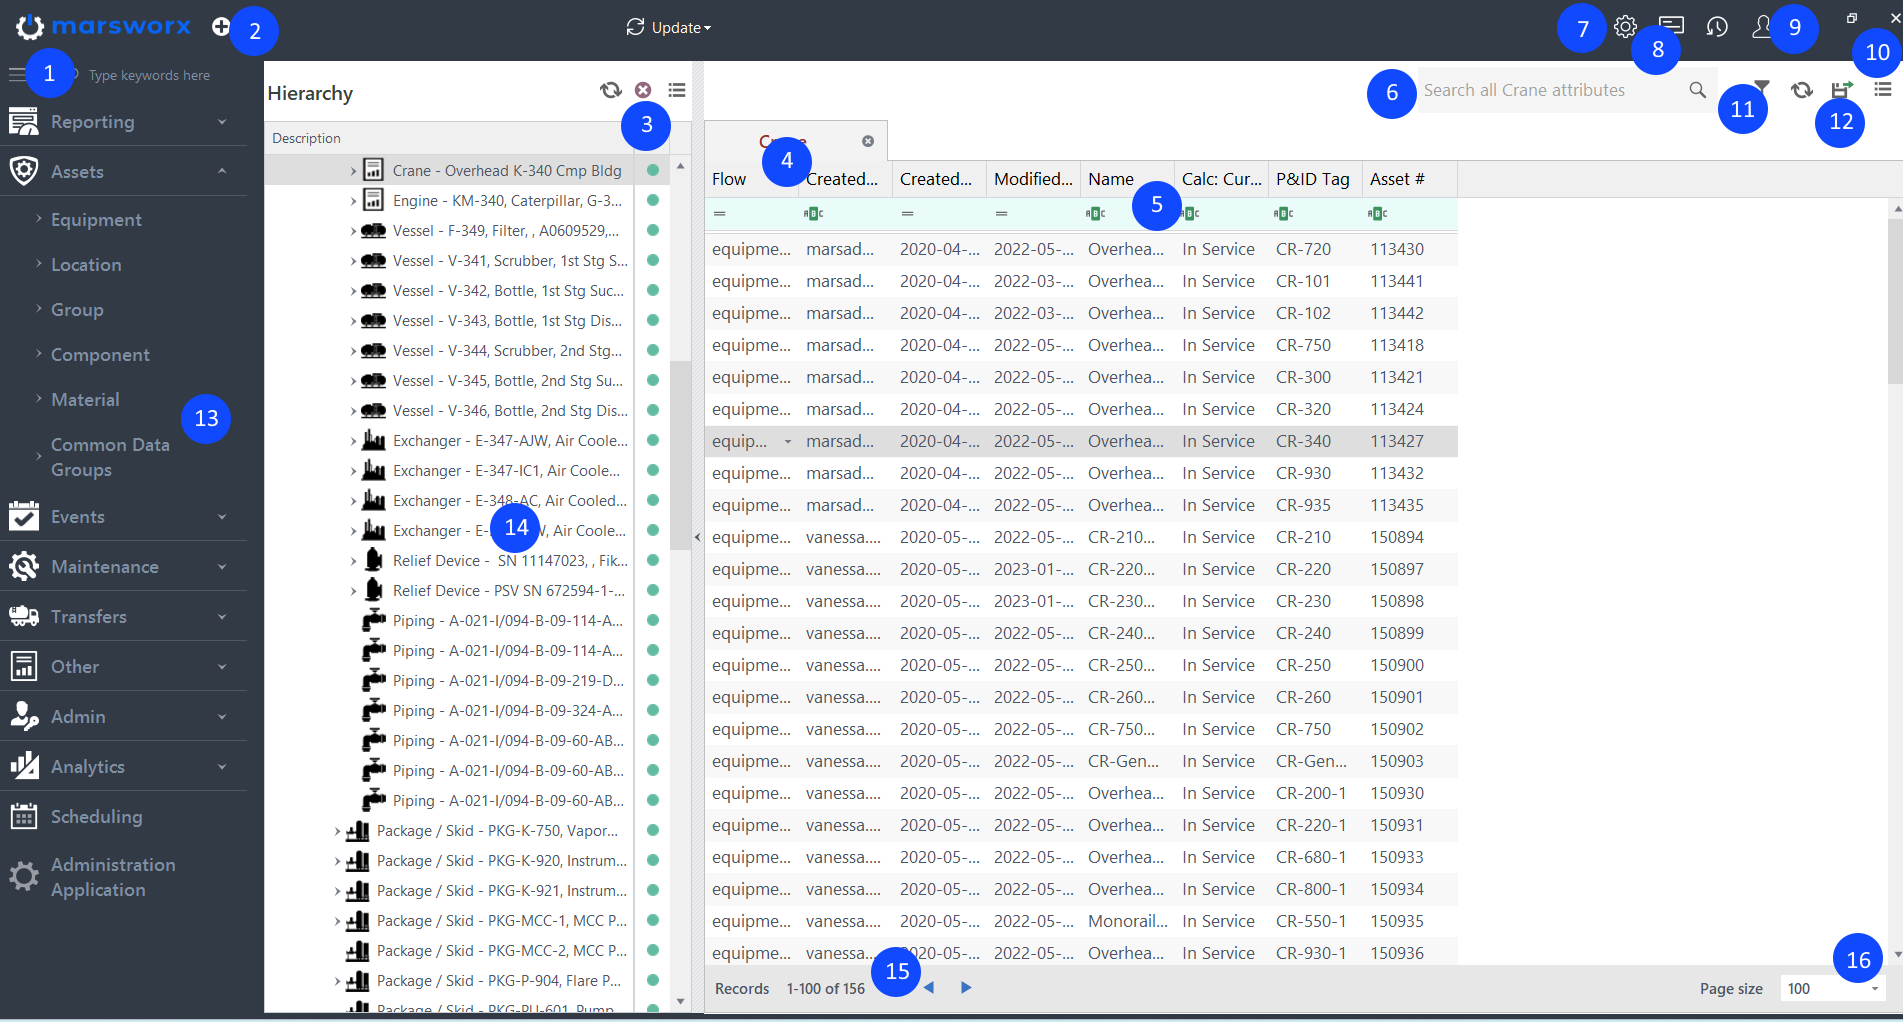
1. Search for elements
2. New button - create new Assets, Events, Maintenance Programs or Transfers (based on user permissions)
3. Hierarchy settings - refresh, clear, or filter data shown
4. Grid with different data sets as chosen by user
5. Column filters - create filters for each column
6. Grid search location or hierarchy
7. Settings - application customization ( submit tickets here)
8. Notifications - relevant activities
9. User profile - view or edit
10. Column menu - add/remove attributes from grids
11. Filter Editor - customized column selector
12. Export data
13. Select element
14. Hierarchy - show equipment, locations, work, and maintenance programs
15. Paging - page forward or back
16. Page size - # of records shown in the grid
FAQs Desktop
BUGS
Q: How do I submit a bug I find while in the desktop application?
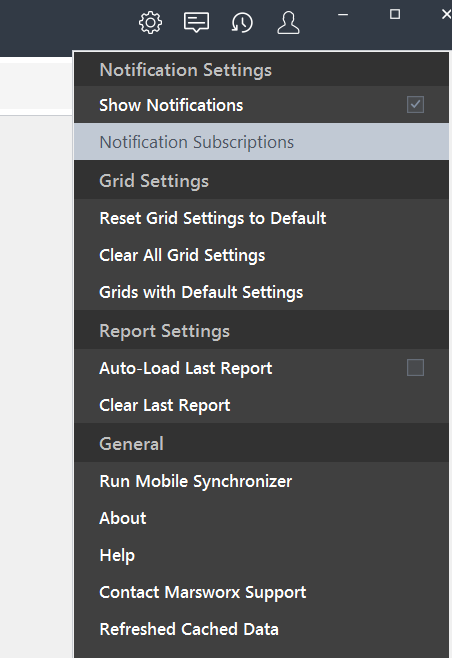
A: If you encounter a bug, please click on the gear button in upper right hand of screen.
Click on Contact Marsworx Support as shown below.
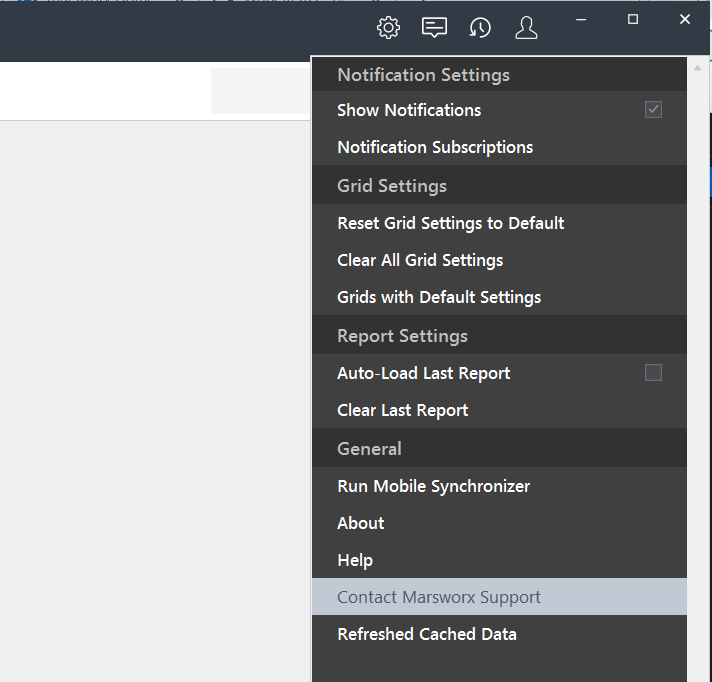
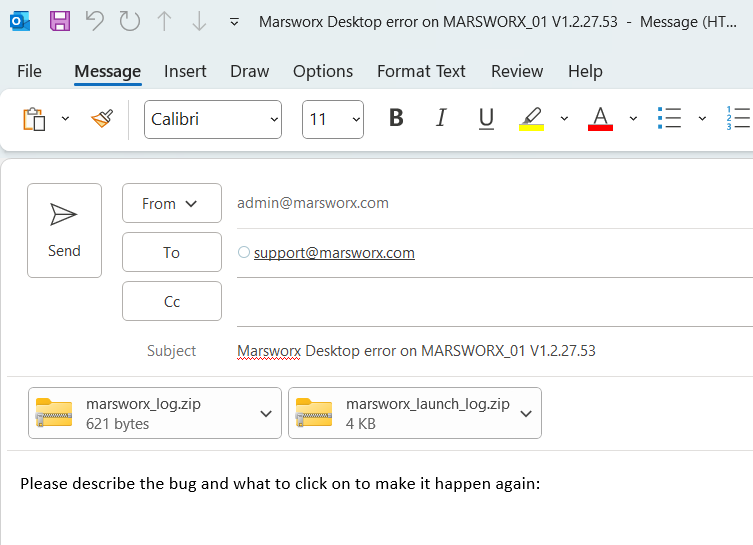
User will be directed to Create New Email page where you can submit to support@marsworx.com as shown below. Be sure to confirm your "From:" email address is correct.
Fill in details and screenshots if applicable and your query will be directed to a team member to assist you.
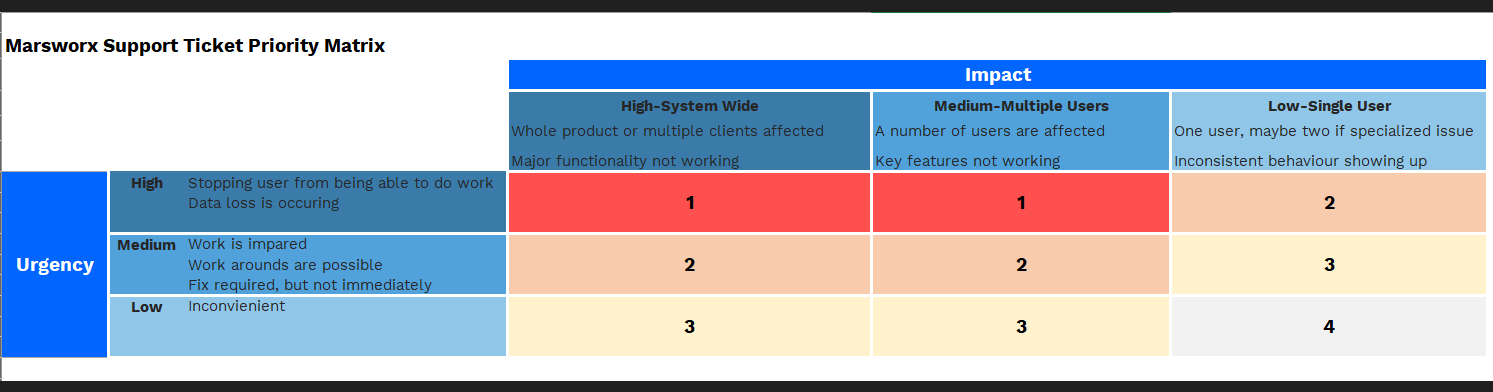
Q. How are ticket prioritized in marsworx?
A: When a ticket is submitted to marsworx via the path indicated above, the issue is evaluated and triaged accordingly using the below matrix.
EDITING PRIVILEGES
Q: Why can I not create, edit, or change an Asset?
A: Contact your Administrator. They will check your user profile and permissions which dictate the ability to edit assets. Permissions are granted on a per user basis.
📽️Q: How can I receive a notification when work orders I created are completed?
A: Click on the gear icon at the top right of decktop screen and choose Notification Subscriptions
A window will appear where you can subscribe to a choice of event notifications.
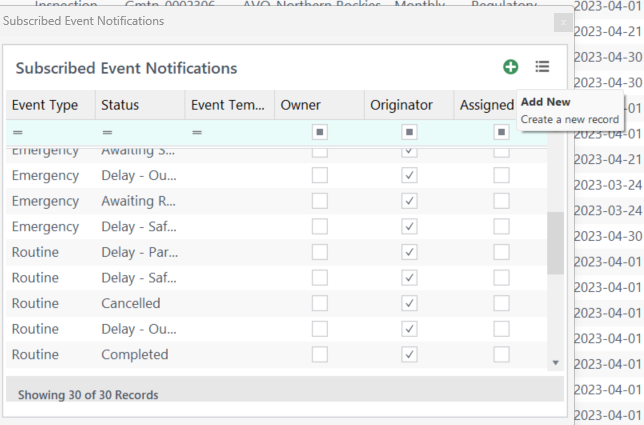
Click on the green arrow to add a new row if desired.
Scroll down to that row and right click for drop down choice of event type to add.
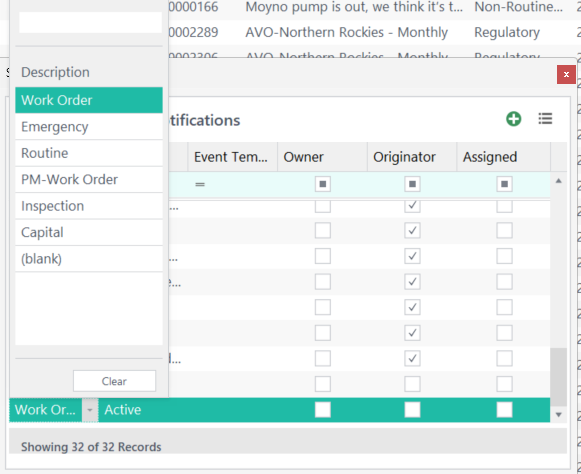
Click boxes that apply. Do you want to be notified of chosen events where you are the owner or the originator or the assignee or all three?
Close the window.
Please note a user cannot turn on notifications they do not already have permission to in their user profile. See your administrator for assistance with user permissions.
Notifications can also be applied within a job plan. If a user has permissions for the selected job plan, they can then be chosen as the assignee when creating that event.
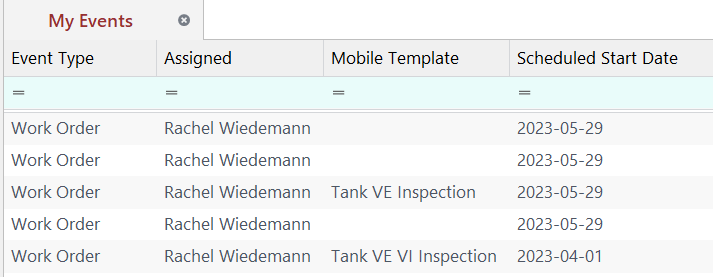
Q: How do I know which work I need to look at this week?
A: Under Events in the element menu, choose My Work or My Events grids.
From here, use filters to drill down to specific statuses and dates.
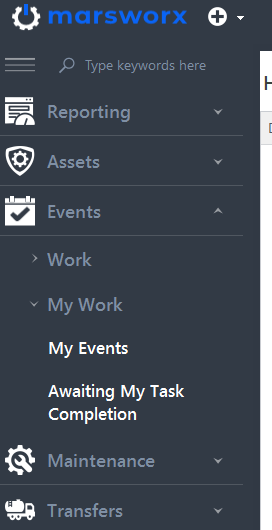
Here you are able to see events assigned to you in grid form.
EVENT WITH CONTRIBUTOR ACTION STUCK ON A STATUS
📽️Q: Why is my event "stuck"? What stage is it currently in?
A: There are a couple ways to determine which stage an event including contributor action is currently in.
Open your event in a grid on your desktop.
Open the detail editor for the event in question.
On the right hand side of screen, tab over to tasks. Are these complete?
Examine the current stages of the Contributor area on the right hand of screen.
Is it still waiting review or approval?
Events involving contributor action are dynamically built and customizable to dictate their flow and path.
Status cannot advance until certain stages are first completed.
With administrator privileges, open the admin app and navigate to Flows.
From the drop down menu on your right, choose your flow.
Look at Status Transitions at the bottom of your screen.
You may need to "stretch your screen" for full view.
Managing the flow of stages is accomplished by clicking/choosing the order of work to be done.
NOTE: This affects ALL flows of this type. Not just the one/ones you are inquiring about.
Remember: you are in control of the flow and can edit it at any time.
RUN MOBILE SYNCHRONIZER
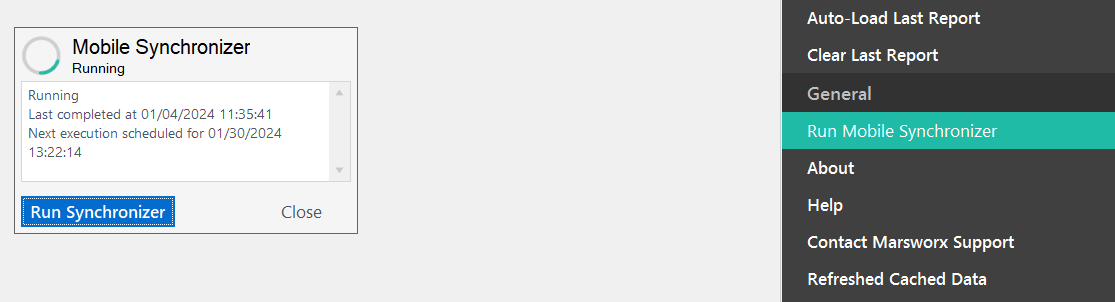
Q: How do I run the Mobile Synchronizer from desktop application?
A: The "Run Mobile Synchronizer button is located under the gear button at the top right of screen.
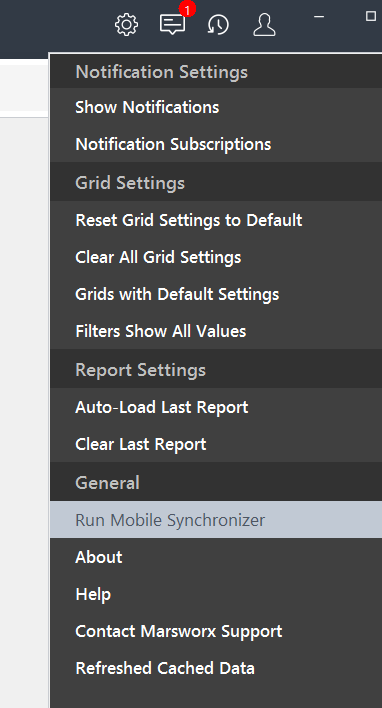
Click on Run Mobile Synchronizer then choose Run Synchronizer. Once it reads, "running", you may close winodws as the synchronizer is now running in the background.
DYNAMIC VS COMMON GRIDS
Q: What is a Common Grid vs a Dynamic Grid?
A: The term "common grid" refers to grids which contain the same types of information or attributes available to assets within that grid. Below you see all available fields to filter by are visible. All fields are common to this grid.
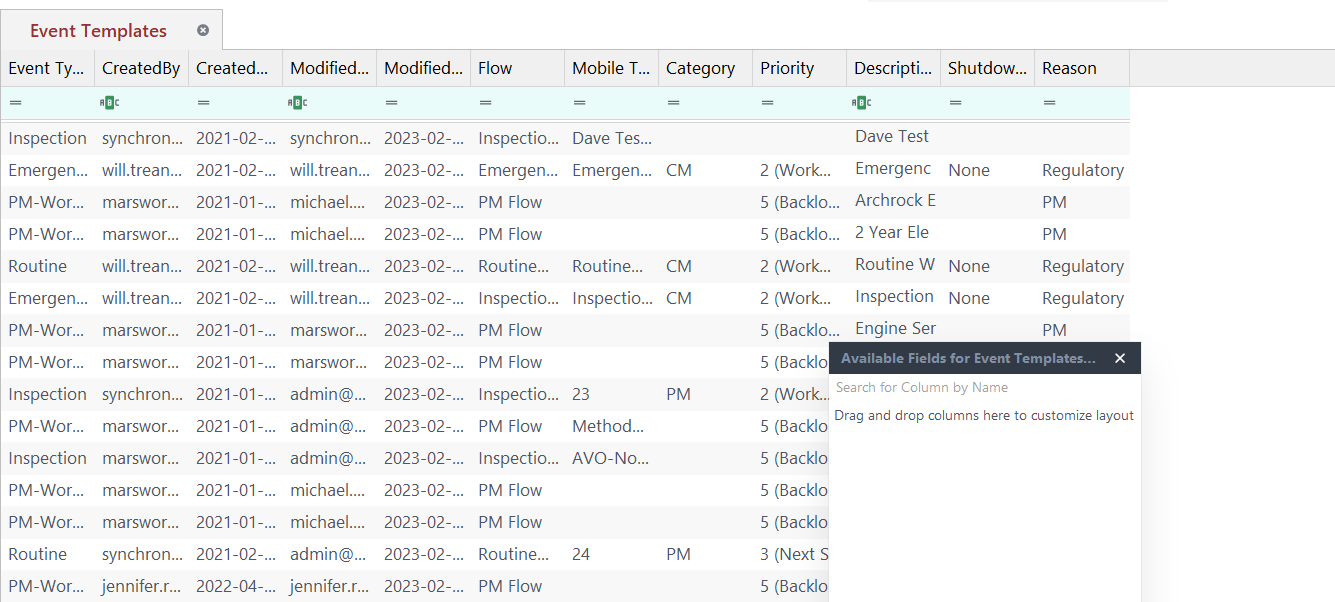
A Dynamic grid allows users to choose specific information desired through selecting and controlling data producing a dynamic and flexible user view. Creating your dynamic grid is achieved through filtering. In the diagram below, you see how dynamic and personalized the grid can be produced through multiple available fields to filter by.
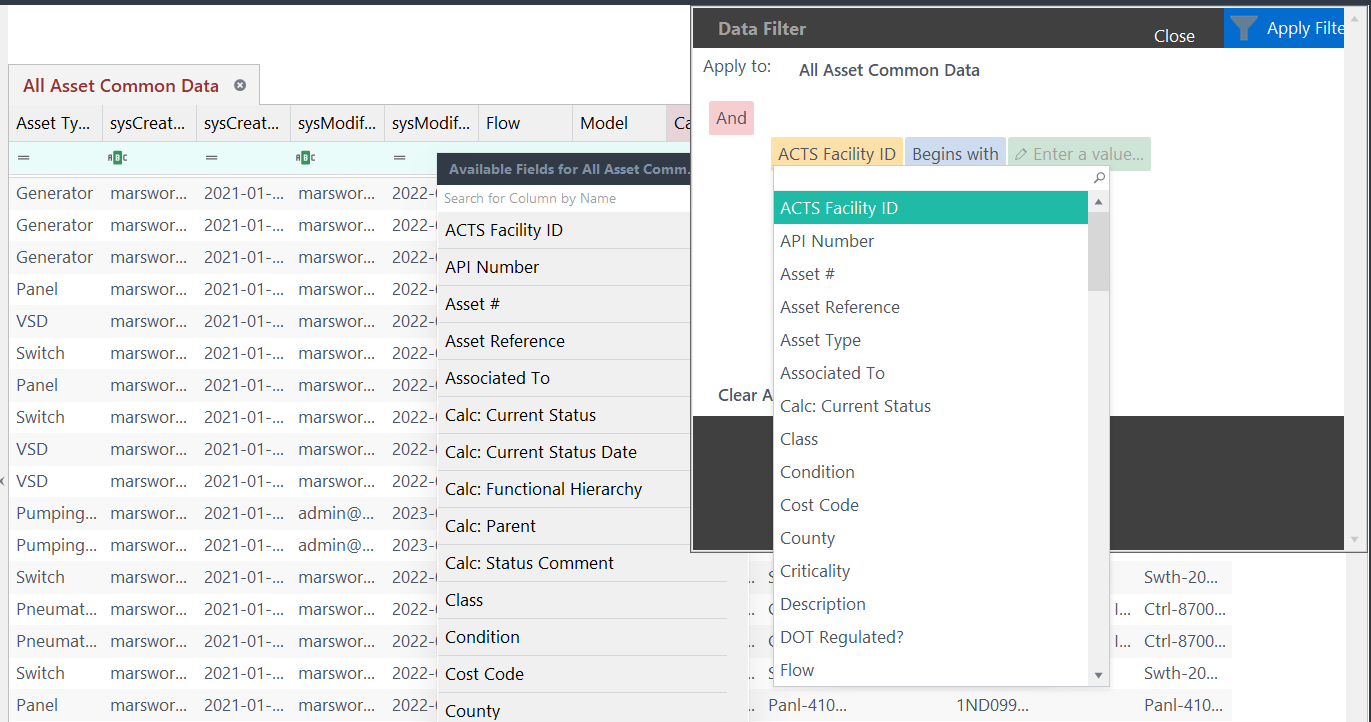
For example: the Filter Editor (nested queries) will provide dynamic personalized grid views.
PM SEQUENCES
Q: How do I change the sequence on a PM?
A:Open the PM programs you wish to edit on a grid view through filtering if more than one.
NOTE: if the PM is active, you MUST deactivate to edit.
If active, lclick the active button at top of screen and deactivate.
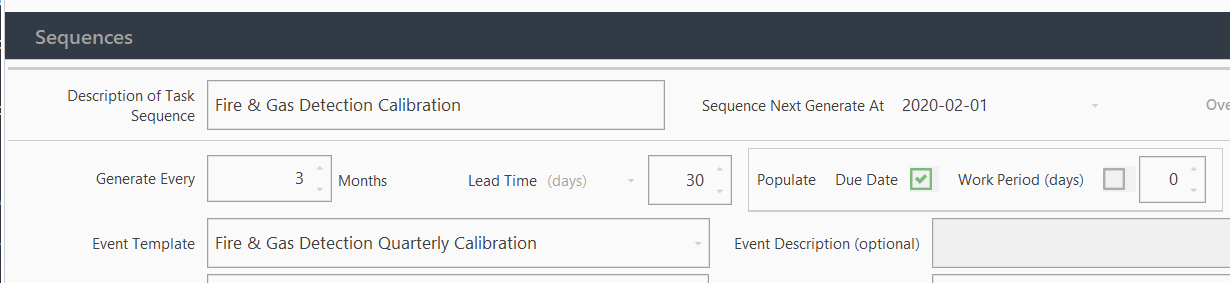
Navigate to the "Generate Every" field in the sequencing area as shown below and edit the sequence as desired.
Click the Active button to a green status to make active again.
Close window.
NOTE: When changing the sequence on several PMs, you must do one at a time.
RECEIVING AN ERROR MESSAGE IN DESKTOP OR ADMIN APPLICATION
Q: When I receive an error message in the desktop or administration applications, what should I do?
A: Firstly, read the error message as they are designed to provide information to you. Sometimes, the error will include instruction on missed data or incorrect flow or status, for an example, that is halting you from proceeding.
If, after reading error message and possibly applying necessary changes still does not allow you to continue your work, please submit your details to support@marsworx.com located by clicking the gear button at top right and choosing Contact marsworx Support.
FAQs Mobile
Q: Where can I find my work?
A: From your home screen, choose My Work Orders or Group Work Orders. All work assigned to you will be found here. Remember you can use filters to search.
NOTE: When assigning group work orders and loading to your device, the user MUST be connected the internet.
Q: How many devices (iphones/tablets) can be used with each user account?
A: One. Each email address in the system (account) is tied to a single physical device. the device used with the account can be changed at any time however the account will ONLY be accessible from the new device.
Q: Does my device work offline?
A: With only a couple exceptions, YES, marsworx mobile was developed for dynamic dependable use in the field. The exceptions are as follows:
You can only sync when connected to the internet. This will include assigning group work orders to yourself as that requires syncing.
KEEP IN MIND: Should you choose to turn off cellular data on this app through settings on your phone, you will not be able to receive any updates (work orders, changes, asset/site data)
Q: How do I change my password when I get locked out of mobile?
A: On your login screen, choose Forgot yout Password?
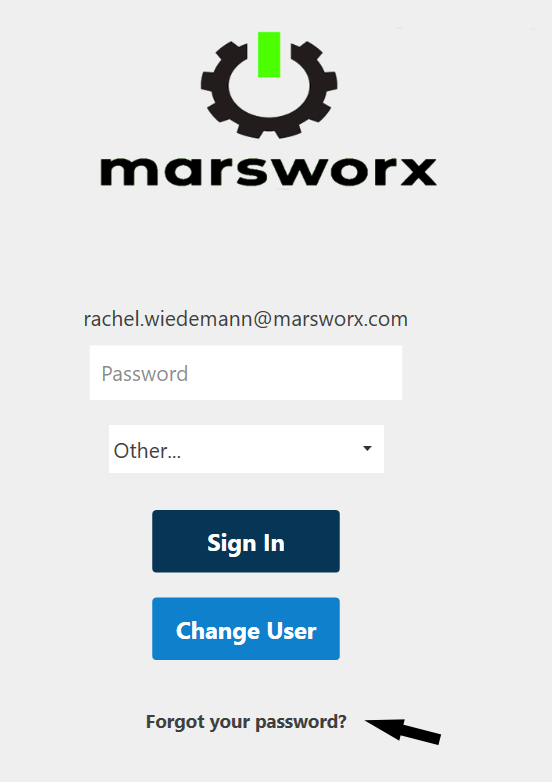
You will then receive an email with a new password which you will input on this same screen.
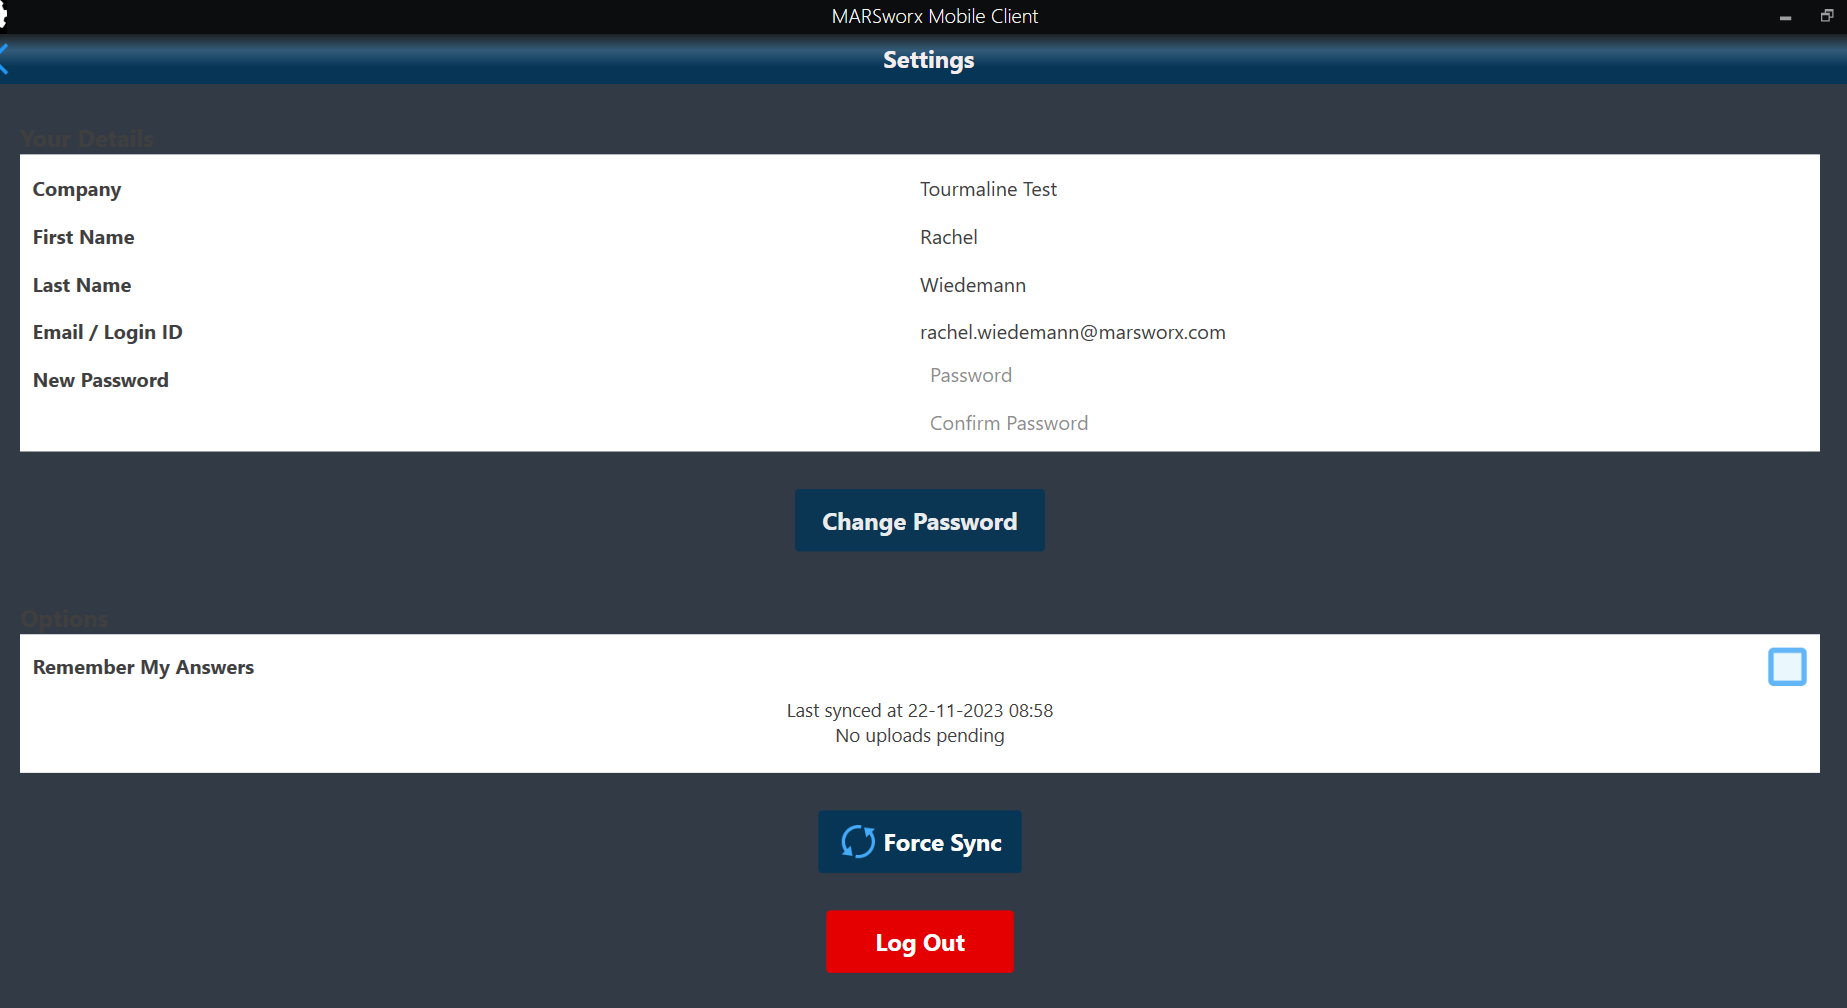
Once you have successfully logged back in, you may go to your settings screen and change the password to one of your liking.
NOTE: Should you not receive an email with your new password due to possible spam protection, contact us via support@marsworx.com and a marsworx team member will provide prompt assistance.
Desktop
Access information below or in menu on left.
Filtering
Find the four ways to filter data.
Using Filter Editor
Multi field filters may be created.
Searches through data using criteria you set returning matching results.
Compare two different fields on a record.
📽️
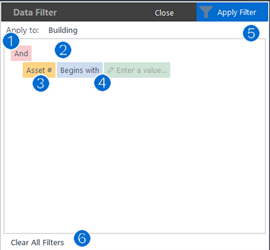
Press the filter button on the upper right hand of your grid screen. This will prompt the filter window to appear.
The filter will only apply to the currently selected grid regardless of how many are open.
KEY COMPONENTS
Choose AND or OR filters. Description below.
AND filters: refers to ALL criteria chosen
OR filters: refers to only selected criteria chosen
Add Another Field: mousing over this area, a plus button appears allowing you to add another field to the criteria. You can add as many fields as required
Click on Field to Filter by for a list of all available fields to filter by.
Under Filter Criteria, set whether values must be Equal, Great Than, Less Than, In a List etc. of entered values.
Enter search value beside criteria.
Text Filters are NOT case sensitive.
Press Apply Filter. This runs the criteria chosen and returns all matching results.
NOTE: if no results are returned after a filter, double-check the criteria is correct.
To clear all filters, simply click Clear all Filters.
A blue bar appears at bottom of grid when filter is applied. This is now additional access to Filter Editor.
FILTER CRITERIA EXPLAINED
The filter criteria options are related to the type of field that is selected to filter against.
Different field types contain different options.
After choosing a condition, the corresponding areas or fields to enter will vary depending on the condition chosen.
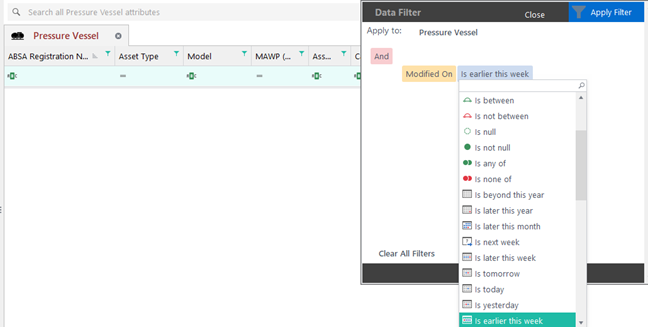
DATE CONDITION
Select a date attribute to filter on, then click on the criteria option to see a list of options.
The example below will find any records that have been edited this week.
The “week” starts on Sunday.
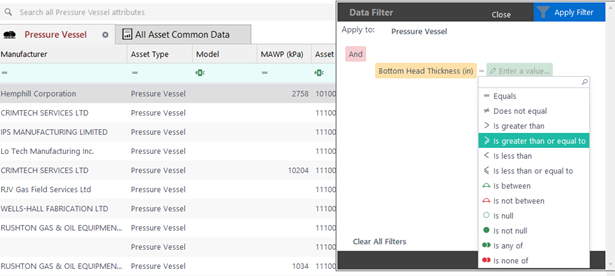
NUMBER CONDITIONS
Numeric Fields: the option to look for specific values or values that fall in a range.
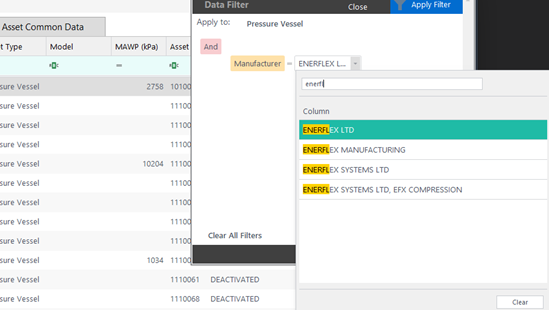
LIBRARY FIELDS
When filtering by a library field, you can select which values to look for using the library.
Library values can be filtered using the search box at the top.
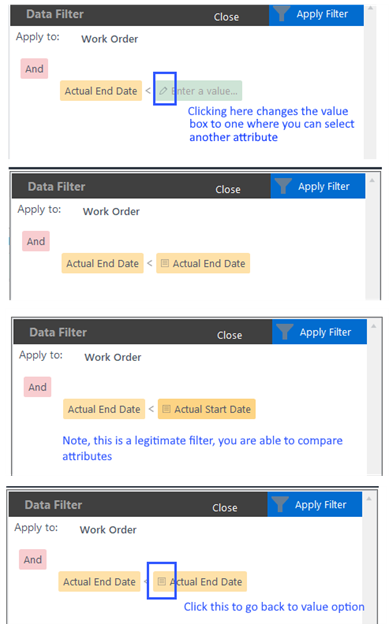
COMPARING TWO FIELDS ON A RECORD
Filters can be created to compare two different fields on a record.
For example, a filter can be created that compares two date fields and finds records where one is earlier.
Below, the filter will identify any records where the Actual End Date is earlier than the Actual Start Date.
Using the Search Bar
Designed for quick look up capabilities of certain criteria.
At the top of most grids is a general Search bar to search against the currently selected grid. The search gathers all the data for the record type and any records will be returned.
The following data types support search:
Asset Types, Event Types, Maintenance Programs, Transfer Types, Documents
KEY FEATURES
By Type: Search allows you to search across all the attributes in the selected type using key words.
All Fields Included: The search term(s) may be found in any of the fields in the grid or in the related location or hierarchy fields.
Case Sensitive: Search is not case sensitive.
Phrases: You can search for a specific phrase by putting quotes around the words.
AND / OR: Multiple terms can be searched for at once. By default, search will OR the search terms, meaning it will look for records that contain any of the search terms. By putting AND between the search terms the search will look for records that contain all the search terms.
Combine Results: Search and Filtering can be combined on the same grid. A typical scenario would be to filter a dataset down to a smaller size by running a filter, then run multiple searches against this set.
Saving: Search criteria is saved in Reports.
Clearing: To clear a search, delete the search text and run the search with no search criteria entered.
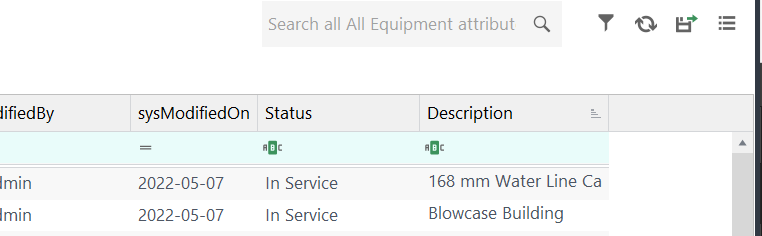
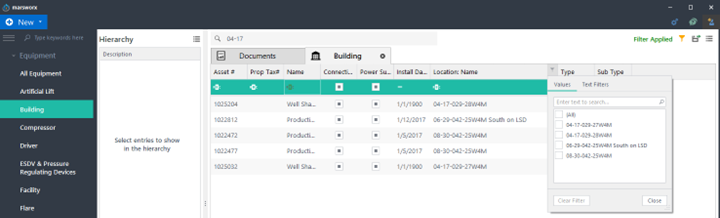
HOW SEARCH WORKS AND IT'S LIMITATIONS
A search looks at three different data sets to determine what records to bring back:
All fields for the record type selected.
All fields on the parent location or asset for each record.
All fields in the hierarchy for each record.
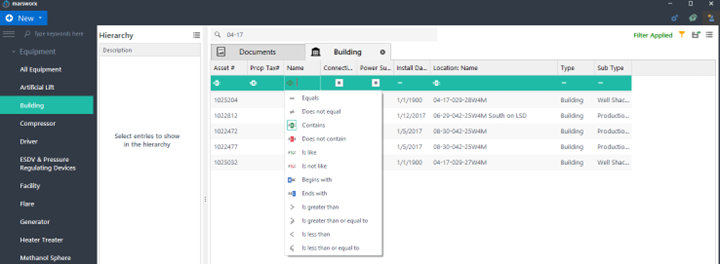
The search below will look for any Building records that have 04-17 in any of fields, as well, it will look for Buildings where the parent location has 04-17 in any of its fields or 04-17 can be found in any of the Building’s hierarchy.
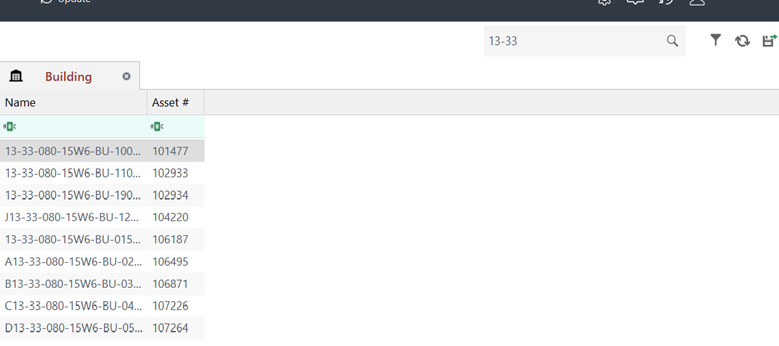
A search string must be at least three characters in length.
EVENTS
Search does NOT work against the following fields on Events (Work Orders):
Owner
Assigned To
Originator
Schedule
Lead group
Mobile Template
Job Plan
PM Program
Documents: search works only against the related Asset or Event fields (and their location and hierarchy).
Search cannot see any of the Document attributes.
Unexpected results: Search will look at all fields available and attempt to match on any using the provided search terms.
A search of “01-01” may match on any number of fields such as a date or a location name or serial number.
Specific word phrases can be searched by putting quotes "around the phrase".
Searches can be setup to include all given terms with the word AND between them ex: Well Shack and Northern.
Column Filtering
Column filtering is available when all the results for a grid are shown.
Assists user to find their data more efficiently.
VALUE FILTERING:
Left click in blue row of chosen column.
The row will turn green once clicked on.
Filter the data from drop down menu.
Click on icon or drop down menu in blue cell to see filter options list.
Make selection. Hit refresh at top right of screen to view results.
LIST FILTERING:
Click on grey filter icon from mousing over in upper right-hand corner of a column name to prompt pop up list of values in that column.
Select the values to display by clicking on the checkbox beside them. Hit close.
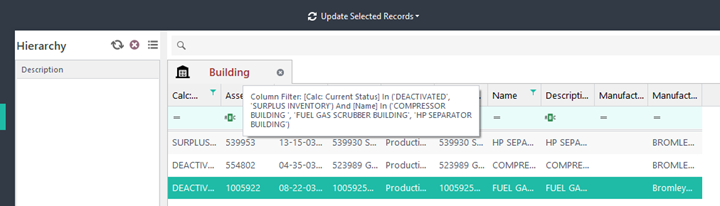
To see what filters are currently being applied to a grid, place the cursor over the tab at the top of the grid. A popup appear listing any fields that are filtered.
Grid Filtering
CUSTOMIZING VISIBLE COLUMNS
📽️
Changing the way a grid looks does not affect the data within the grid or affect how other people will see the grid data.
For any grid, you can select which columns to display.
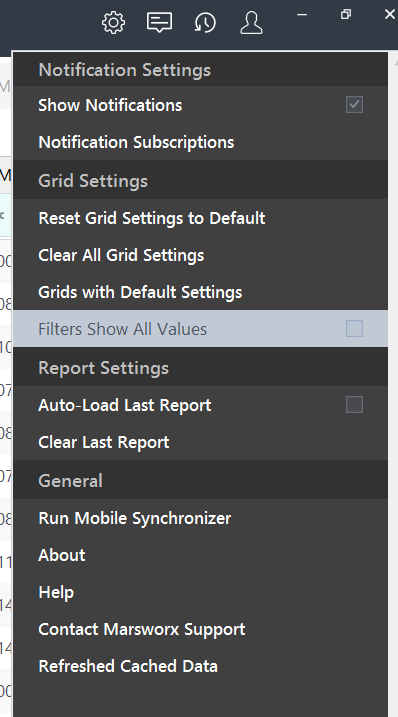
FILTERS SHOW ALL VALUES
Under the gear button at the top right of your screen, you may choose Filters Show All Values. When checked, your grid will display all possible values for that grid.
Uncheck this feature if you prefer to NOT have your display show all values wherein customizing your grid may be easier to navigate.
REMOVING A COLUMN
Right click to the right of the grid name and choose Remove columns from Grid.
OR:
Left-click on the column header and drag the column up off the grid. A black X will appear on the screen. Release the mouse.
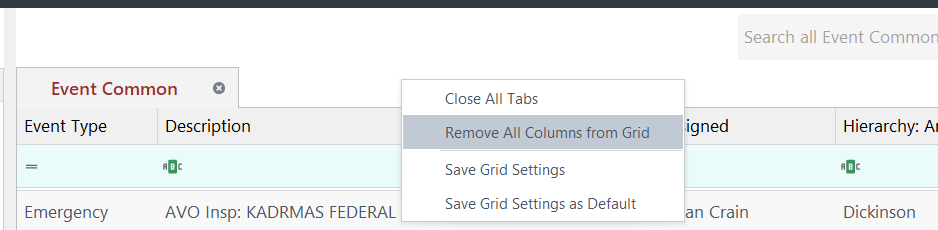
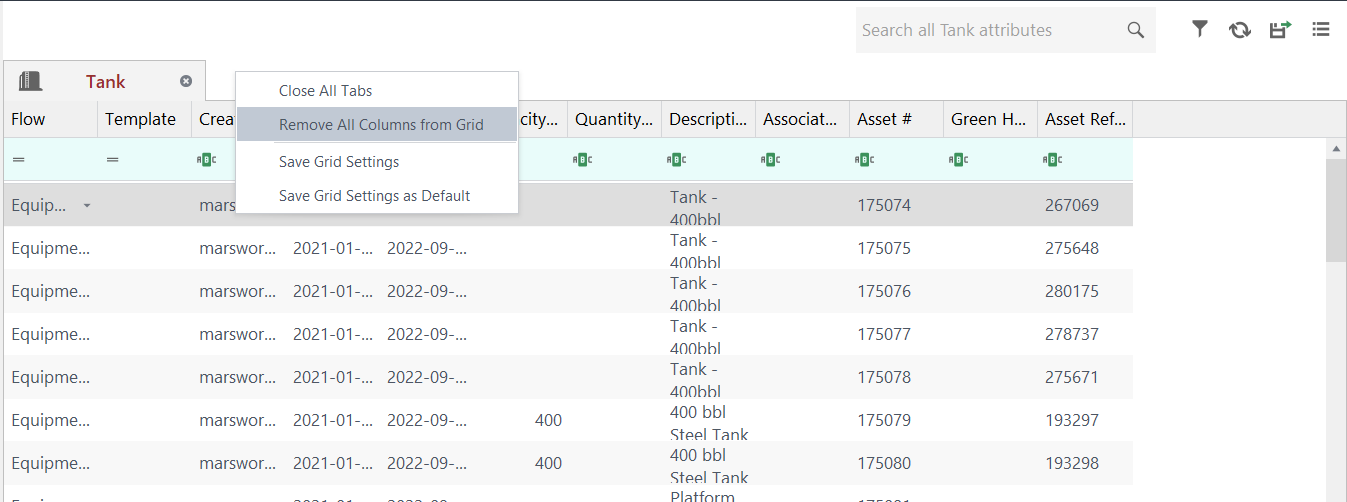
REMOVING ALL COLUMNS
Right click in the area beside the grid name and choose remove all columns from grid as shown below. You can then procede to add columns/fields of your choice as described below.
ADDING A COLUMN
Press the hamburger button (button with three horizontal lines) in the upper right-hand corner to display list of all available fields that can be added to the grid.
Next, either double-click on the field to add, or click and drag the field onto the grid.
Your results now appear in your grid.
RESIZING
Click and drag the right edge by the column name. This can be tricky due to the amount of data in a small area.
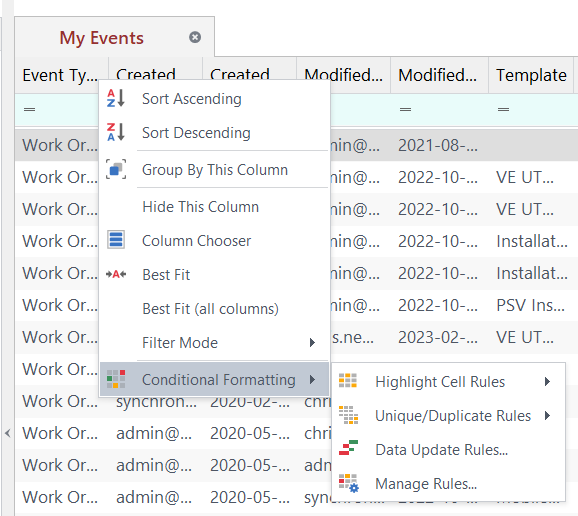
SORTING
Mouseover in the column name cell until a filter icon appears, then right click to choose from a diverse option list.
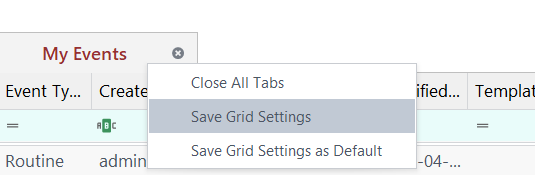
SAVING GRID SETTINGS
In the cell of the name of grid, right click and choose Save Grid Settings. This ensures the grids appear as you have customized them when opened.
RESET OR CLEAR GRID SETTINGS
Left click on settings (gear icon) top right of screen and choose your preference as shown below.
Here you can reset to previous default settings, clear all settings, or view previously set default settings.
PAGING AND PAGE SIZE
Select the record set size from the page size list in the lower right-hand corner.
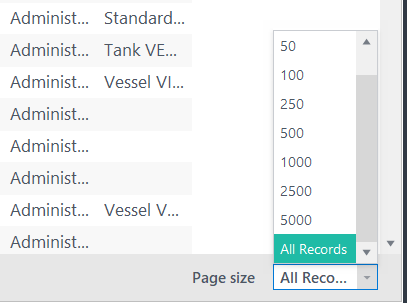
Change the value to retrieve chosen number of records.
Larger data sets may take some time to retrieve. This is dependent on internet speed and the number of records requested.
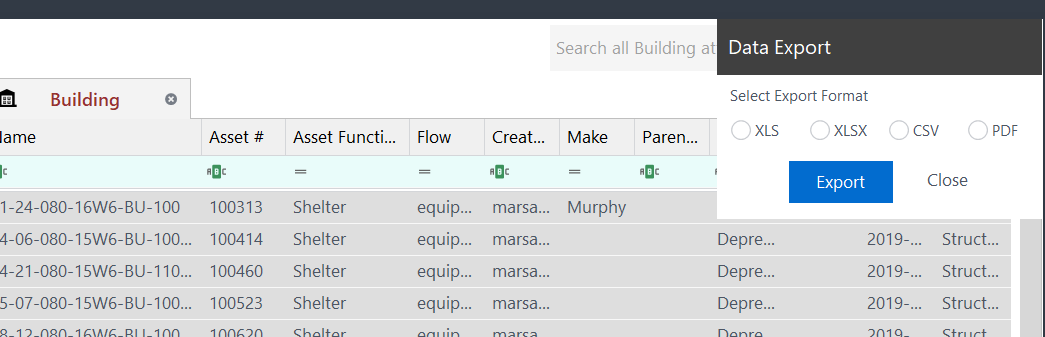
EXPORTING DATA FROM GRID
Press the export button at the top right-hand corner of the grid to bring up export menu.

Select desired export format as shown below.
Press Export which causes visible data to be exported.
Once the export is complete, marsworx will attempt to open the exported data file.
HELPFUL TIP: when exporting, all visible grids will be exported together.
Asset Management
Access information below or in menu on left.
Create and edit assets. Manage relationships and share reports.
Hierarchy
Visualize your asset management information.
Shows parent/child relationship between ALL assets.
Provides option to turn on and off different layers.
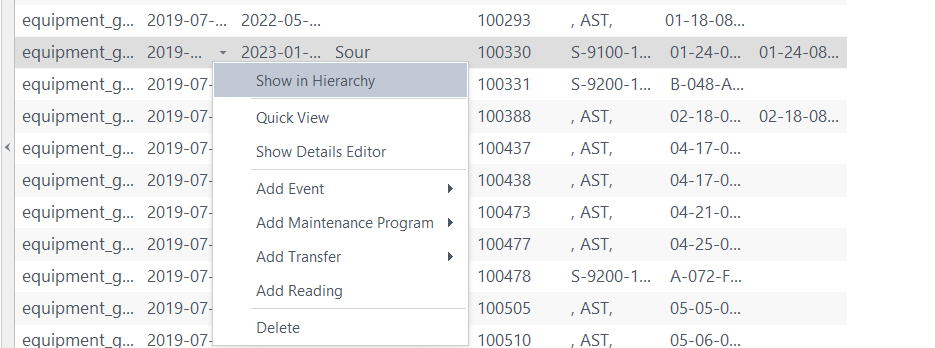
Right-click on the desired Asset from the chosen grid and choose Show in Hierarchy.
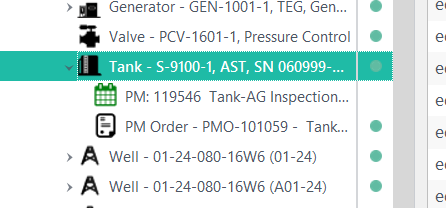
When a piece of equipment, event, transfer or maintenance program is shown, marsworx loads and displays ALL information related to the asset.
Turn on and off different layers by clicking on the hamburger menu button just above the hierarchy as shown in the diagram below which then prompts this pop up window.
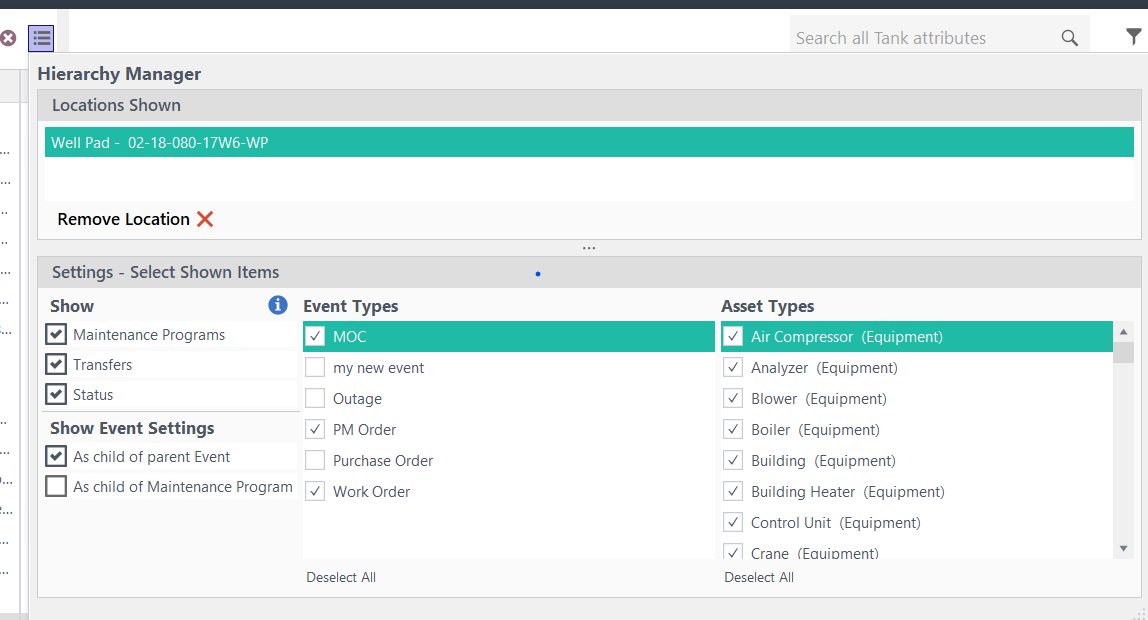
Click on event or asset options to turn on and off visibility in hierarchy.
Once all changes have been made, press the Refresh button beside the x and hamburger menu.
Example: when a piece of equipment, event, transfer or maintenance program is shown in the hierarchy, marsworx first looks up the location it resides on. It then loads the location and all related equipment on that location. Finally, the remaining corporate hierarchy for that location is displayed.
Many locations can be shown in the hierarchy at a time.
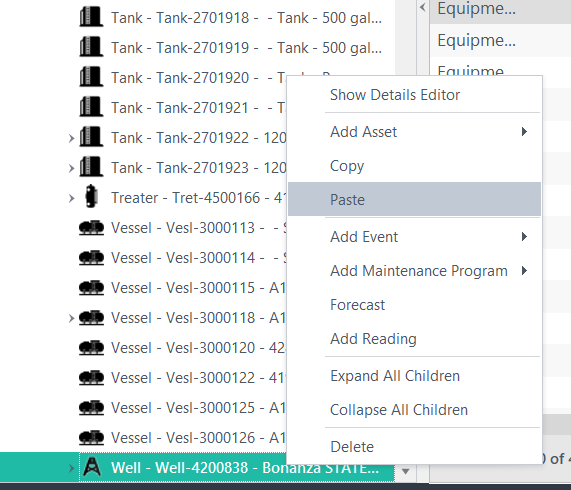
Depending on user profile permissions, you may access a number of features here including:
•View the Details Editor for the asset
•Copy the asset record
•Paste any copy assets as new assets
•Add an event to selected asset
•Add a maintenance program to selected asset
•Forecast any child maintenance programs to the asset. Maintenance programs on child equipment will also be included in the forecast.
Right-click on an element in the hierarchy to bring up related menu as shown below.
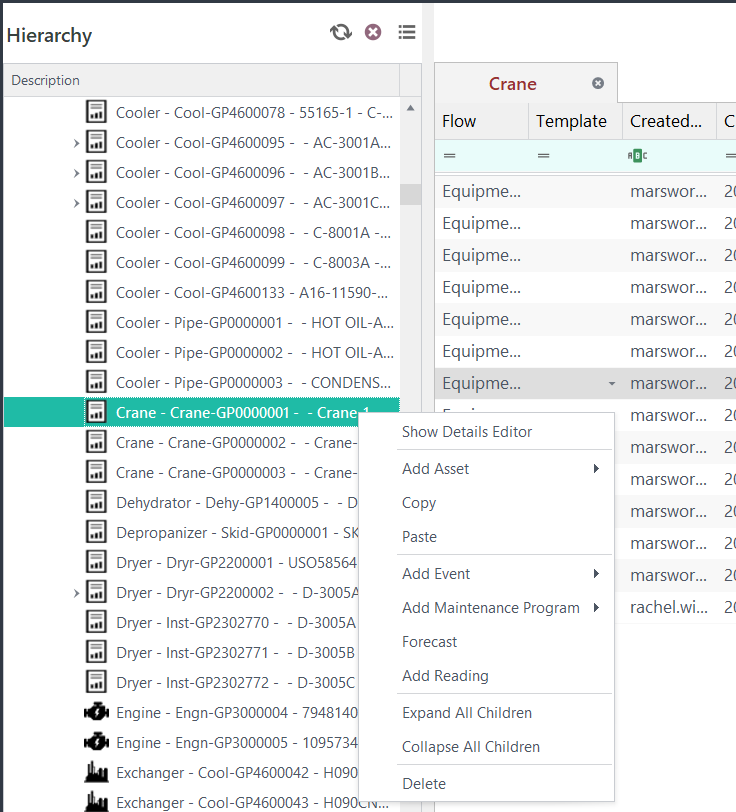
Choose desired action from menu
From a maintenance program you are able to add an event to other assets.
From an event, you are able to show the detail editor for the selected event.
From transfer, you are able to show details editor for selected transfer.
Show detail editor for that asset.
From a forecast, can create preventative maintenance programs.
Additional feature:
Hierarchy settings are managed through the new options when a User accesses right-click on the hierarchy title.
The user can save their settings and revert back to those saved settings at any time.
Reports will open with their saved settings, if the user wants to go back to their own saved settings, they can choose the revert option.

Reports, Creating and Editing
A report may contain a series of grids of all different types.
📽️
Any custom formatting done to the grids as in which columns are shown, the column order, their widths, any column searches, what column is being used for sorting, and the number of records returned for each grid may be saved.
Custom filters applied to the grids.
Locations shown in the hierarchy, and the hierarchy settings (whether to show PMs or Events, what asset types to show etc.) may be shown.
Reports are useful for a collection of information that needs to be accessed more than once.
HOW TO CREATE A REPORT
Create the screen to show all information you wish your report to contain through various searching techniques.
NOTE: please refer to grid filtering for instruction on filtering to optimize your report.
Click on the plus + button that shows up beside the Personal folder under the Reporting option on the left-hand side menu. (as shown below)
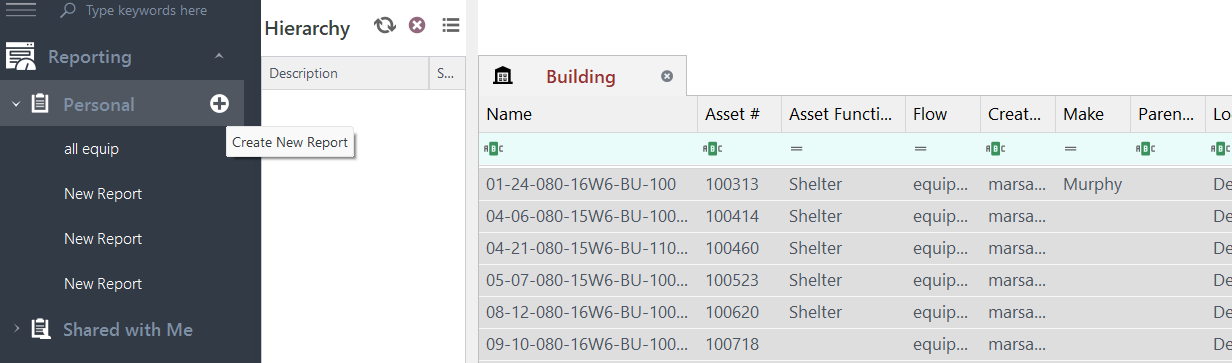
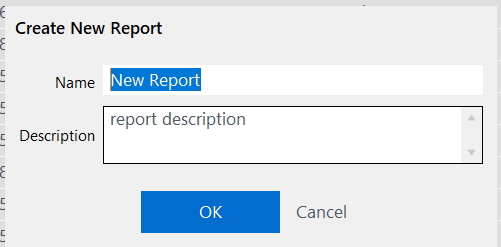
This will prompt a pop up window. (as shown below)
Fill in report name and description as shown below.
KEEP IN MIND: The description field is optional.
Click OK to add the report to the Personal folder.
EDITING YOUR PERSONAL REPORT
Only PERSONAL reports can be edited.
First, run the report.
Make changes to the visible grids, filters and hierarchy as desired.
Bulk editing now available on Reports.
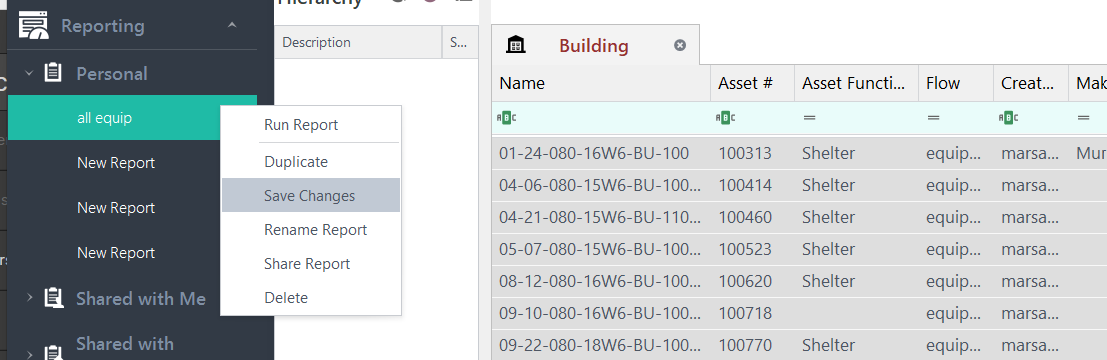
Click on the Plus button that shows up beside the report you want to edit. This will bring up a menu of options.
Select the SAVE CHANGES option to save all your edits.
SHARING YOUR REPORT
Only the logged in user will be able to see reports in their Personal reports.
To share a report, press the plus button that shows up beside the report you want to share.
Select the Share Report option to bring up the window.
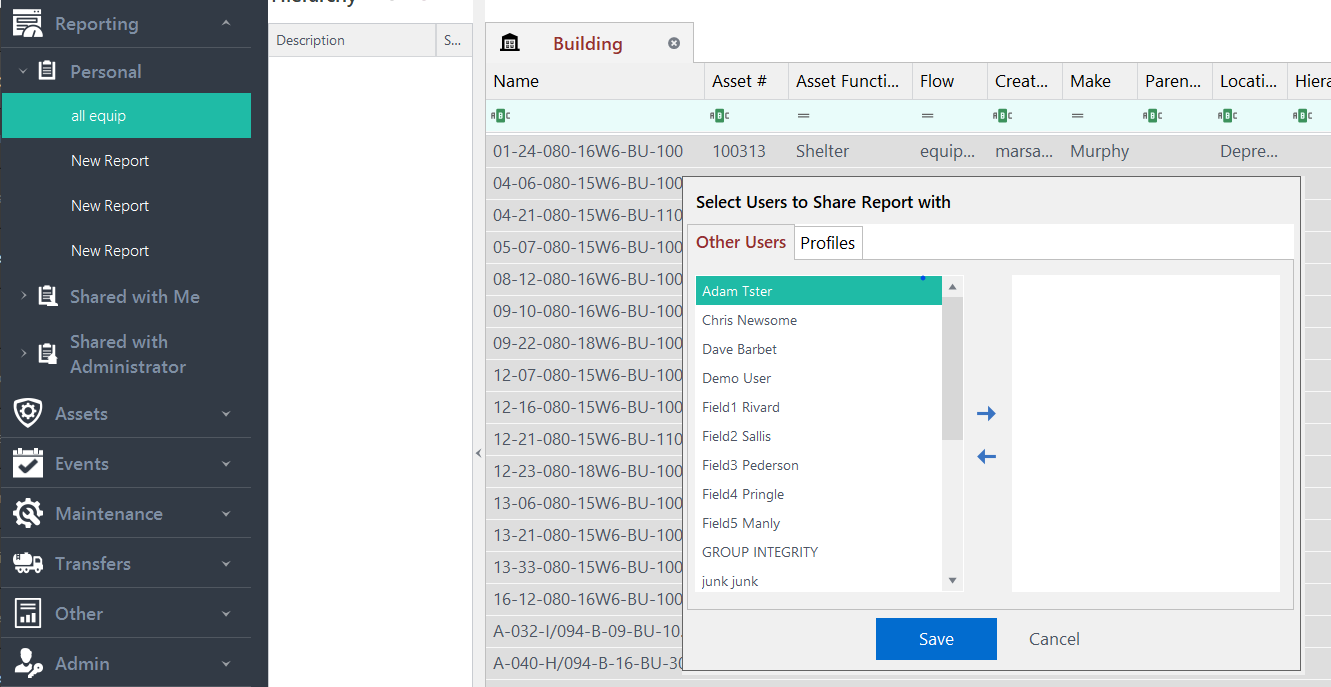
To share report to a user, select from the user list in the left-hand side.
Press the right arrow to add that user to the "shared with" list on the right-hand side.
To stop sharing a report, select the user from the right-hand side and press the left arrow.
he same process can be applied to share the report to a profile. Any user logged in with that profile will have access to the report.
You are not able to edit a shared report. You are able to duplicate the shared report, which will in turn, create a copy into your personal folder which you then are able to edit and save changes.
AUTO LOADING REPORTS
When marsworx launches, it can auto load the last report that was run before it was closed.
From the drop down menu in the gear button at top right of screen, choose, Auto Load Last Report.
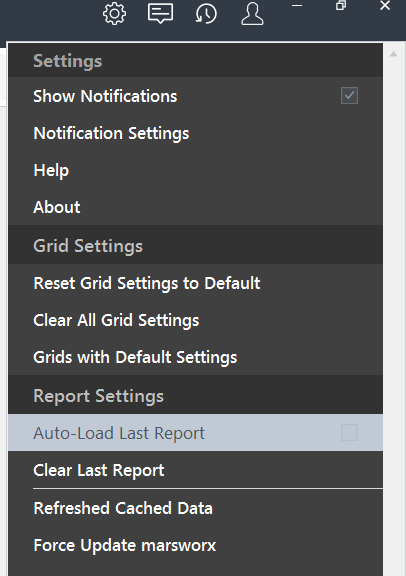
Unselect Auto Load Last Report to disable this feature.
Choosing Clear Last Report will reset which report marsworx uses to auto load.
Creating a New Asset
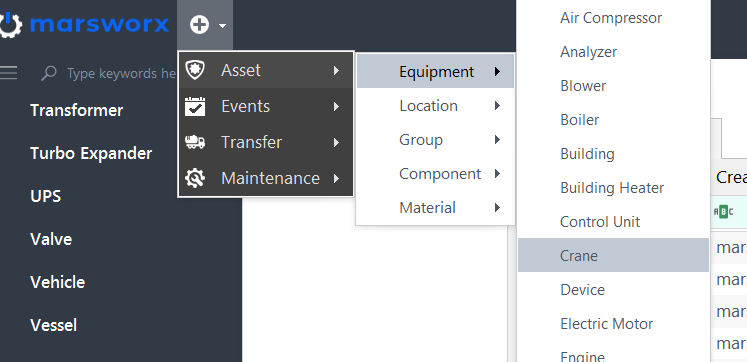
There are two ways to create a new asset:
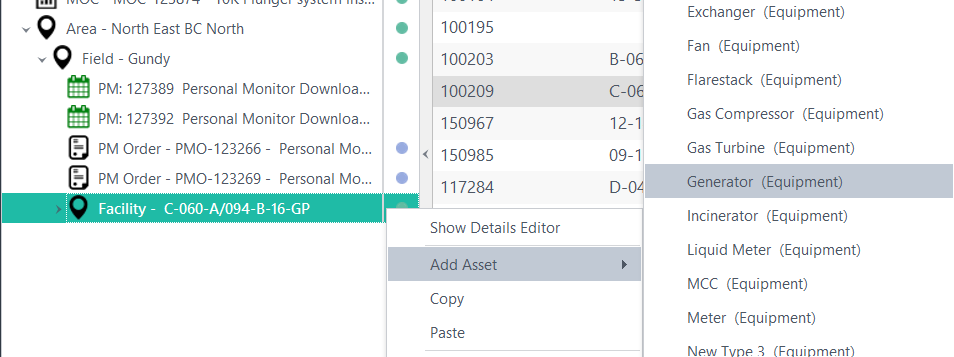
Right click on NEW button to create a new asset as shown below:
Or..Right click in the Hierarchy to create new asset as shown here
Choose parent location asset from the drop down menu. This is mandatory to associate all things together through the hierarchy.
Use the search bar to assist in locating desired location.
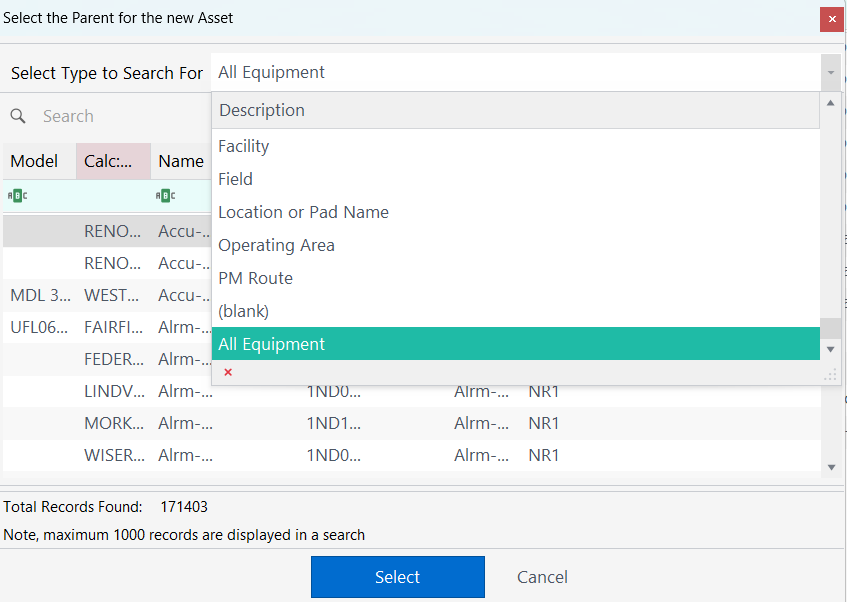
Select the parent location from the list and press the Select button at the bottom of the window (as shown above) to set location.
Once the parent location is chosen, the asset editor will popup.
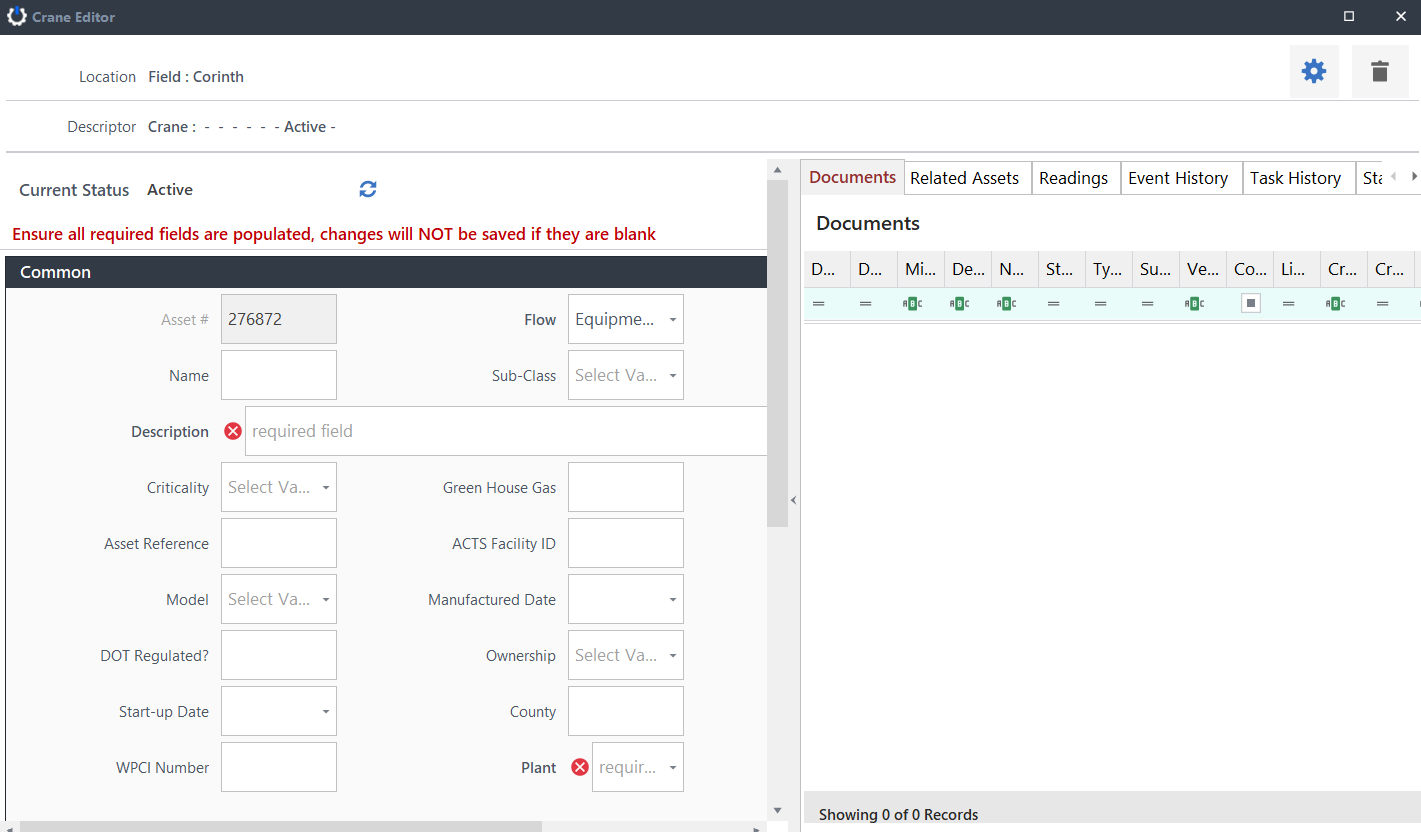
Populate all desired and mandatory fields.
Close the editor to save the new asset.
Please refer to the following pages or search for pages under the Asset Management header for further instruction on managing assets.
Managing Asset Relationships
The Relationship Manager can be accessed two ways:
FROM THE HIERARCHY:
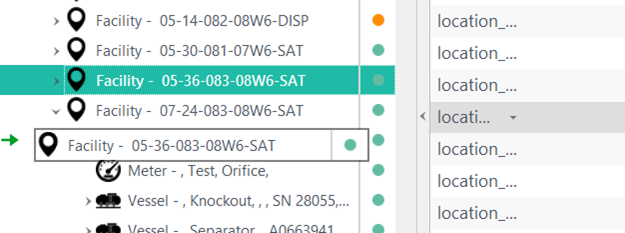
To create or change an asset relationship in the hierarchy, click and drag the asset to move and drop it onto the asset you wish to create a relationship to.
When moving the asset in the hierarchy, note the arrow color on the left side of the hierarchy. When it is a green straight arrow, the hierarchy will move the node beneath (as a child) the dropped-on node. When it is a blue bent arrow, the hierarchy will move the node beside (as a sibling) the dropped-on node.
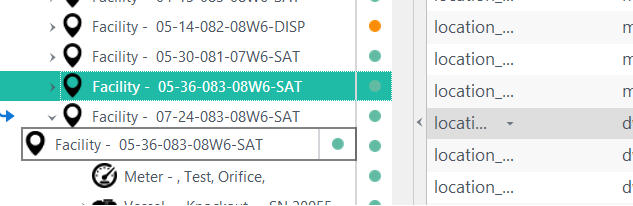
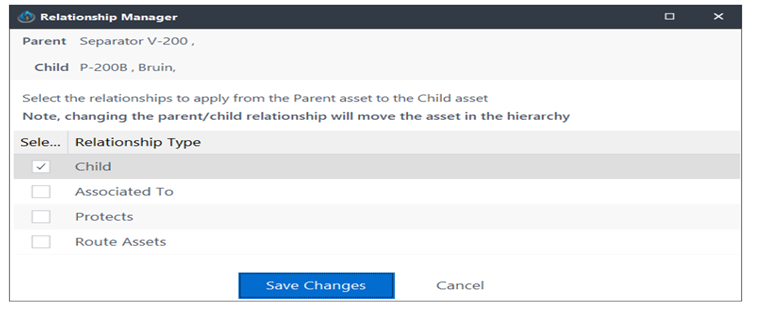
Dropping the node will cause the Relationship Manager popup window to appear (as shown below).
Define what relationships are intended and select all that apply.
Deselect any relationships that do not apply.
Setting the child relationship will cause the asset to move in the hierarchy.
FROM THE ASSET DETAIL EDITOR
In the Asset detail editor is a tab called Related Assets. This tab will display all assets related to the current asset.
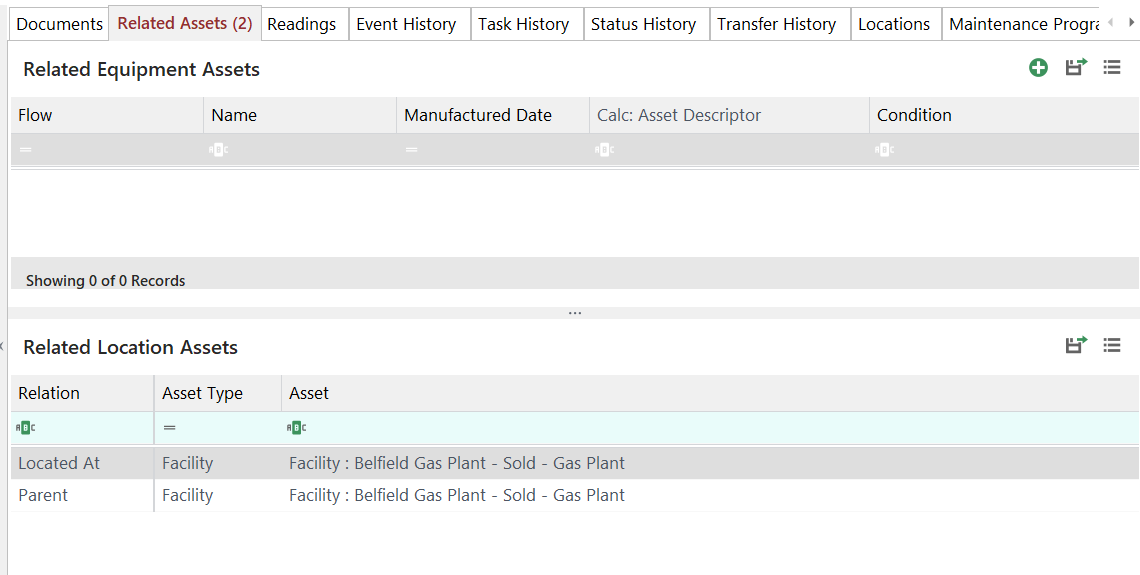
Right click on the related asset to bring up details editor.
Left click green plus arrow near hamburger menu top right to add a new relationship.
NOTE: the application will not allow you to delete Location or Parent relationships. Those can only be edited by moving the asset in the Hierarchy.
Editing an Asset
The ability to edit Assets is based on the permissions granted to the current logged in profile.
Permissions can be granted for an entire asset type or on an attribute by attribute basis.
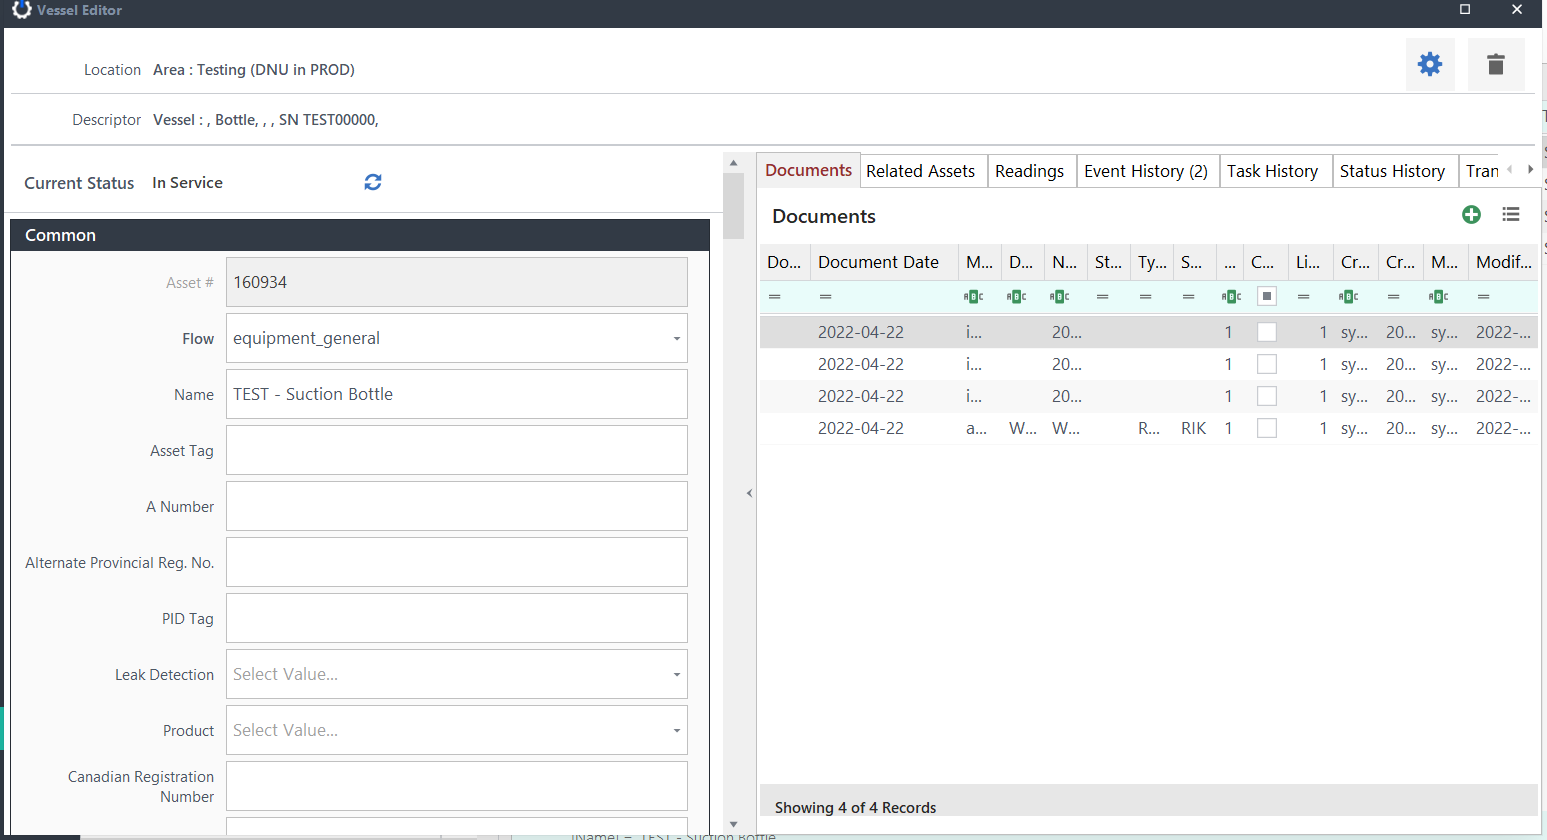
ASSET DETAIL EDITOR
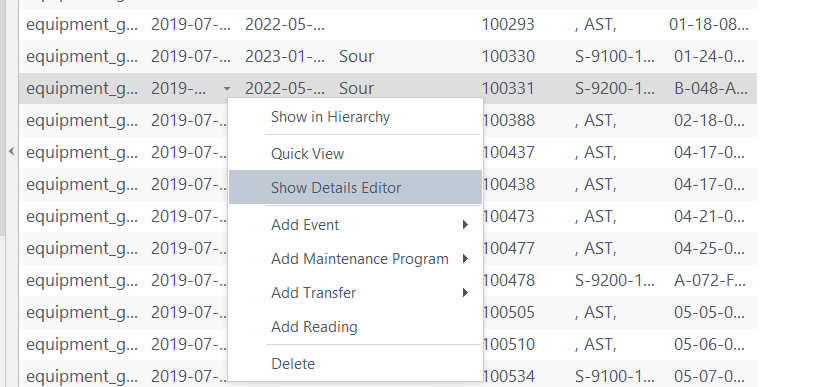
Locate desired Asset from the Asset Grid through filtering or from the Hierarchy.
Right click on chosen asset to edit and select Show Details Editor.
The detail editor for an asset is built dynamically based on what attributes have been added to the asset type as well as which attributes are visible to the user’s profile.
A READ ONLY message may appear at the top of the Editor for the following reasons:
An Asset can only be edited by one person at a time within marsworx.
Current status of the asset may cause it to be locked (eg: work locked to Mobile).
Click on the desired fields to make any changes .
Read-only fields: will appear grey .
No data changes will be saved until all required fields are populated .
Close the editor window to SAVE any changes made.
ADDITIONAL INFORMATION
Documents: displays any documents linked to the asset or to events associated to the asset. Adding additional documents is done here.
Related Assets: shows any other assets that are related to the current asset. Relationships can include the location the asset is on, it's parent asset, any child assets, assets protected or protecting the asset, or any other relation types defined.
Readings: any readings taken in association with the asset. Readings are usually obtained through work orders done on mobile.
Work History: any events related to the asset (for example, PM work, change requests, NCRs etc.)
Status History: history of all status changes on the asset .
Transfer History: if the asset has been moved, this will show any historical locations the asset was located at.
Locations: latitude and longitude location coordinates for the asset. Used by marsworx mobile for mapping any events associated to the asset.
Features
Access information below or in menu on left.
Bulk Editing
Quickly change, update, or add information to a group of assets.
📽️
Ability to bulk generate on PMs now available in PM grids. See below for instruction.
Within bulk editing, you are able to modify multiple assets at once.
From your chosen asset grid, use your shift key to choose a group of assets to edit.
NOTE: You may want to apply filters to your grid first.
Left click the UPDATE button at the top of screen.
You have two options:
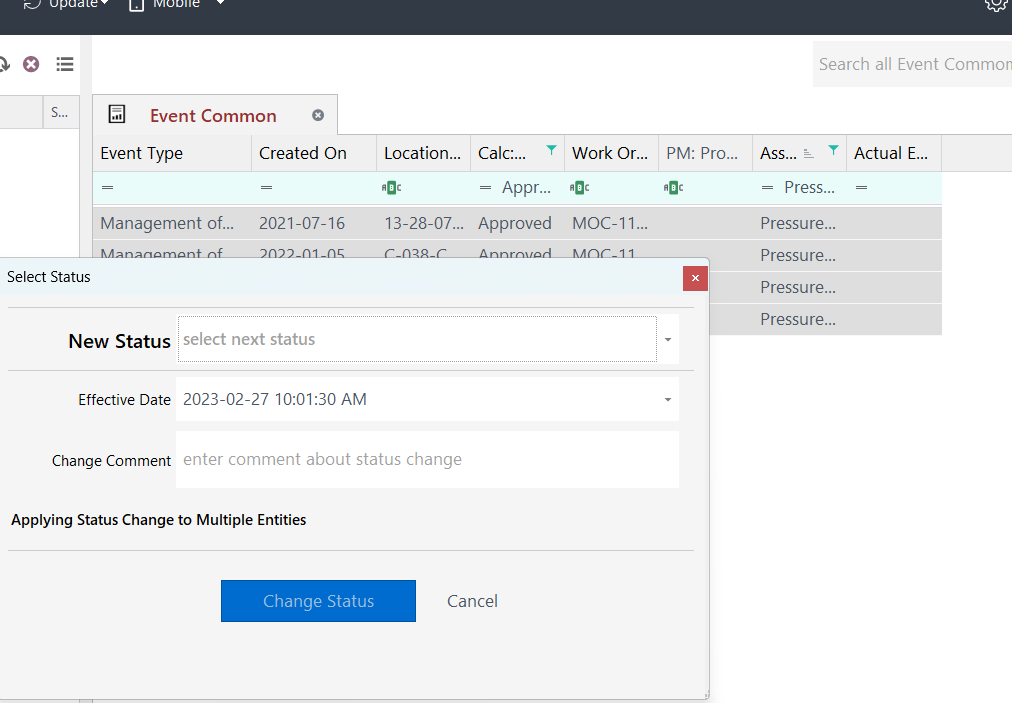
Left click change status to change the status on multiple assets at once.

Populate your changes in pop up window.
Click on change status which immediately updates the status of the chosen assets.
Left click change data to update event data.
NOTE: updates to event data can NOT be made to assets with a read only status.
NOTE: Values now display in groups just as they would appear in the editor.
After choosing change data, this window will appear:
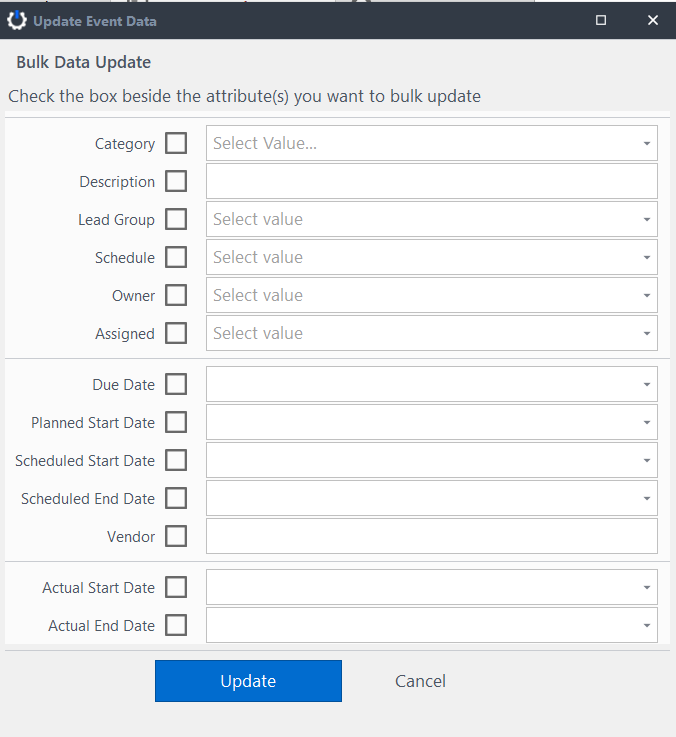
Click the box of the field you wish to update and populate the field with new status.
Click on update which immediately updates your changes to the assets you selected.
BULK GENERATE ON PM GRID
From your PM grid, filter your selection of PMs to bulk generate and choose Generate Now at top of screen as shown below.
NOTE: Bulk generate on PM Grid is only possible with ACTIVE PMs. Inactive programs will not generate.
NOTE: This feature is dependant upon your permissions. Please contact your Administrator in this regard.
A window will appear and you will choose the new date to generate the PMs to.
Scheduler
Scheduling is a useful tool for seeing upcoming work in a calender or "daytimer" view.
Beneficial for detailed planning involving one or more crafts required with certain work.
Data is populated in Calendar by Scheduled Start Date
Launch the Scheduling application from the menu on left in desktop. From here, you will filter data you are looking for.
Click on any of the quick view options at the top of screen to adjust your view.

Scroll down and open down arrow on bottom right to bring up the filter editor to create a dynamic personalized view.
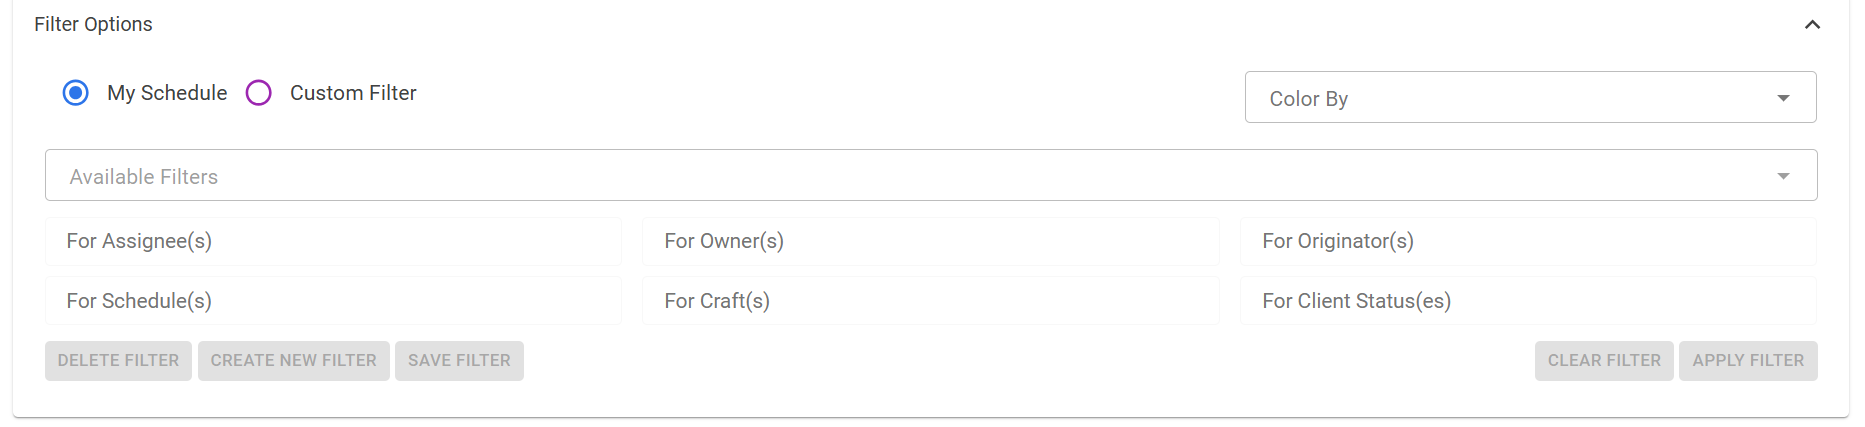
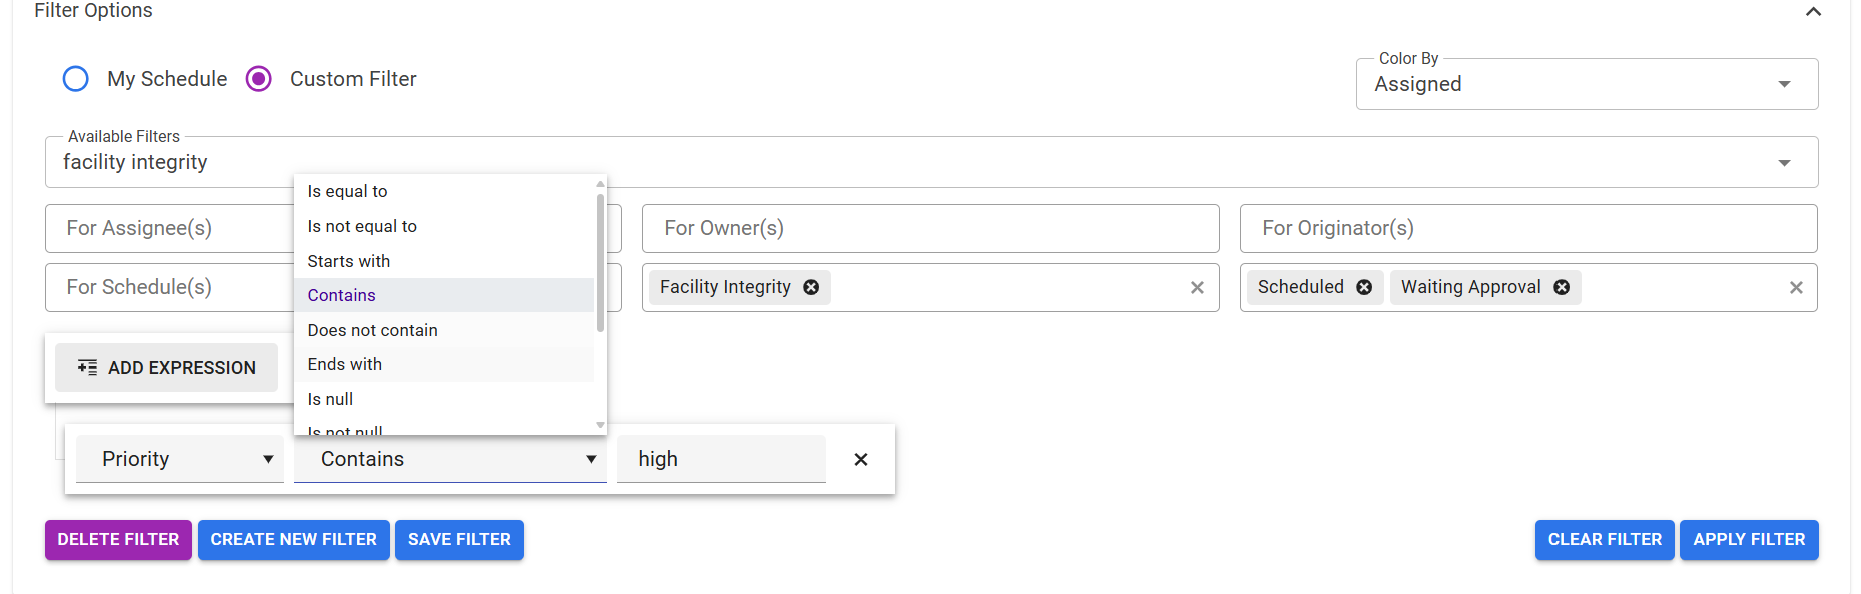
Choose Custom Filter to create your own new filter you can save as default if desired. Choose from drop down menus.
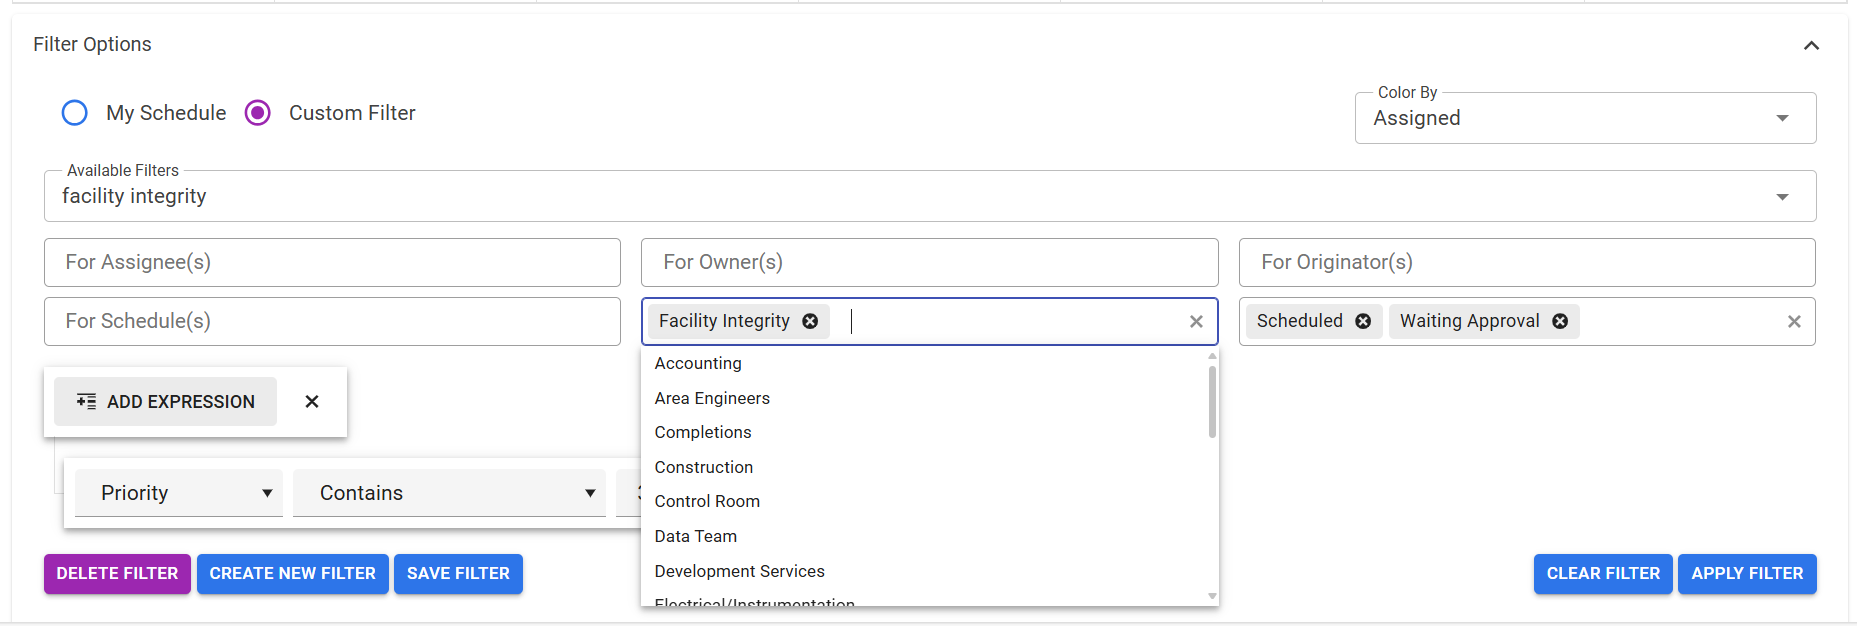
Choose Add Expression for additional filtering. Save Filter then Apply Filter.
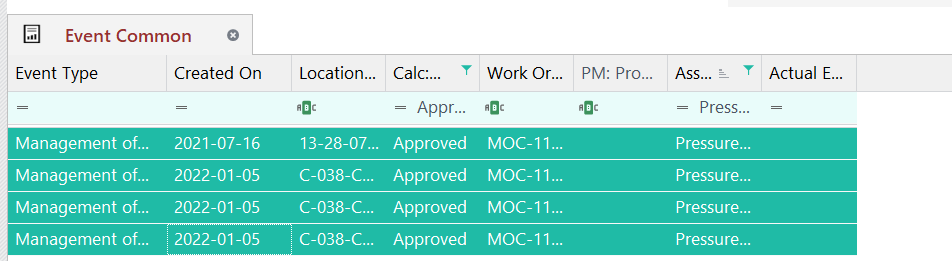
Event Management
Access information below or in menu on left.
Management of Change MOC
Management of Change offers tracking of project management including review and approval through select contributors.
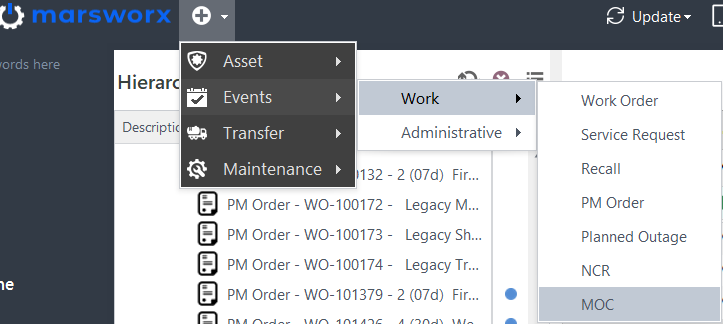
Creating an MOC is possible three ways:
From the New Button at top left hand side of screen
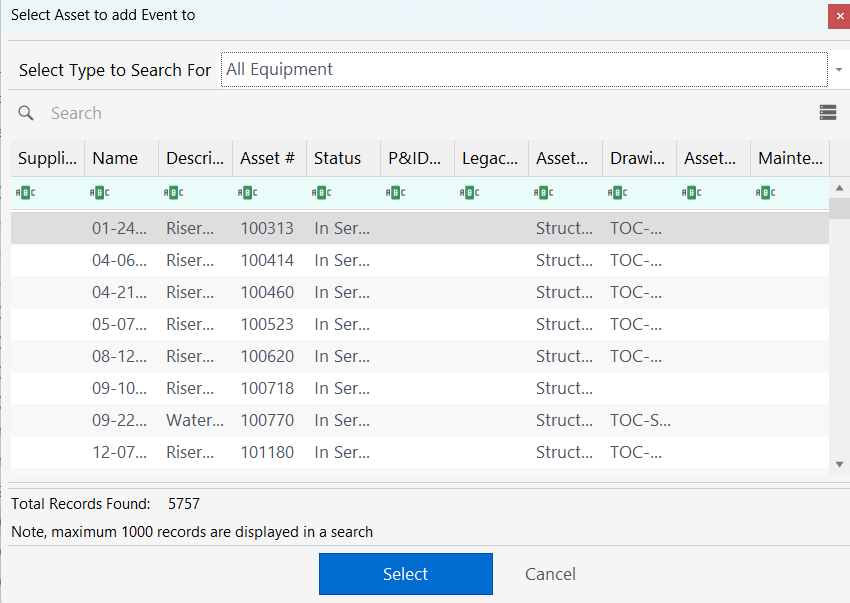
From the Hierarchy, you will then choose the Asset to apply the MOC to. You may need to apply filters to find desired Asset.
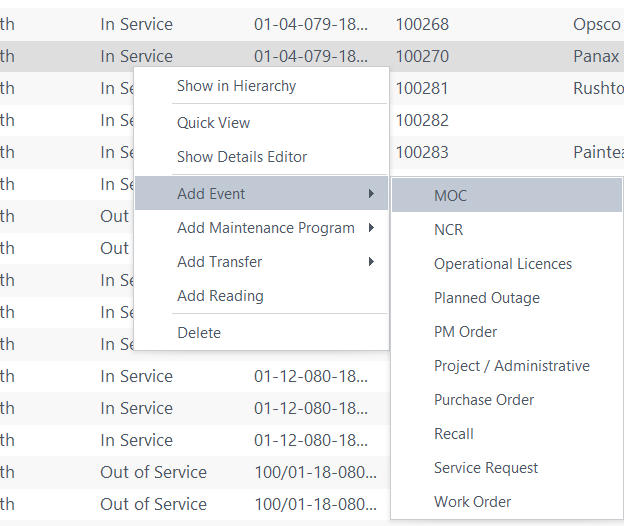
From right clicking in the Hierarchy or an Asset from the Grid:
Once the desired Asset is chosen for MOC, the MOC Editor will appear:
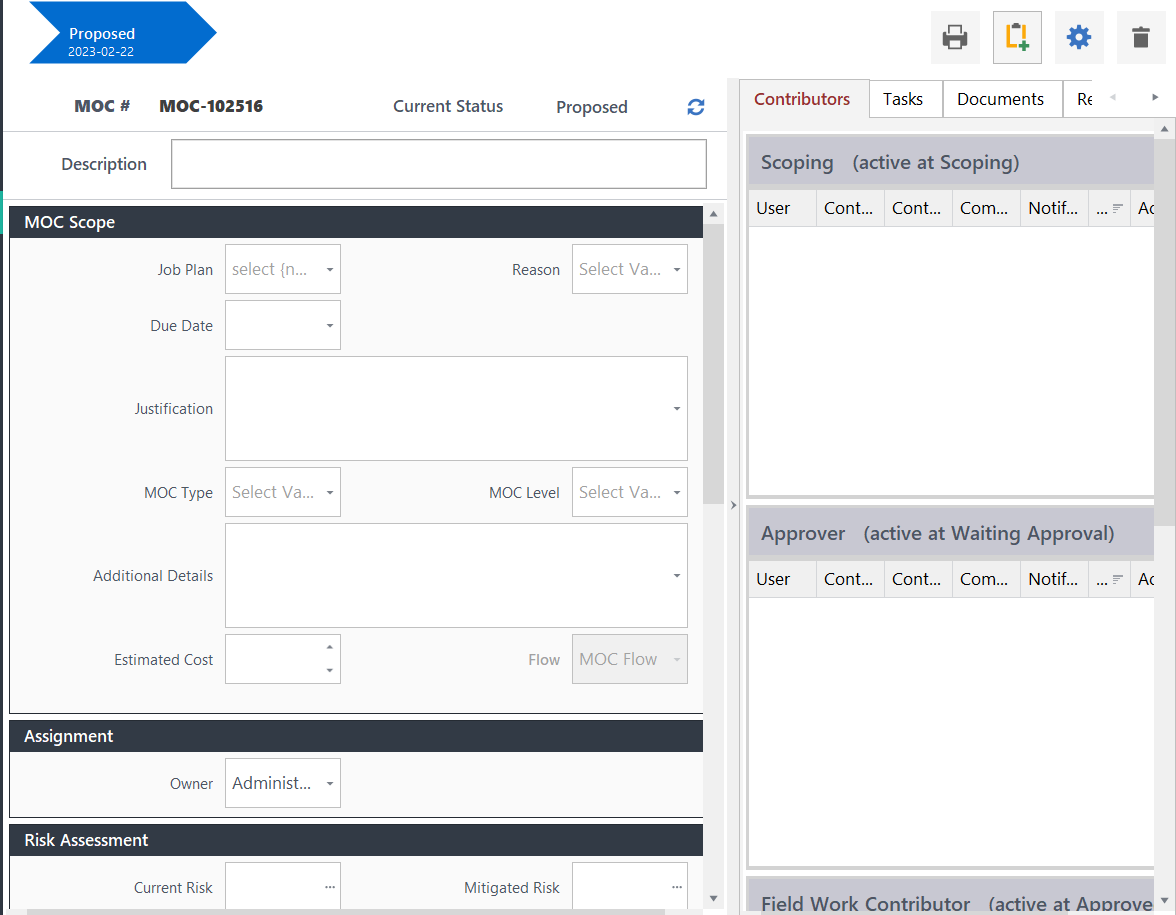
Give a detailed Description of your MOC.
NOTE: the Job Plan chosen ensures the correct process is followed.
Begin to populate desired and required fields for your MOC.

When you have completed all the required fields on the left side of MOC editor, stretch out the right side of screen to add your contributors.
The Contributors you choose will need to have MOC contributor status which is implemented by Administration Application in user Privileges.
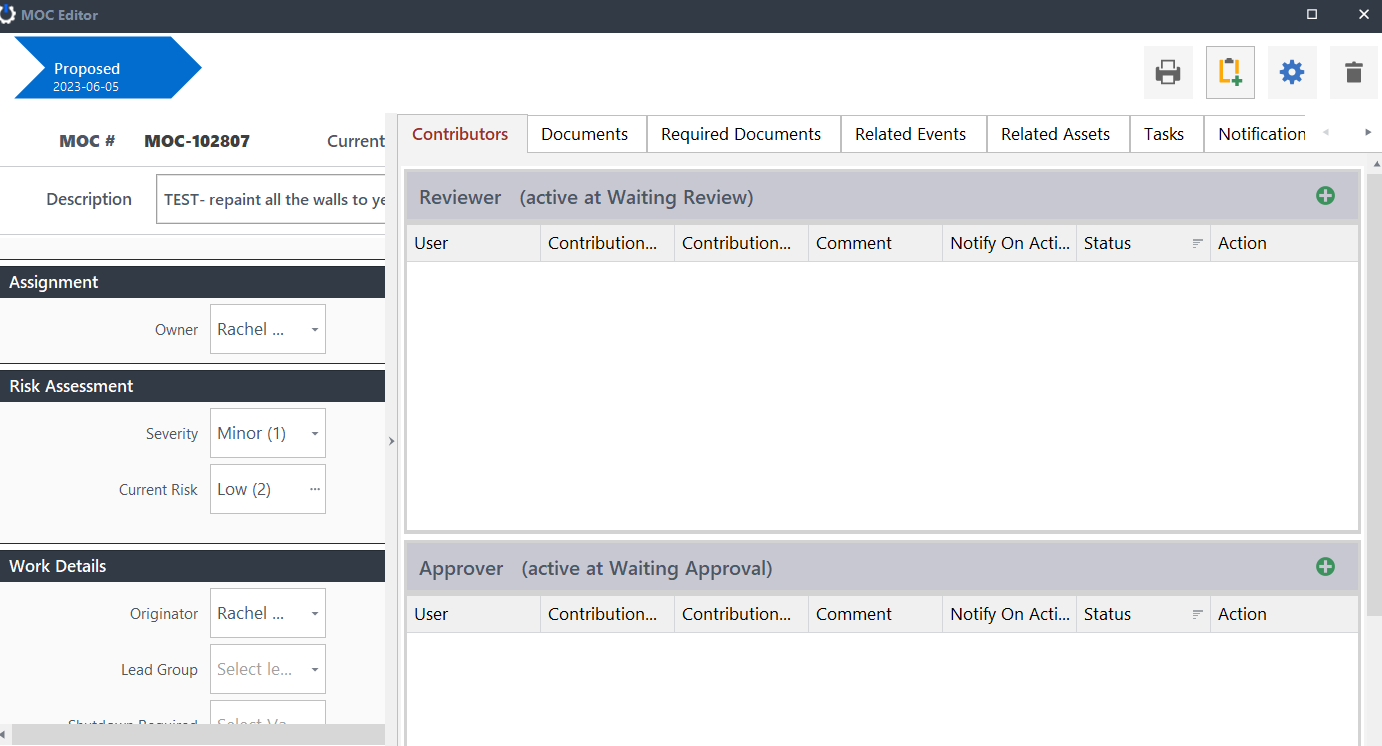
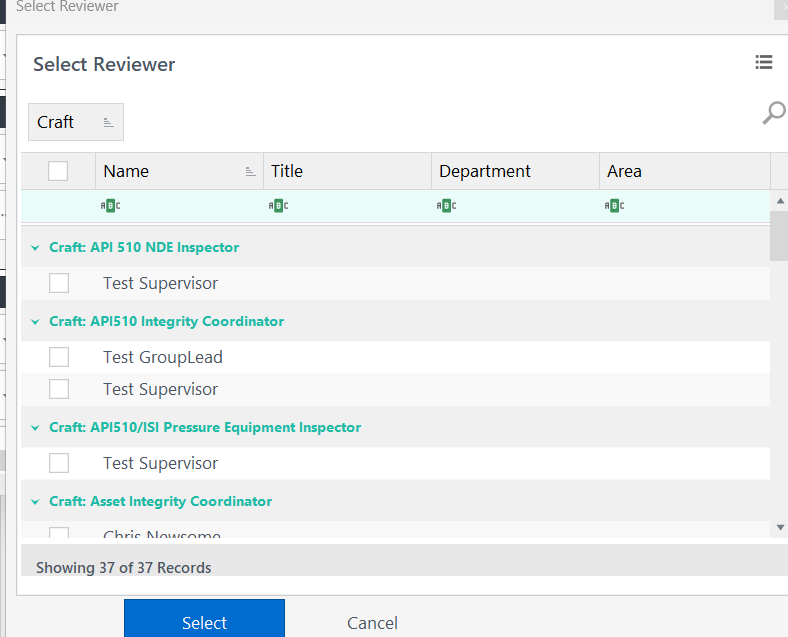
To the right of reviewer header, click the green plus arrow to choose your contributor, in this example, the reviewer.
Choose your reviewer and press select as shown below.
Add your next contributor the same way. In this example, that is approver. click the green plus button to the right of Approver to make your selection.
Notifications may be sent out to the assignee, the owner, originator, and contributors based on active status as well as how specific notification settings have been set up individually.
Managing Transfers
The ability to move assets from one location to another via a formal material transfer.
Define one to many different transfer types and for each transfer type what attributes they would like to track.
A transfer is created to move one or many assets from one location to another. Through the transfer manifest, move either the whole asset or in the case of bulk assets, part of the asset.
Right click on asset in your chosen grid and choose Add Transfer or..
Click the New Button in top left of screen and choose Transfer

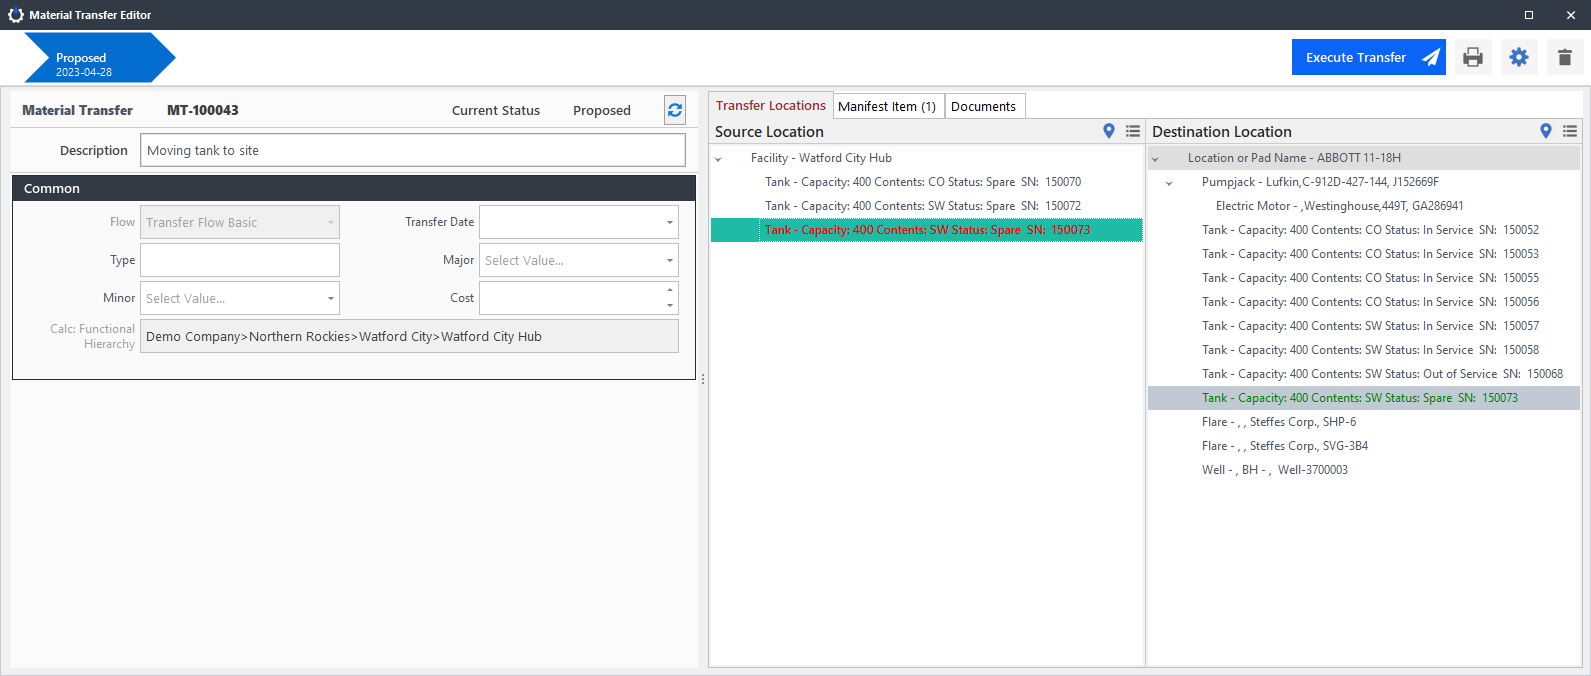
COMPONENTS OF A TRANSFER
A transfer requires a source location and a destination location.
The source location will be the location where the assets to be transferred are currently located.
The destination location will be the location where the assets are to be moved to.
- Button to set or change the source location for the transfer. Changing the source location will removal all assets currently in the transfer manifest
- Button to set the destination location for the transfer. Transfers must between Location asset types.
- List of all the assets that can be moved from the source location. Click and drag assets from the source to the destination.
- Attributes for the transfer, these are managed through the Admin Application
- Status change button for the transfer.
MOVING ASSETS
To add an asset to the transfer, click and drag the asset from the source location list to the desired position in the destination location list. This will move the asset and any child assets into the transfer manifest.
A transfer will move the asset AND any related PM programs or Events. Note, Events that move with the asset will still show the original location they were done at.
You will receive a warning if you try to move an asset with any active PMs or open Events attached.
TRANSFER MANIFEST
The transfer manifest details all the assets that are part of the material transfer
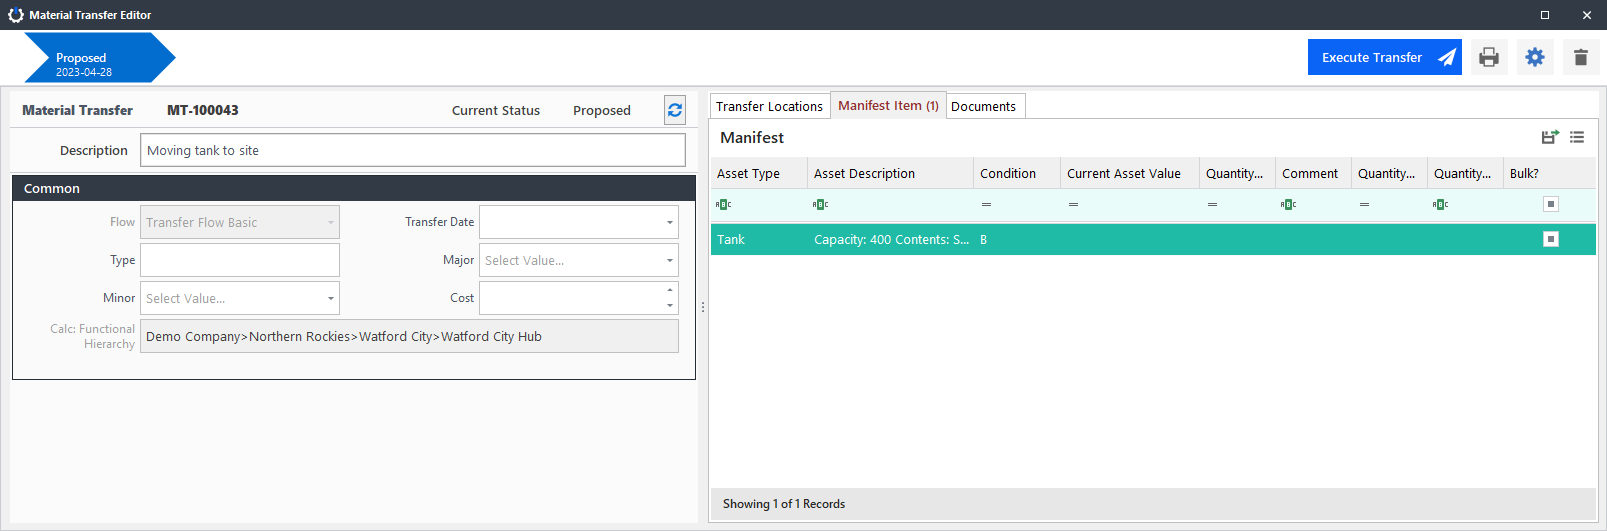
The manifest provides you with the opportunity to update the asset's current Condition or Current Value. This information is stored with the asset.
To remove an asset from the transfer, right-click on the asset record in the manifest and choose the Remove Asset from Transfer option.
BULK TRANSFERS
A bulk material transfer is one where you can move a quantity of the assets from source to the destination, for example, a volume of liquid or joints of pipe.
To execute a bulk transfer, set the Bulk flag for the asset in the manifest and note the quantity to be moved.
When the transfer executes, the noted quantity will be debited from the source and an asset with that quantity will be added to the destination.
EXECUTING A TRANSFER
The Execute Transfer button will appear when the source and destination locations have been set and assets from the source location have been added to the manifest.
Pressing the Execute Transfer button will move the assets from the source to the destination location and change the transfer status to completed.
Managing Documents
Attach or link Documents to:
· Assets
· Events
· Job Plans (which will be attached to events they are applied to)
· Transfers
A document can also be attached to more than one thing at a time.
Permission to add/edit documents in marsworx is granted by asset type and based on current logged in user profile.
ATTACH DOCUMENTS FROM DETAIL EDITOR
Within detail editor of chosen asset, event, job plan, or transfer, click on the documents tab on the right side of your screen.
Left click the green + button to bring up the document details editor to add a new document.
The Document Details Editor appears as shown below.
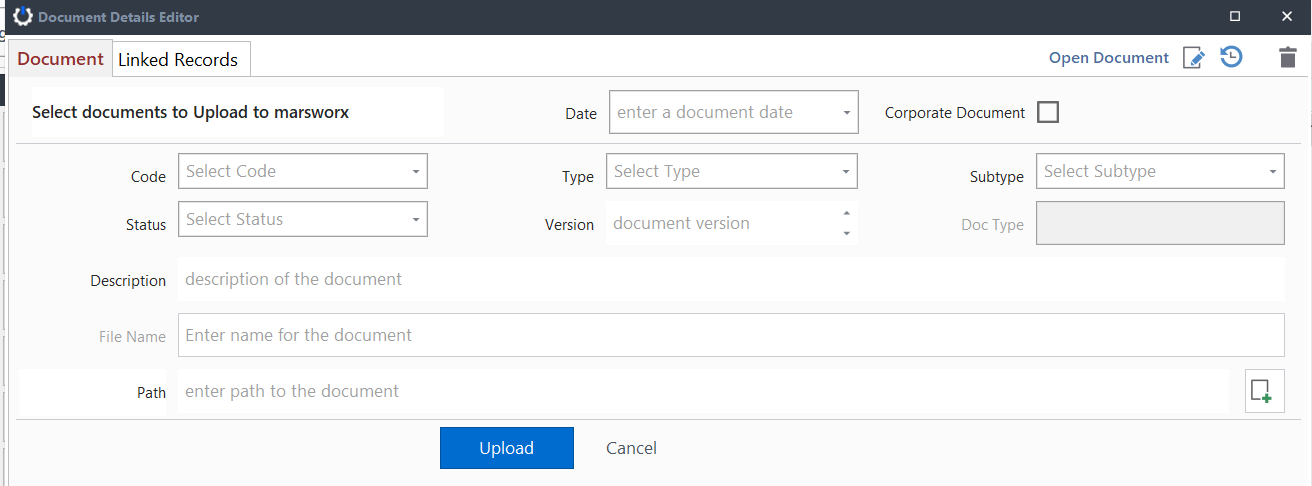
While filling in fields to select your Document, it is strongly recommended to fill in type, subtype, name and description fields. This will make finding and identifying the document in the future much easier.
If attaching more than one document at once, any details entered in the editor will be applied to each attached document.
Once all details have been entered, press upload to attach the document.
Document details can be edited at any time.
LINKING A DOCUMENT FROM DOCUMENT DETAILS EDITOR
The two ways to link a document from the Document Details Editor are:
Click on the tab at upper your left of screen beside documents called linked records. This contains any current linked records as well as the option to export new records via the export icon BETWEEN the + and hamburger menu on the right.
With the document tab open, click on the square with + icon to the right of the path field. Choose your file to link.

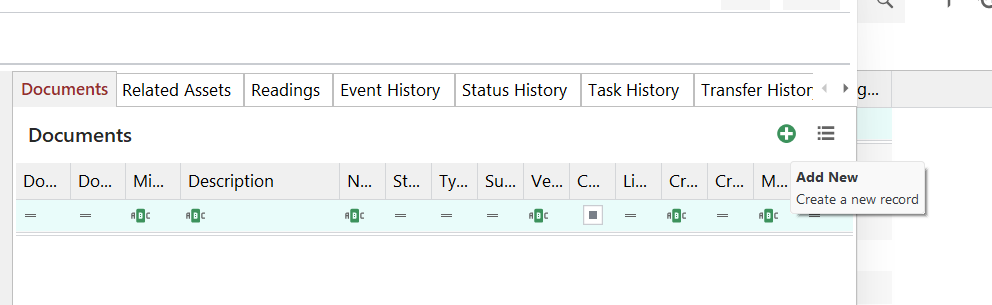
MANAGING DOCUMENTS FROM THE DOCUMENTS GRID
Within the Documents Grid, you are able to right click on any document which then allows you to:
•View Document
•View Document Details
•Download Document
•Add Document
•Delete Document
KEEP IN MIND: Changing the document name or location will break a link.
Linked documents are not uploaded to marsworx, but rather, a link to the location of the document is saved. These documents are available to anyone who has access to the document location.
In addition, not all users may have access to the linked location.
Maintenance Programs
The TWO TYPES of Maintenance Programs available within marsworx:
A time-based maintenance program (or PM), is a preventative maintenance program that can be applied to an asset that will generate an event on a periodic time basis. This can be a specific time period or based on last completion date.
PM: Time Based Overview
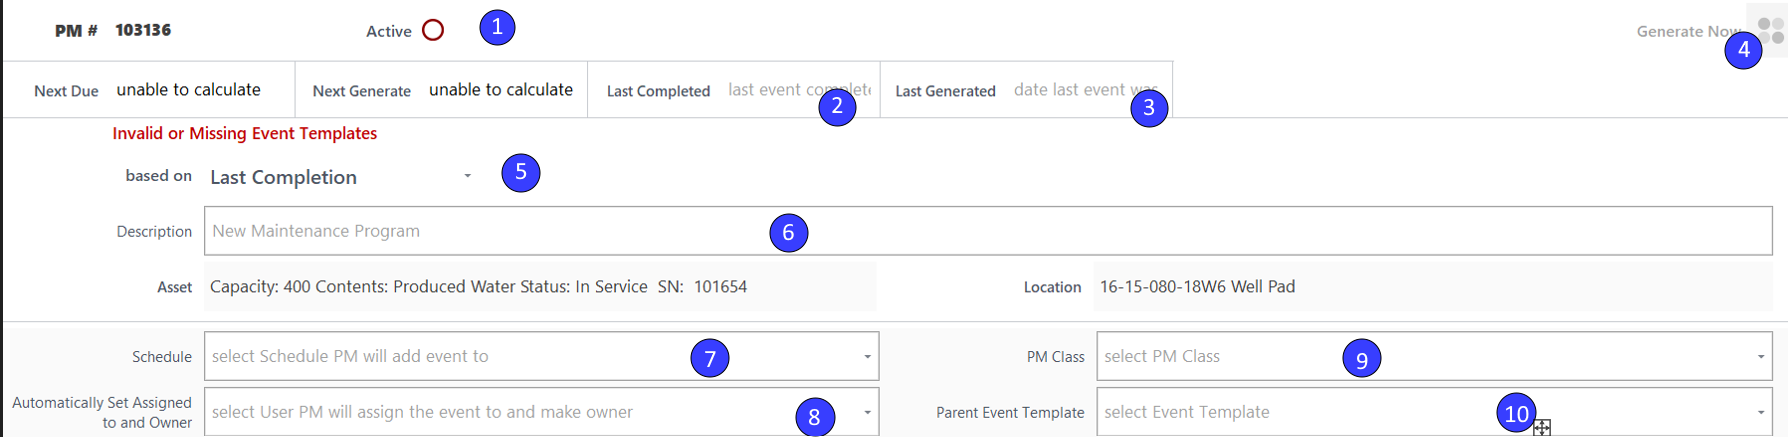
- clicking here turns circle green activating the PM. Above is in the inactive state. Must deactivate to make changes.
- date of last completed event generated by the PM
- date of the event last generated by the PM
- click here to force PM to generate now
- choose based on absolute or last completion
- describe the pm program
- choose which schedule applies if desired
- select the user this PM will auto assign as owner
- select PM class if desired
- select parent event template if desired

- sequencing will appear here once timing is set
- choose the desired interval for this sequence
- this will populate the number of times this PM has generated an event.
- choose date you wish this program to start
- once the above fields are populated, press the green plus button to complete building your sequence

- choose how often you wish this PM to generate work.
- describe the task
- how many days in advance you want generated work to produce notice
- auto populate the due date on events
- next generated sequence date
- allows you to generate work with a larger lead time. lets assignee know to not start work before the work period
- force a sequence to generate on a different day
- override next generate
- add another sequence or delete sequence
- choose your event template
- static data of asset PM is against
- additional event description if desired
- choose assignee for events generated from PM
A counter based maintenance program is unique in where readings can be automatically added to generated events to help capture meter values. The sequence can generate events against an asset that is different than the asset that the maintenance program is attached to. This is common for PMs attached to Packages/Skids or Buildings.
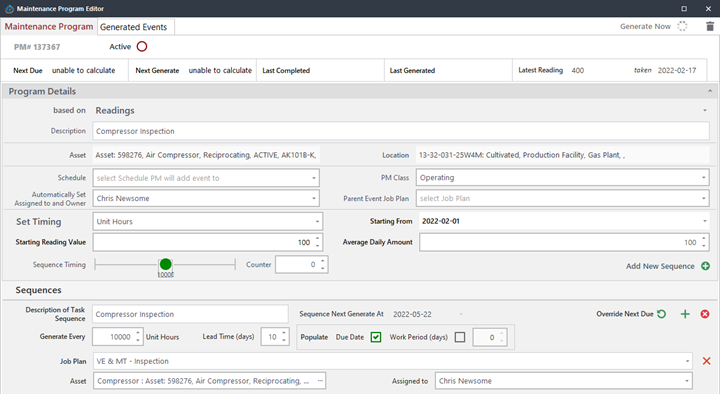
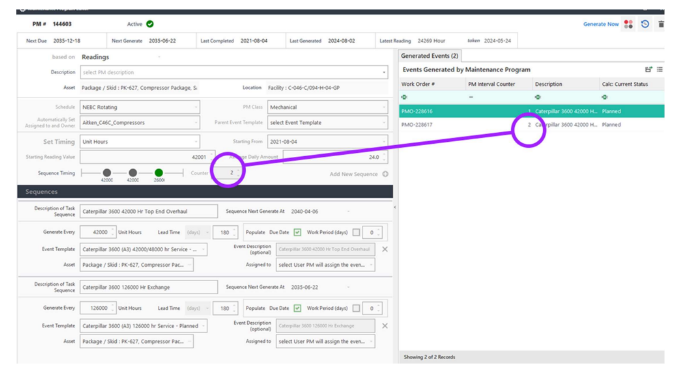
PM: Counter Based Overview
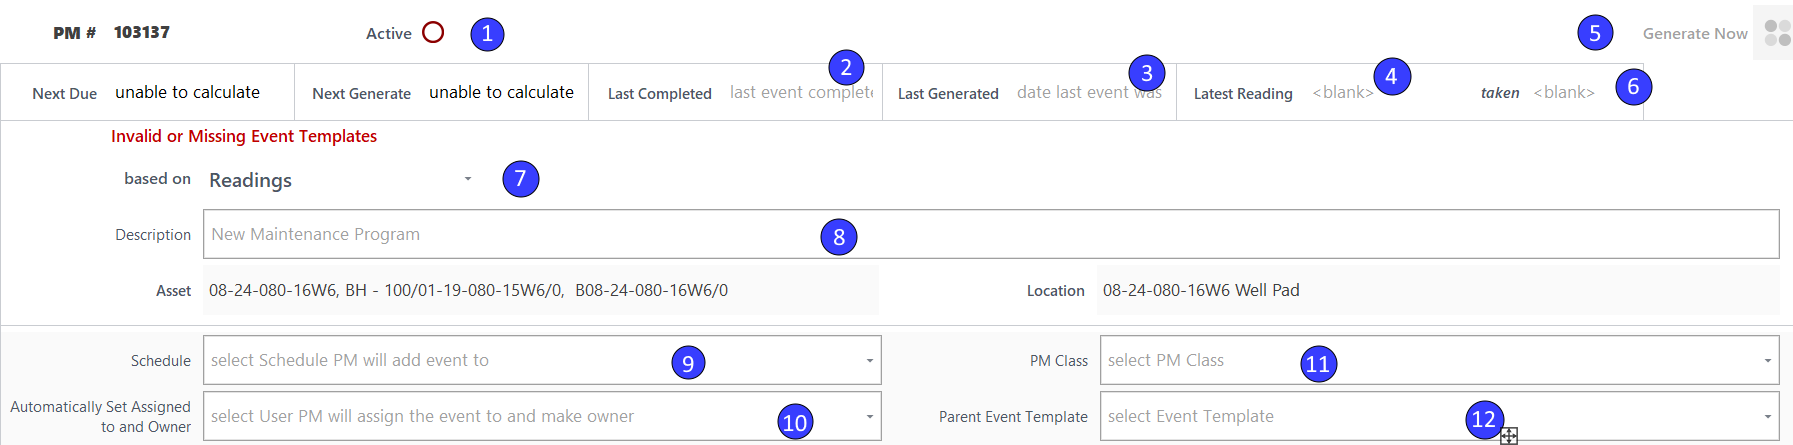
- clicking here activates (turns green) or deactivates. MUST deactivate to make changes
- last date event generated by PM was completed
- last date an event was generated by PM
- last reading taken on last event
- click here to force PM to generate now
- date last reading was taken
- choose based on Readings
- give description of PM program
- select schedule to add events to if desired
- static data containing asset Pm is against
- select Pm class if desired
- select parent event template if desired

- select the starting reading value for PM. not editable.
- will populated once sequencing is chosen
- choose the numeric reading type to be evaluated for next due date
- # of times PM has generated events. Visible only to Admin User Roles
- select the date you wish the Pm program to start
- the average
- add one or more sequences to PM by clicking green plus button

- select how often you wish the PM to generate
- choose event template identifying the type of work generated
- give description of task
- choose lead time or notice before each event. can be days/months. Click on name to change between them
- click here to populate due date on every event
- asset work is generated for. may be different than asset PM is on
- will set the planned
-
- additional info for event if desired
- choose who events generated by PM are assigned to
- add or remove templates to the sequence
Forecasting
View future events that will be generated by a time-based maintenance program, then turn into an actual event.
NOTE: They are not actual events until you decide to make them active. They do not “exist” in the database, but rather only live in the current user’s marsworx session.
Any active time-based maintenance program can be forecasted.
For PMs based on a last completion date, the forecast assumes any non-completed events will be completed by the due date and uses that as the last completed date.
KEY POINTS:
Either one or several PMs can be forecast at a time.
You are able to forecast to any date in the future.
NOTE: Forecasting for multiple PMs a long way into the future may generate a number of forecasts and take some time to complete the forecast operation.
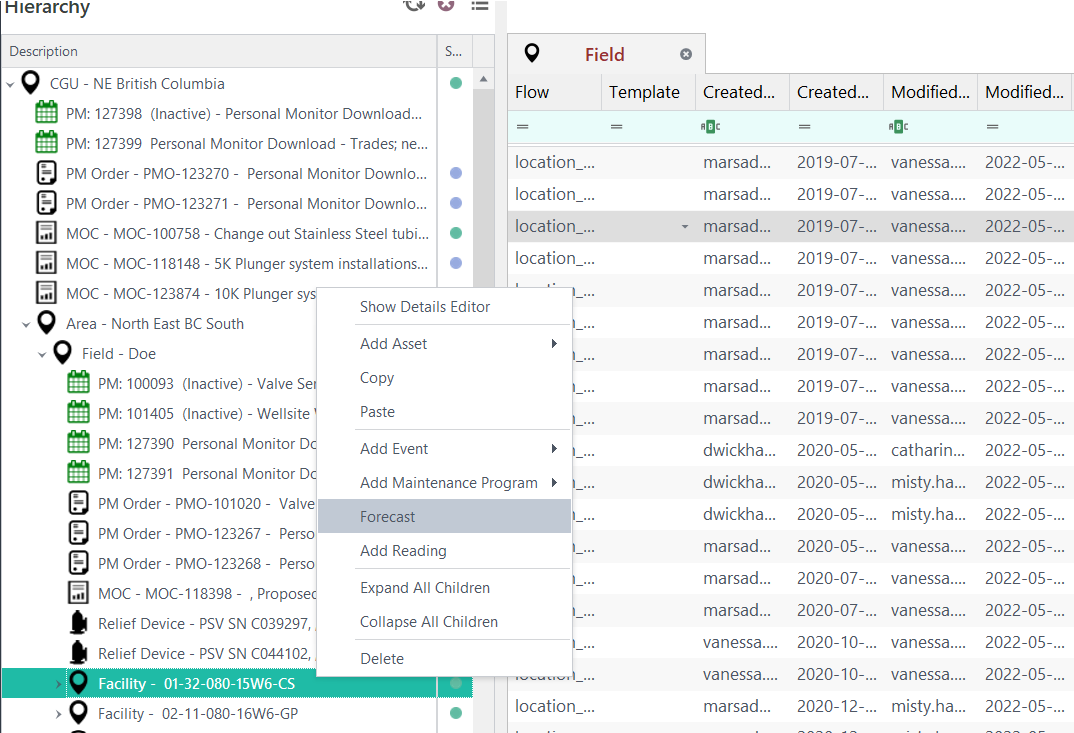
FROM THE HIERARCHY:
Right-click on any asset visible in the hierarchy and select the forecast option. This will run a forecast for any active PMs on that asset and any PMs on any children/grandchildren of the selected asset.
Running a forecast from a location will forecast ANY PMs on any assets on that location.
This is helpful for aligning future work with an upcoming outage.
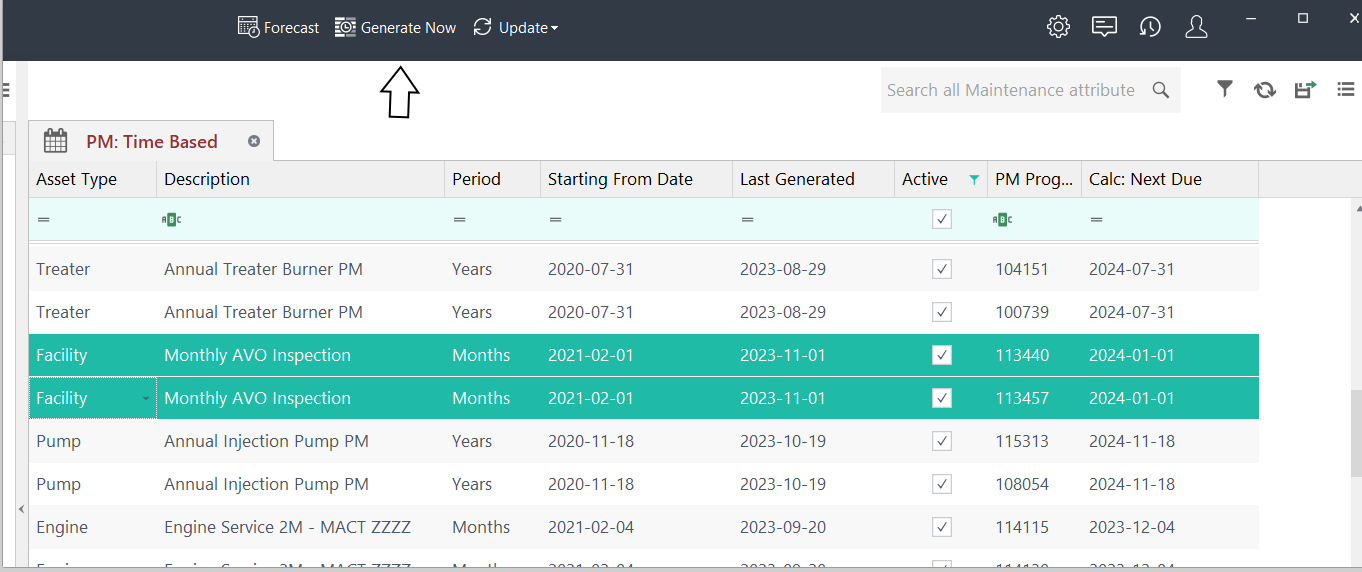
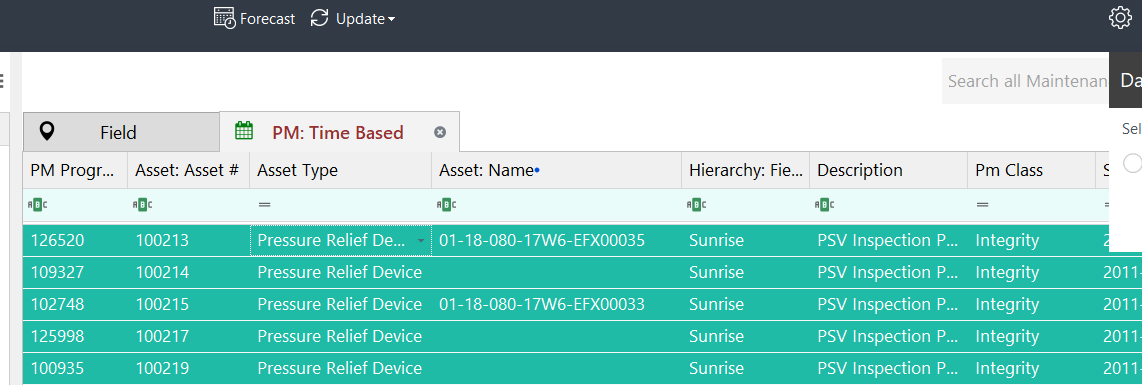
FROM THE PM: TIME BASED GRID
Select a series of maintenance programs in the PM: time based grid.
Hold down the shift key and click on desired rows to select them, then click the run forecast button found at the very top of your screen as shown below.
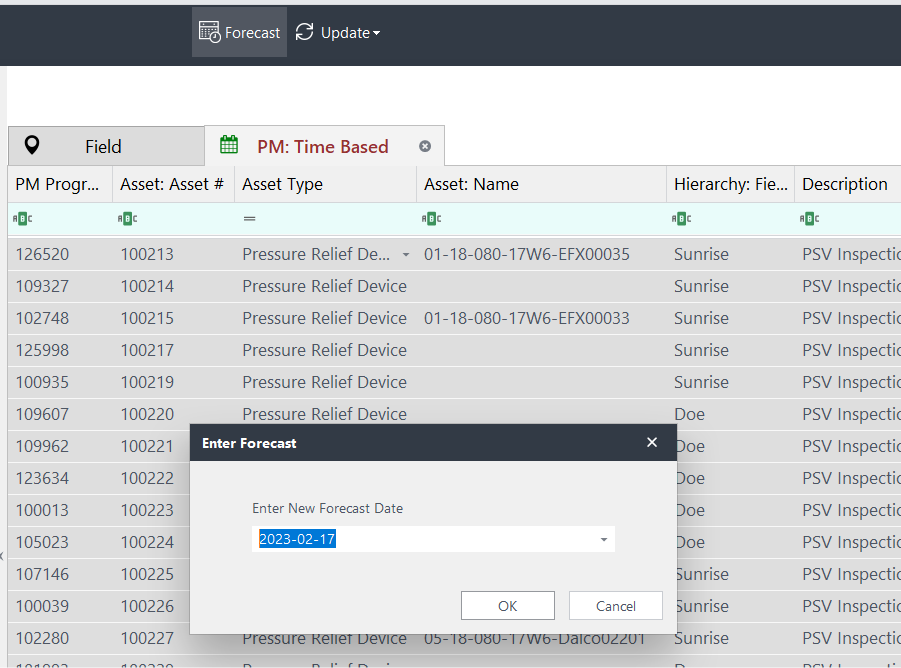
Choose the date you wish to forecast to.
NOTE: Forecasting for multiple PMs a long way into the future may generate a number of forecasts and take some time to complete the forecast operation.
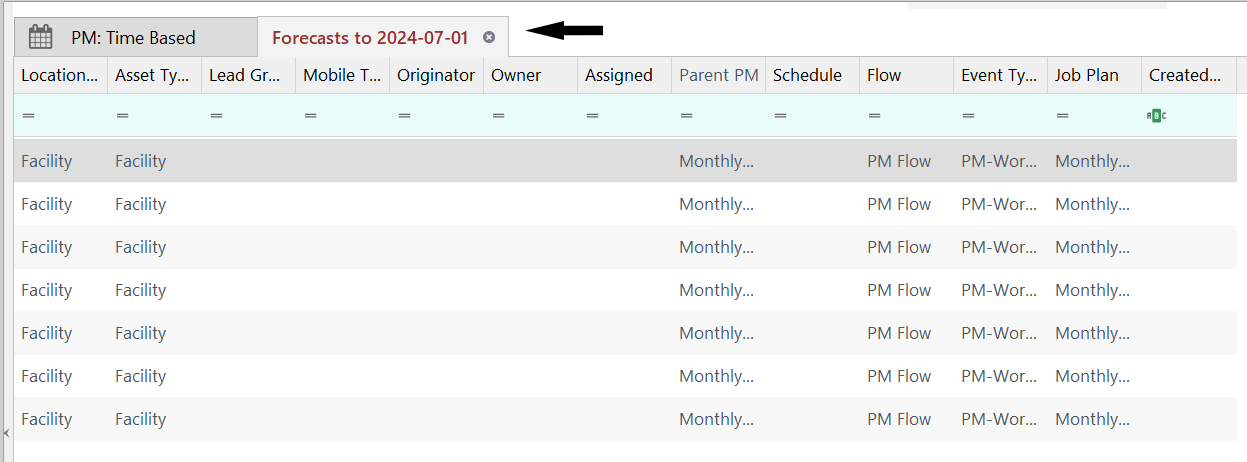
TURNING FORECASTS INTO EVENTS FROM GRID
All forecasts will be displayed in a new grid.
NOTE: closing the forecasts grid will clear all forecasts.
Rght-click on any forecasts in the Forecasts grid to bring up the context menu.
Select the create event from forecast option as shown below.
This creates a new event from the forecast and removes the forecast from your grid.
The new event will have whatever the default event status is for the event type.
Multiple forecasts can be run and stored in the forecasts grid at a time.
A Forecast can be rerun for a PM as many times as required without consequence to the PM or generated events.
If a forecast for a PM is turned into an actual event, this will affect future forecasts for the PM as the sequence and due dates will be incremented based n the forecast that was turned into an event.
Creating a Timed Based Maintenance Program
📽️
A preventative maintenance program that can be applied to an asset generating an event on a periodic time basis.
THE TWO TYPES OF TIME BASED PM'S ARE:
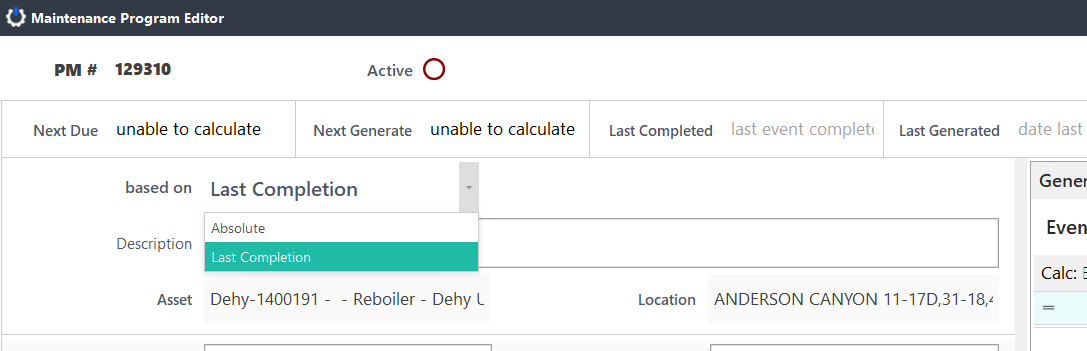
ABSOLUTE: the PM will generate an event on a specified period. Previously generated events do not affect this PM from generating. This type is useful for generating an event every month or once a year.
LAST COMPLETION: the PM will generate an event on a specified period based on the completion date of a previously generated event. If there are previously generated events that are not yet completed, this PM will not generate until they are completed.
Once a PM has been activated, it will automatically generate work based on the time criteria.
In PMs based on Last Completion, work will be generated based on the status of previously generated work.
FOUR WAYS TO CREATE A TIME BASED PM
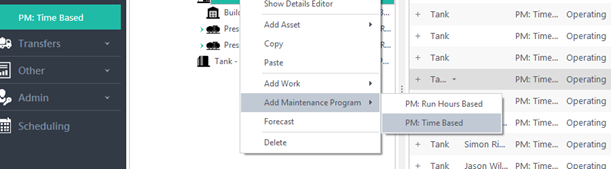
FROM THE HIERARCHY:
Right click on any asset visible in the hierarchy and select the Add Maintenance Program option and then the PM: time based option.
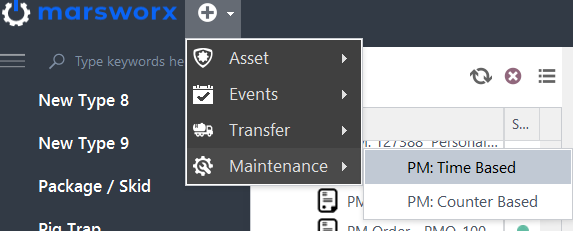
ADD NEW BUTTON:
Press the New button in the upper left hand corner and then choose Maintenance and then the PM: Time Based option
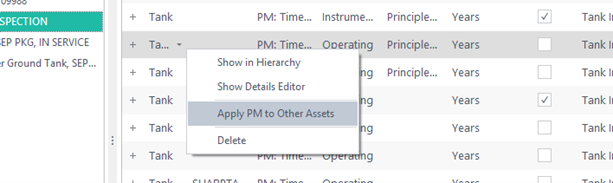
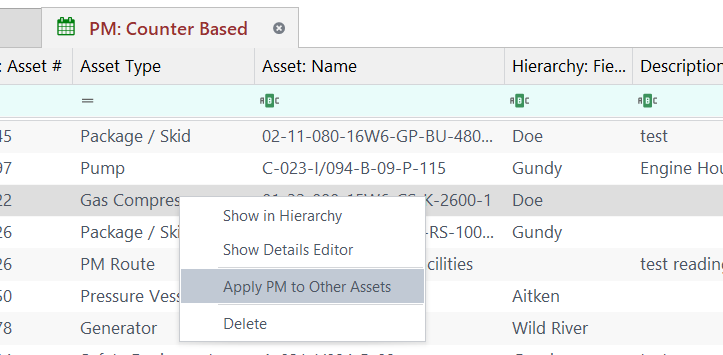
APPLY PM TO OTHER ASSETS:
Right-click on any PM shown in the hierarchy or in the PM: time based grid and select the Apply PM to Other Assets option. This will allow you to duplicate the selected PM onto other assets.
COPY AND PASTING AN EXISTING PM:
Right-click on any PM shown in the hierarchy and select Copy.
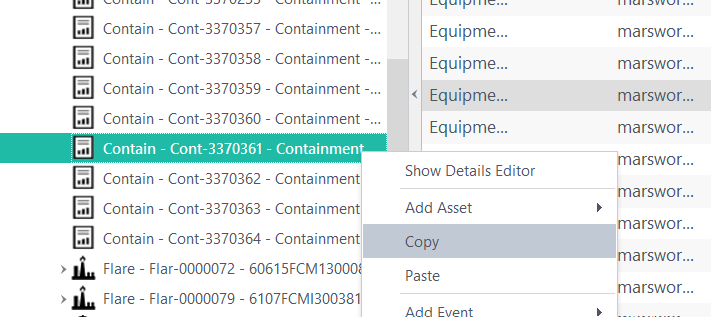
Right-click on a destination asset for the PM and choose paste. A copy of the PM will then be written to the selected asset.
Right click on any PM shown in the hierarchy or the grid and select Copy.
Now right click on a destination asset for the PM and choose Paste.
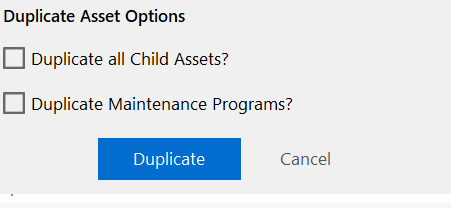
Once you have chosen the destination to paste to, this window appears confirming this action.
Click the box that applies and hit duplicate.
BUILDING A MAINTENANCE PROGRAM
Once the asset for the Maintenance Program has been identified, you must Determine whether or not the Maintenance Program will be run on a set time interval or schedule itself to run based on previously completed work. This is defined in the Based On field.
Choose BASED ON. This sets the type of PM programs: time based or based on last completion. Changing this value will affect when the PM will generate events.
Populate some of the details about the PM, these FIVE attributes are optional:
DESCRIPTION: useful for understanding what the purpose of the PM is.
SCHEDULE: assign a schedule for the PM. Does not affect what happens to the Events the PM generates.
PM CLASS: can be used to help search for PMs and identify PMs of interest.
AUTOMATICALLY ASSIGN GENERATED EVENTS: optionally define a user to assign all generated events to.
NOTE: this can be overridden in the sequence. Assigned to in the sequence overrides choosing Owner/Assigned to in the program. Choose only one of these fields or remember the assignee in the sequence is the one that applies.
PARENT EVENT JOB PLAN: the Job Plan that will be used to create a parent event. If Parent Event Type is populated, and if any sequence on the maintenance program will be creating more than one event (has more than one job plan on it), a parent event will be automatically generated to help manage the child events. If Parent Event Job Plan is blank no parent event will be created.
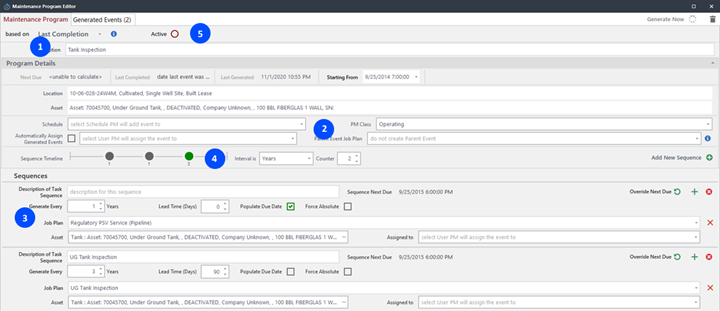
SEQUENCES
A sequence defines what events a maintenance program will generate.
Key attributes of a sequence:
GENERATE EVERY: define the period interval the sequence will generate
NOTE: if the PM has multiple sequences, for PM sequences to work, the periods for all included sequences must be multiples of each other, a 5 and 10year, 3 and 6 year, 1 and 12 months. You are not able to activate PMs where the sequences are not multiples.
JOB PLAN: what job plan will be used on the generated event.
ASSET: what asset the to apply the event to, defaults to the asset the PM is attached to. Can be changed to any asset on the same location as the PM.
ASSIGNED TO (optional field): user who the event to will be assigned to, this value will override the Automatically Assign to User defined at the PM.
NOTE: Assigned to in the sequence overrides choosing Owner/Assigned to in the program. Choose only one of these fields or remember the assignee in the sequence is the one that applies.
LEAD TIME (Days) (optional field): lead time required for generation. Leadtime will be subtracted from the Next Due date to determine when the PM will create the next event
POPULATE DUE DATE: when checked, the PM will automatically set a due date on the generated event(s). It will use the Next Due date.
WORK PERIOD: choosing work period sets the planned start date on a generated event. See following example:
- You have a monthly PM you want to generate a week early so Users can see what is coming up.
- You do not however, want them to start the work a week early.
- The Lead time could then be set to 37 days and the Work Period would be 30.
- The result is the generated event would generate a week BEFORE the start.
FORCE ABSOLUTE: used only for PMs set as based on last completion. When set, the PM will use the completion date of events last generated by this sequence. This makes the sequence act more like a PM based on absolute date.
A maintenance program can have one to many sequences. Using more than one sequence, a PM can generate different types of work at different periods.
For example, the image below shows a PM with a 5 and a 10-year sequence, which means the PM will generate an event with the job plan associated with the 5-year sequence five years from the Starting From date. It will then generate an event, using the job plan in the 10-yearsequence, five years from the completion of the 5-year event. Five years after that it will generate an event from the 5-year sequence. This will continue as long as the PM is active.
Sequences can be added by pressing the add new sequence button.
Sequences can be deleted by pressing the red X in the circle in the desired sequence.

Once the Sequences are created, the next step in setting up the PM is to setup the timing.
STARTING FROM: this is the date the maintenance program will start counting forward from. For PMs based on last completion, the PM will use the latter of the starting from date or the last completed event that was generated by the PM to help calculate when it will next generate.
INTERVAL: the period types the sequences will be measured in.
Supported periods are: HOURS DAYS MONTHS YEARS
TIMELINE: for PMs with multiple sequences, this can be used to determine which sequence will generate next. Once a sequence generates, the timeline will automatically advance.
The last step is to Activate it. A PM can be activated or deactivated by clicking on the circle active button at the top of the PM.
When activating, a PM will validate whether or not all required fields have been filled in. It will report any issues in red at the top.
Once the PM is activated, it is a good idea to check the Calculated Next Due date. This will identify when the PM is next due to generate.
NOTE: only inactive PMs can be edited.
CALCULATING NEXT DUE DATE
The next due date for a PM is calculated when:
The maintenance program is activated.
Events generated by the maintenance program are completed/cancelled.
The next due date will calculate based on the type of PM.
ABSOLUTE
Next Due: (Period * Counter) + starting from date
Period: the smallest interval of all the sequences on the PM
Counter: number of times the PM has generated events
Starting from: date you can control for the PM
LAST COMPLETION
If PM has generated an event:
NEXT DUE: Date Last generated event was completed + period
If PM has NOT generated an event:
NEXT DUE: starting from date + period
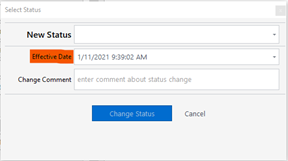
Date event was last completed is the status date associated with the completed or closed status (whichever comes first)
KEEP IN MIND: PMs use the status date on the generated events.
If you are manually changing the status on an event ensure the effective date matches when the status actually changed.
If using mobile, the date will be set correctly.
If an incorrect date has been entered on an Event, it can be fixed by a user with the event administrator permissions.

JOB PLANS AND ASSETS
When it is time to create an event from a sequence, the PM will create an event using the Job Plan set in the sequence, it will link the event to the asset noted and assign it to the person noted.
The Asset associated with the job plan can be different than the asset the PM program is on.
PMs support having more than one job plan in a sequence. A unique event will be generated for each job plan in a sequence. This allows for a PM to create events for multiple assets and/or for multiple people at once.
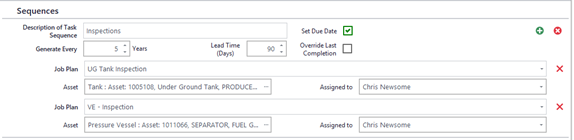
In the above example, the PM will generate an event for the noted Tank using the UG tank inspection job plan and assign it to Chris. It will also generate an event for the noted Pressure Vessel using the VE – Inspection job plan and assign it to Chris.
Job Plans can be added to a sequence by pressing the green plus button. They can be deleted by pressing the red X beside the job plan of choice.
An example of a PM with more than one job plan would be one for a compressor skid. The PM would be against the skid, the sequence would have two job plans, one for the engine asset and one for the compressor each assigned to a different user.
Creating a Counter Based PM with Readings
Any asset type, including corporate hierarchy locations, can have one to many maintenance progrmas applied to it.
A Counter based maintenance program, (or PM), is a preventative maintenance program that can be applied to an asset that will generate event(s) based on readings applied to that asset. On the PM, the reading type to track is identified, and any readings of that type entered against the parent asset can cause the PM to adjust when the next generate date will be.
All Counter PMs are based on last completion. Counter based PMs will wait until all open work generated by it are completed/closed before generating new work. When a child event is completed, the readings on the event will be evaluated to see if they should update the parent PM.
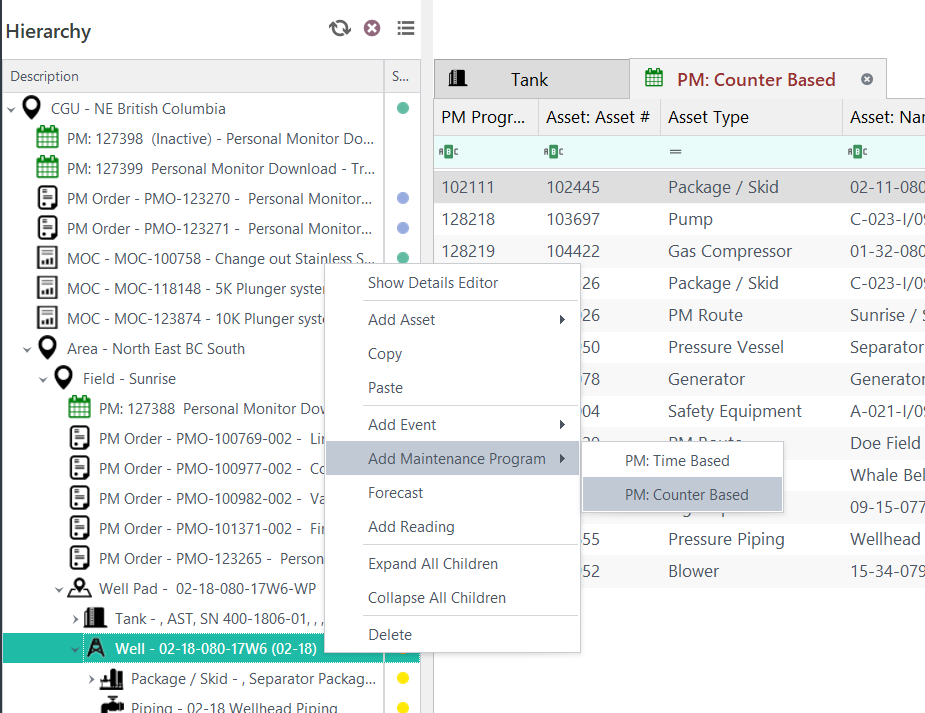
There are three ways to add a maintenance program to an asset:
FROM THE HIERARCHY: right click on any asset visible in the hierarchy and select the add maintenance program option and then the PM: counter based option.
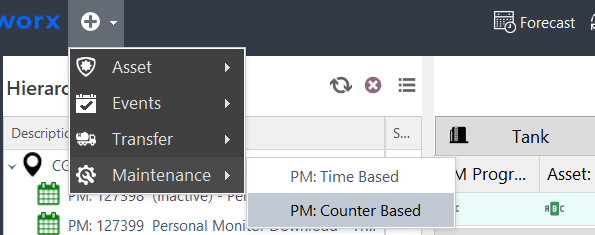
ADD NEW BUTTON: in the upper left-hand corner press the New button and then the maintenance choice and then the PM: Counter based option. You will be required to select what asset the new PM will be attached to.
APPLY PM TO OTHER ASSETS: right click on any PM shown in the hierarchy or in the PM: counter based grid and select the apply PM to other assets option. This will allow you to duplicate the selected PM onto other Assets.
A maintenance program is broken into two parts; the Programs Details section and the Sequences.
PROGRAM DETAILS
In the program details section, you are able to fill in information about the maintenance program.
Key Details include:
Active: turns the PM on and off. Inactive PMs will not generate events.
When activating a PM, all required attributes will be verified and the Next Due date will be recalculated. Turning a PM off and then on again can be used for forcing a PM to evaluate all readings against the PM’s asset.
Set Timing: define what numeric reading type will be evaluated to adjust the PM next due date.
Starting From: date the maintenance program will start counting forward from. This date will be used for forecasting future event generation
Starting Reading Value: value that was last used to generate the PM. This value is automatically updated when the PM generates. Readings taken on events generated by the PM can also modify this value.
Average Daily Amount: the average the counter would increment on a daily basis. This is used for forecasting and determining when the PM will next be due.
Timeline: for PMs with multiple sequences, this can be used to determine which sequence will generate next.
Counter: visible to users with the PM Admin role, shows how many times the PM has run, and is used to determine what the next sequence to generate will be.
SEQUENCES
A sequence defines a period to generate at, which event should be used, which Asset to apply to the event, who to Assign the event to and if any lead time is required for generation.
A maintenance program can have one to many sequences. Using more than one sequence, a PM can generate different types of work at different periods.
Generate Every: defines the period that the PM sequence will generate. The generate every value will correspond to the reading type that the PM is using.
NOTE: The Generate Every field in PM sequences must be multiples of each other, for example, a 10,000 hour and 50,000 hour set of sequences would work, a 10,000 hour and 25,000 hour set will not.
Sequences can be added by pressing the Add New Sequence button.
Sequences can be deleted by pressing the red X in the circle in the desired sequence. Events can be deleted by pressing the red X beside them.
All sequences require at least one Event.
JOB PLANS AND ASSETS
When it is time to create an event from a sequence, the PM will create an event using the job plan set in the sequence, it will link the event it to the asset noted and assign it to the person noted.
The asset associated with the event can be different than the asset the PM program is on.
PMs support having more than one job plan in a sequence. A unique event will be generated for each job plan in a sequence. This allows for a PM to create events for multiple assets and/or for multiple people at once.
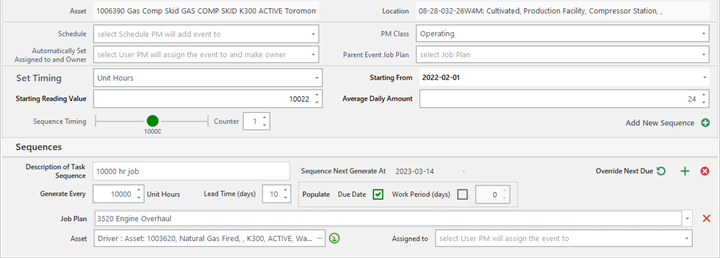
In the above example, the PM will generate an event for the noted compressor using the VE Inspection job plan and assign it to Chris. It will also generate an event using the MT – Inspection job plan and assign it to Dave.
Job Plans can be added to a sequence by pressing the plus button in the green circle. They can be deleted by pressing the red X beside the job plan of choice.
PM CALCULATIONS
Next Due: the next due date for a counter PM is based off the:
-Starting Reading Value
-Average Daily Amount
-Starting from date/last completion date
-Sequence period
-Most recent reading value on the PM asset where the reading type matches the one on the PM
The formula is = (PM Period – (most recent Reading Value on PM asset - PM Starting From))/Average per Day
Example:
period =10,000; most recent = 7,000; starting from = 6,000; average per day = 1,000
10000-(7000-6000) = 9000
9000/1000 = 9
Therefore, PM has 9 days until next run. Next Due date would be the Starting From date (for new PMs) or the last completion date + 9 days.
Next Generate: is based off the Lead Time (in days) on the next sequence – the calculated Next Due date
Last Completed: represents the last completed date for any events generated by the PM. If available, this value will be used in place of the Starting From date value when calculating the Next Due date.
Last Generated: the date the PM last generated an event.
Latest Reading: displays the last reading value and taken date on the PM’s asset that was used to calculate the Next Due date. This process runs periodically. Only readings where the Taken Date is greater than the PM's Last Completion Date are taken into consideration, historical readings will not affect the next due date.
NOTE: the next due date is calculated only for PM's without open work, therefore readings are not evaluated for PM's where there is open work (meaning not in a Completed. Closed, Skipped, or Cancelled status.)
The engine will look for the most recent reading, determined by the reading’s Taken Date, attached to the PM’s Asset where the reading type matches the one defined on the Counter-based PM. The PM’s Next Due date (see above formula) will be recalculated using the reading’s value.
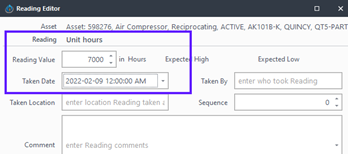
UPDATING READINGS
Counter-based PMs are influenced by readings captured against the PM’s asset. The reading values are expected to be cumulative, meaning new reading values should be larger than previous reading values.
Readings can come into marsworx in one of four ways:
Manually created in the desktop application
Entered through the mobile application
Imported through the reading import tool
Integration using the API with an external system
UPDATING AN EXISTING READING
Existing readings values can be updated. If the value on the most recent reading, ordered by Taken Date, is updated, this value will update the associated PM last reading value.
STARTING READING VALUE
The Starting Reading Value on a Counter PM defines the value the PM will use to count future reading values from.
HOW STARTING READING VALUE IS POPULATED
When a Counter PM generates an event, the Starting Reading Value is automatically updated with the most recent (as determined by the Taken Date) reading value on the associated asset.
If the PM generated event is against the same asset that the PM is on, and that event captures a reading on the same type the PM is using, the value for that reading will be used to update the Starting Reading Value once the event is completed/closed.
EXAMPLE:
In the PM below, if the most recent Unit Hours reading on the 1006390 Gas Compressor is 20053 hours, when the PM generates an event, the value 20053 will be written to the Starting Reading Value.
If on the generated 3520 Engine Overhaul event, a Unit Hours reading was captured of 20062 hours, when the event was completed, the Starting Reading Value would be updated to 20062. This allows operators to capture the exact reading value the asset was at when the work was done.
STARTING READING VALUE FROM PM EVENT
If a reading is taken as part of a PM generated event, it's value can be used to automatically update the starting from value if the following criteria are met:
Reading type is the same as the PM Set Timing type
Reading is taken against the same asset the PM is against
Reading Taken Date is less than the event Completed Date
When the Event is marked as Completed/Closed, it's attached readings are evaluated, if all the above criteria are met, the PM Starting Reading Value will be updated to the value on that reading. This reading value can be less than or greater than the current PM starting from value.
ADJUSTING EXISTING MAINTENANCE PROGRAMS
Over time, existing PM programs may need to be adjusted.
After adjusting an PM, a good practice to follow is to forecast the PM for a longer period of time and verify the forecast dates are what is expected.
When adjusting the interval counter, pay attention to the PMs with event history. The PM counter value must match up with the interval counter value on the most recent event. If they do not match, the PM will not be able to use the completed date from the event to calculate the next due and will use the PMs starting from date to calculate the next date.
DELETING PM EVENTS
If events generated by the PM are deleted, the PM will automatically roll back the Counter.
NOTE: This does not update the starting reading value.
Admin Application
Access information below or in menu on left.
Privileges and permissions are created, determined, and managed here.
Flows
Flows control the chain of events for an event or asset type.
Every asset requires a flow within marsworx.
They dictate the progression of statuses.
📽️
In the Administration Application, open up flows from drop down menu on the left side of screen.
Choose to edit an existing flow by choosing from the drop down menu on the right.
To create a new flow, choose the blue NEW button as shown below.

When creating a new flow, you can choose from an existing flow from the drop down menu or choose New Flow from that menu.
Give your new flow a name and description.
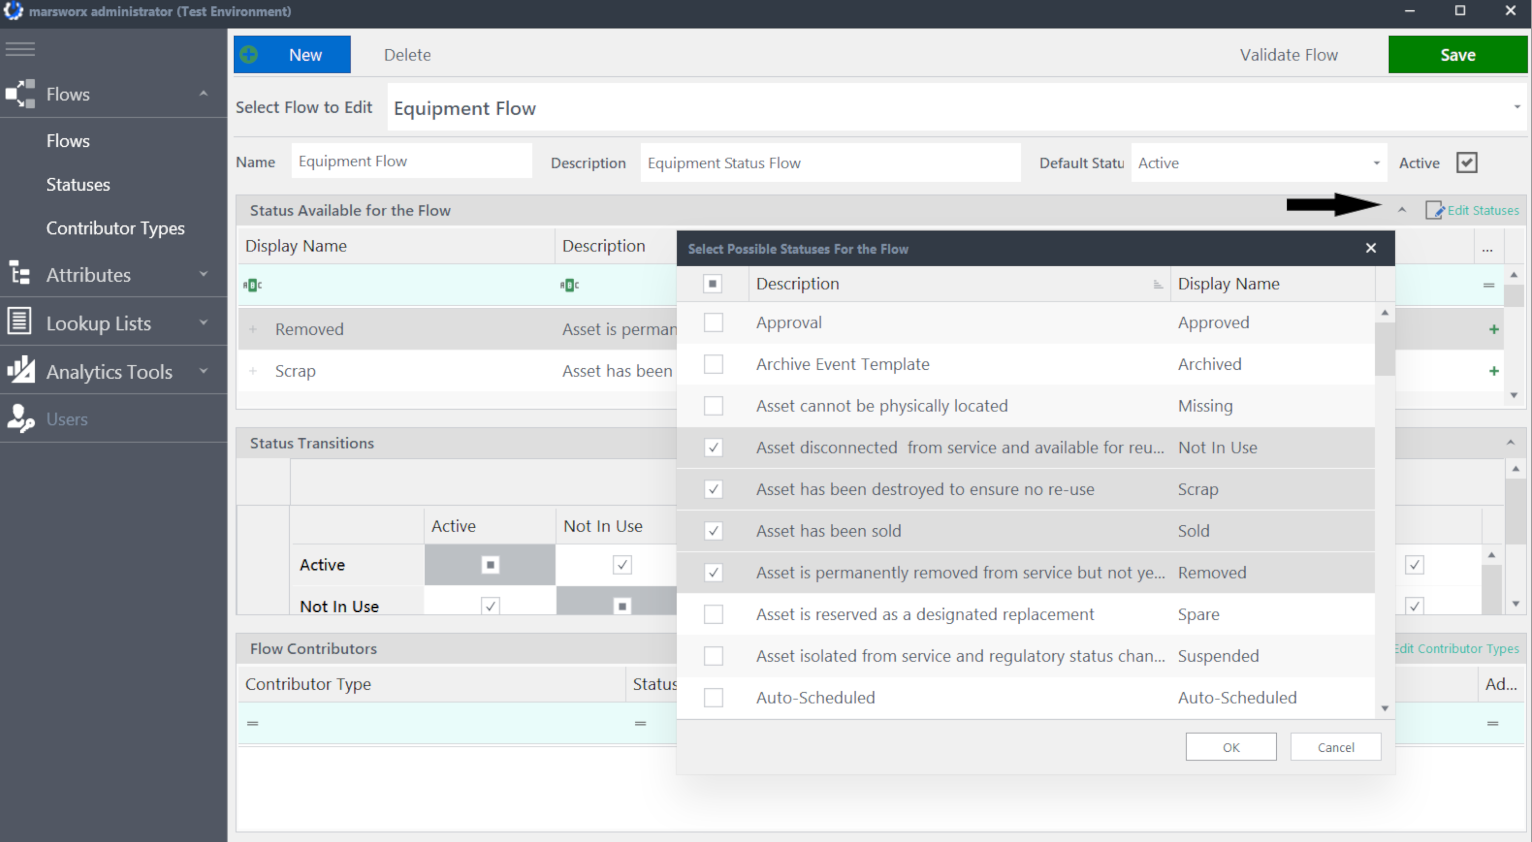
MANAGING STATUSES
Edit, change, and create statuses available and how you wish them to flow from one status to another.
To the right of Under Statuses Available for the Flow, left click Edit Statuses which brings up a choice of statuses as shown below.
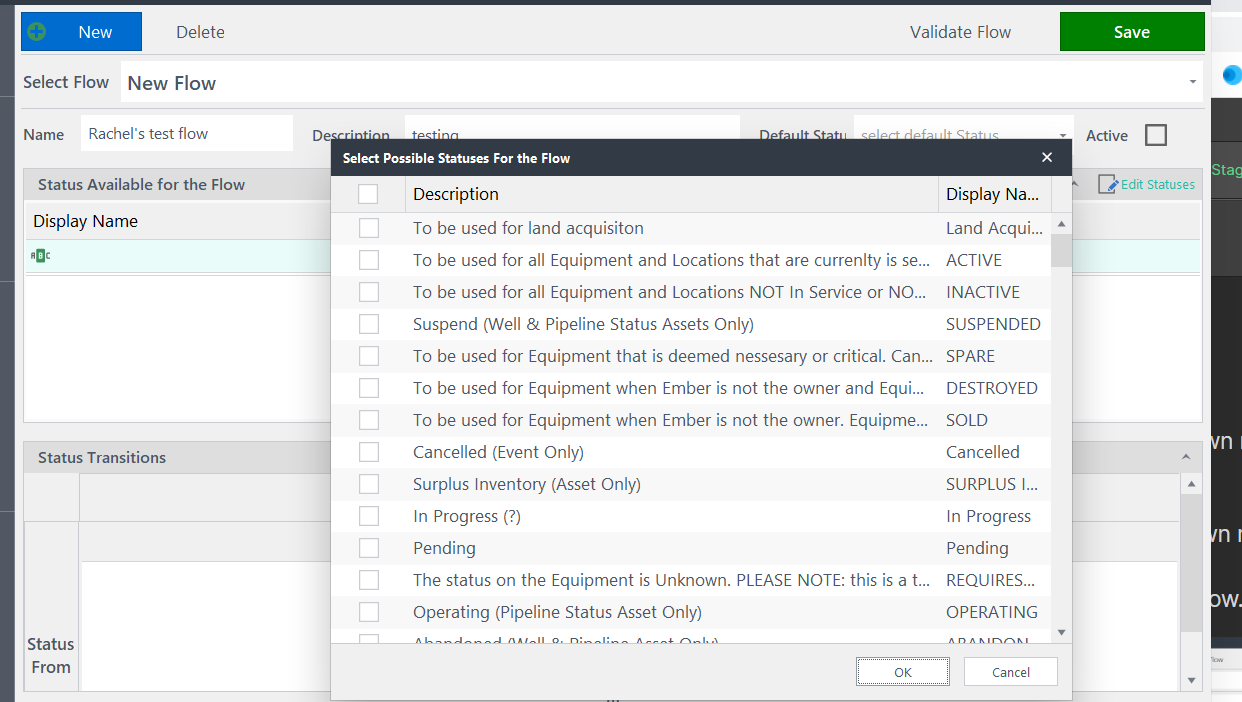
Left click to choose all the statuses you require for this flow
Simply "unclick" the checkmark to omit a status.
Press ok when done and your statuses will appear on your screen.
Next up is managing the transition of chosen statuses.
Stretch out your screen to manage Status Transitions.
On the left is "Status From". Above the graph denotes "Status To".
Manage where you want the status to advance by clicking on the black box.
For example, in the above graph, decommissioned status can go to destroyed or sold status. It can not go to any other status.
FLOW CONTRIBUTORS
Left click on the drop down menu in the row below Contributor Type for a menu of available Contributors to choose from as shown below.
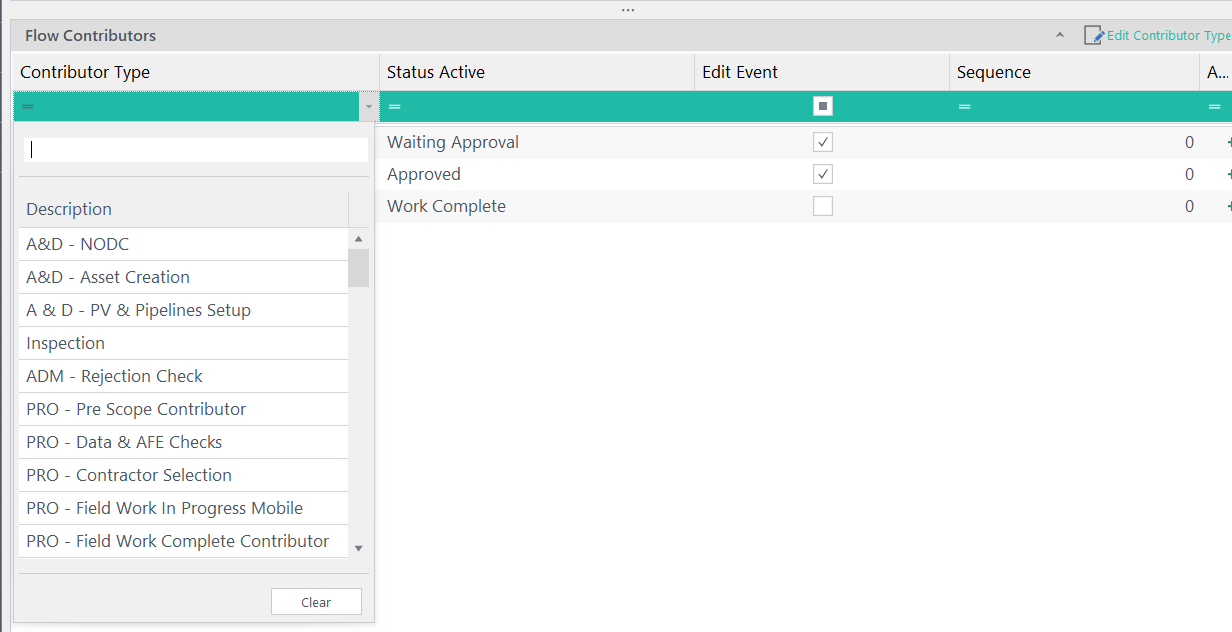
Populate the information as you require ie: At which status do you want the contributor to play an active role in this flow? Do you wish a contributor has permission to edit an event?
Hit save at top right when creating or editing is complete.
Always restart your desktop application after editing in the admin application to load your changes.
Statuses
Statuses control workflow and manage assets and events.
Statuses are associated to asset, event, and transfer types and can be shared across multiple types.
🔵Launch the administration application. You will need to login with a user that has administrator privileges granted.
🔵Navigate to the Status option under the Flows menu
🔵To add a new status, press the NEW button in the upper left-hand corner.
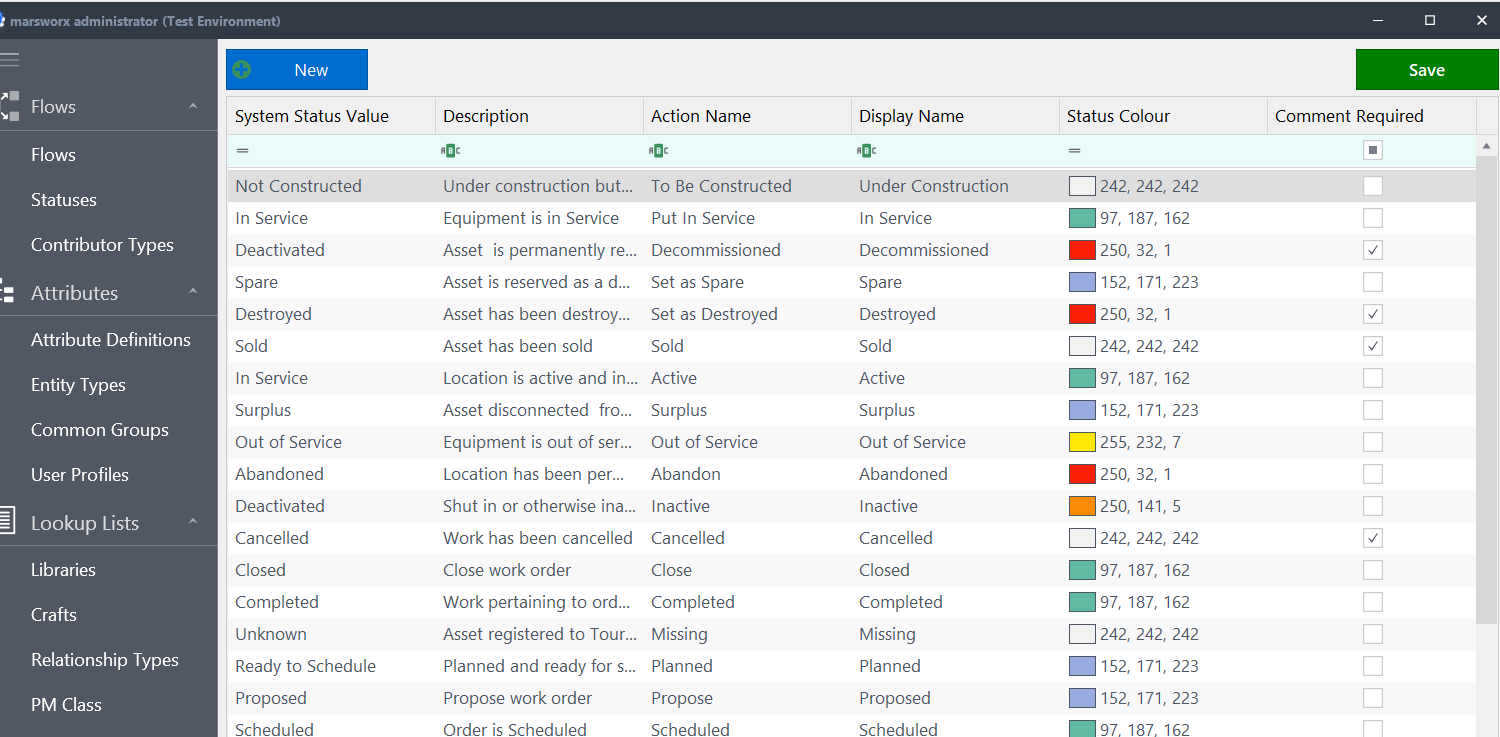
This will create a new status record as shown below.

STATUS FIELDS
Display Name: the status name displayed in marsworx.
Action Name: if the status is written in a button, the action Name is displayed.
Description: details about what the status means, this value is typically shown as a tool tip (pop-up window when you mouse over a status value) in marsworx.
System Status: the marsworx system status that relates to the new status. The same system status can be used for multiple statuses.
Comment Required: when checked, users will be required to enter a status change comment when selecting this status. A common example would be a Cancelled type status.
DELETING A STATUS
🔵Right-click on the status to delete from the status list.
Note, deleting a status will affect any Flows the status is attached to.
UPDATING A STATUS
🔵Select the status to update.
🔵Edit status details in the details pane on the right-hand side.
🔵Press Save Changes button in the lower right-hand corner to save the edits.
ADDING OR REMOVING A STATUS
Adding a status to an Entity is done at the FLOW level.
🔵Navigate to Flows and open the Flow associated with the Entity you wish to add a status to.
🔵Choose Edit Statuses and a window will open to choose a new status ( or remove one) and press ok.
NOTE: be sure to manage the status transitions before hitting save. Please refer to Flows for further assistance with this.
Attributes
Attributes are what marsworx uses to store data.
Can be linked to one or more different entity types (Asset, Event and Transfer types).
Once linked, some characteristics of the attribute are customizable for that type.
Create, edit, and manage attributes in the administration application.
📽️
The three key parts to an attribute are:
Display Name: how the attribute is presented within marsworx.
System Name: system generated value which defines the name the attribute will be stored as in the database. (these must be unique)
Data Type: defines the type of data the attribute will store.
Launch the marsworx Administration Application.
You will need to login with a user that has Administrator and Admin Attributes roles granted.
Go to the Attribute Definitions option under the Attributes menu.
BEFORE creating a new attribute, it is highly recommended to check the existing attributes to ensure one does not already exist.
Press the NEW button to start the attribute creation process.
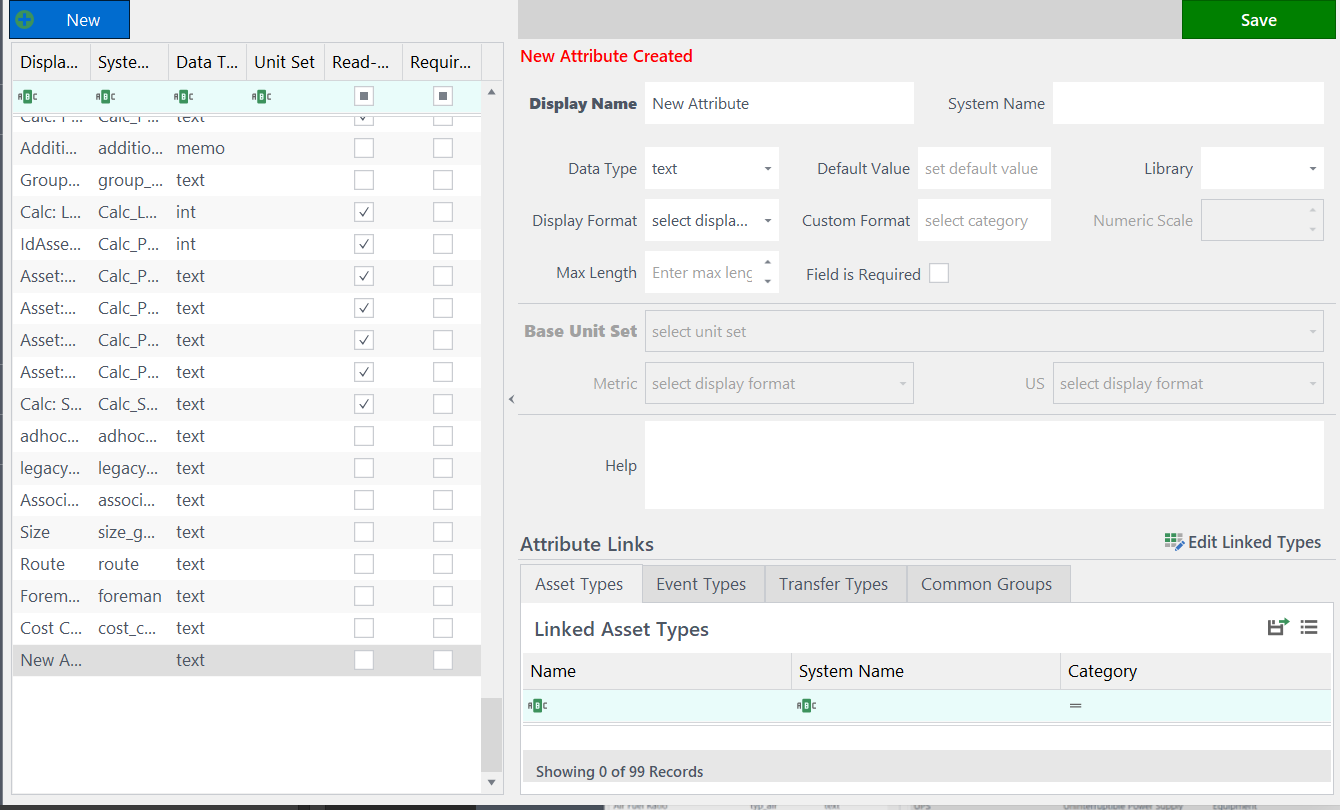
You must define the Display Name for new attributes which will be used to generate the unique System Name.
NOTE: you can provide your own System Name, however, the System Name cannot be changed once the attribute has been created.
Define the Data Type for the attribute, this will determine what sort of data the attribute will store.
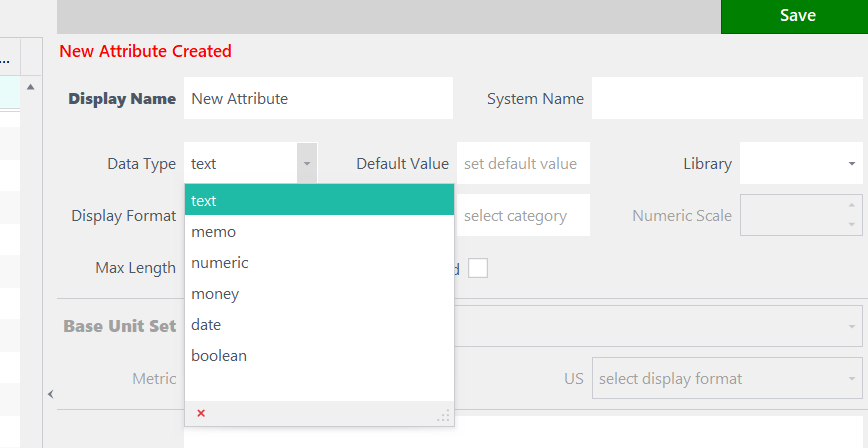
NOTE: the Data Type cannot be changed once the attribute has been created.
THE SIX DATA TYPES ARE:
Text: captures text data. Text attributes can have libraries associated with them. They can also have a maximum length, default value, and a custom display format.
Memo: captures text data, uses a special control that will expand when the user edits, allowing for multi- line, longer text entries.
Numeric: numeric attributes can have units applied to them. They can have a default value, display format, custom display format and numeric precision. There is no distinction between integer, decimal or float values. Setting the numeric precision value to 0 will cause the numeric attribute to behave like an integer.
Money: captures numeric values that will have two decimal places.
Date: use the Display Format or Custom Format options to define how the date should be displayed. The format can be used to restrict the attribute to just date, just time or date and time values.
Boolean: captures a true/false value through a check box control.
UNITS
Numeric: can have units applied. marsworx stores all numeric values with units in a base unit set and then applies a conversion to display in the selected unit type.
For example, all temperatures are stored in Kelvin.
Users will see and interact with the temperate value in the selected unit type, typically Celsius or Fahrenheit (or any other select temperature unit). Users can enter values in the same unit type they are displayed in.
To set a unit for an attribute, first select the unit set that will be used for the attribute. Once the set has been selected, choose what the displayed unit type will be for each unit group.
NOTE: the unit type chosen does not have to match the group name. For example, a temperature could be shown in Fahrenheit for the Metric group and Kelvin for the US group.
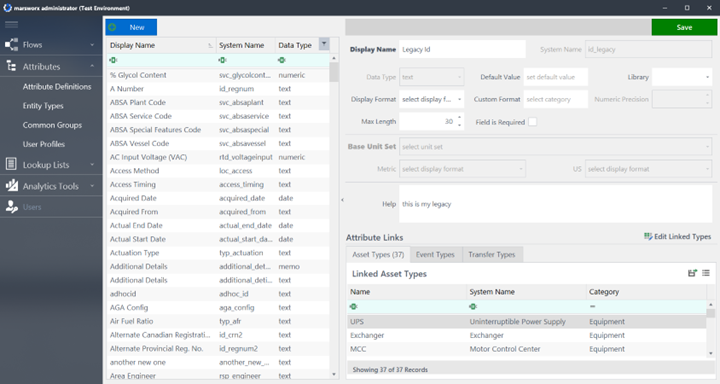
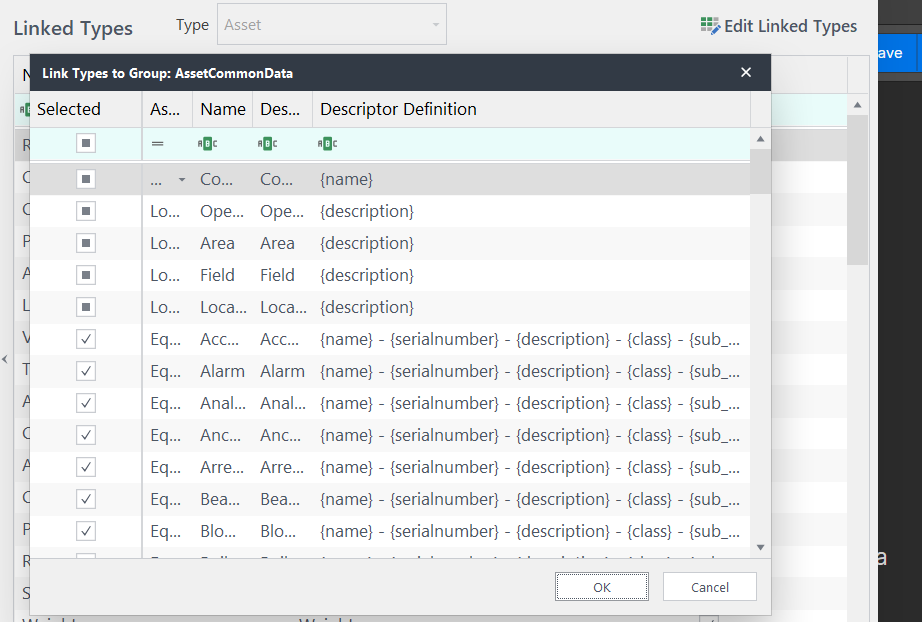
LINKED TYPES
Displays what entity types currently use the attribute.
Allows for the quick addition of the attribute to entity types.
Left click the Edit Linked Types button.
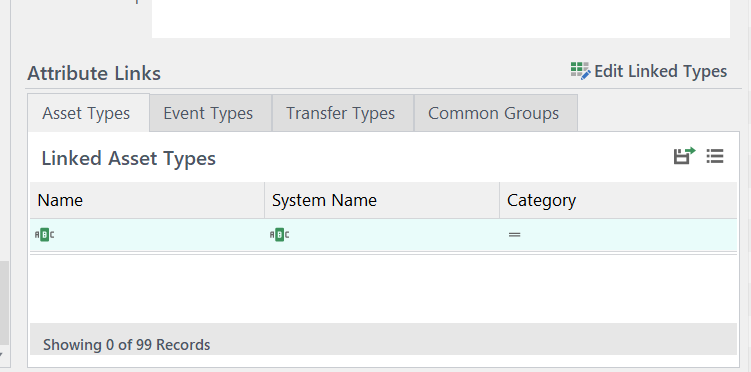
A list of all possible types the attribute can be linked to will appear in a new window.
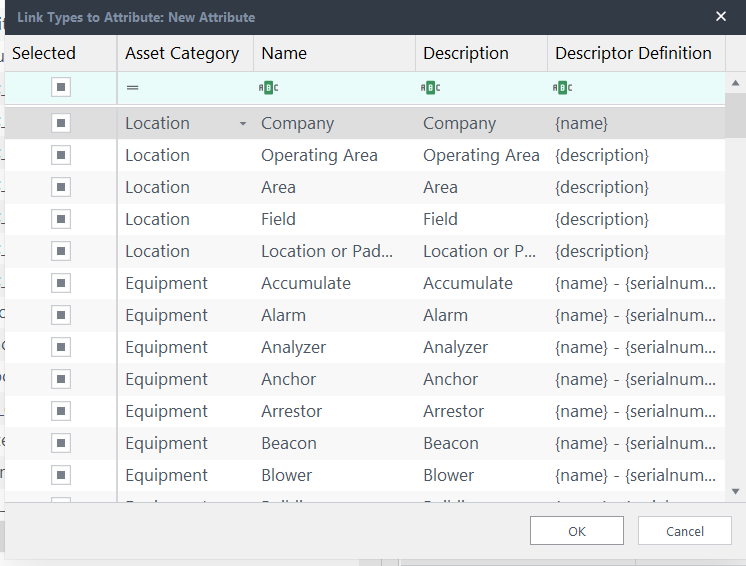
Double left click any desired types from the column titled Selected as shown above and press OK to add the attribute to the types.
EDITING AN ATTRIBUTE
Many fields on an attribute can be edited after it has been created.
When saving an edited attribute, a dialog will pop up asking if the changes should be published to any of the entity types where the attribute is linked.
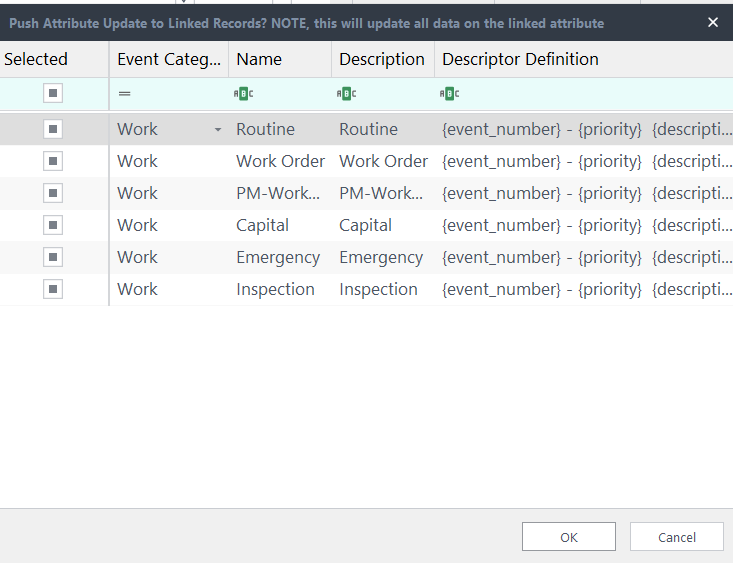
NOTE: this will overwrite any custom changes to the attribute made at the entity type.
SEE Managing Entity Types page for additional details.
DELETING AN ATTRIBUTE
Right-click on attribute in type tree and select Delete Attribute option.
NOTE: system attributes cannot be deleted.
To hide a system attribute, move it into an Attribute Group that is marked as Hidden (one where the Hidden option is selected).
MOVING AN ATTRIBUTE
Click and drag attribute in the type tree using blue arrow.
Always restart your desktop application after editing in the admin application to load your changes.
Common Groups
Common data belonging to a selected group.
Handy tool for managing attributes belonging to groups you select.
📽️
Launch the Administration Application and navigate to common groups found in the drop down under Attributes.
Choose the common group you wish to view via the drop down menu as shown.
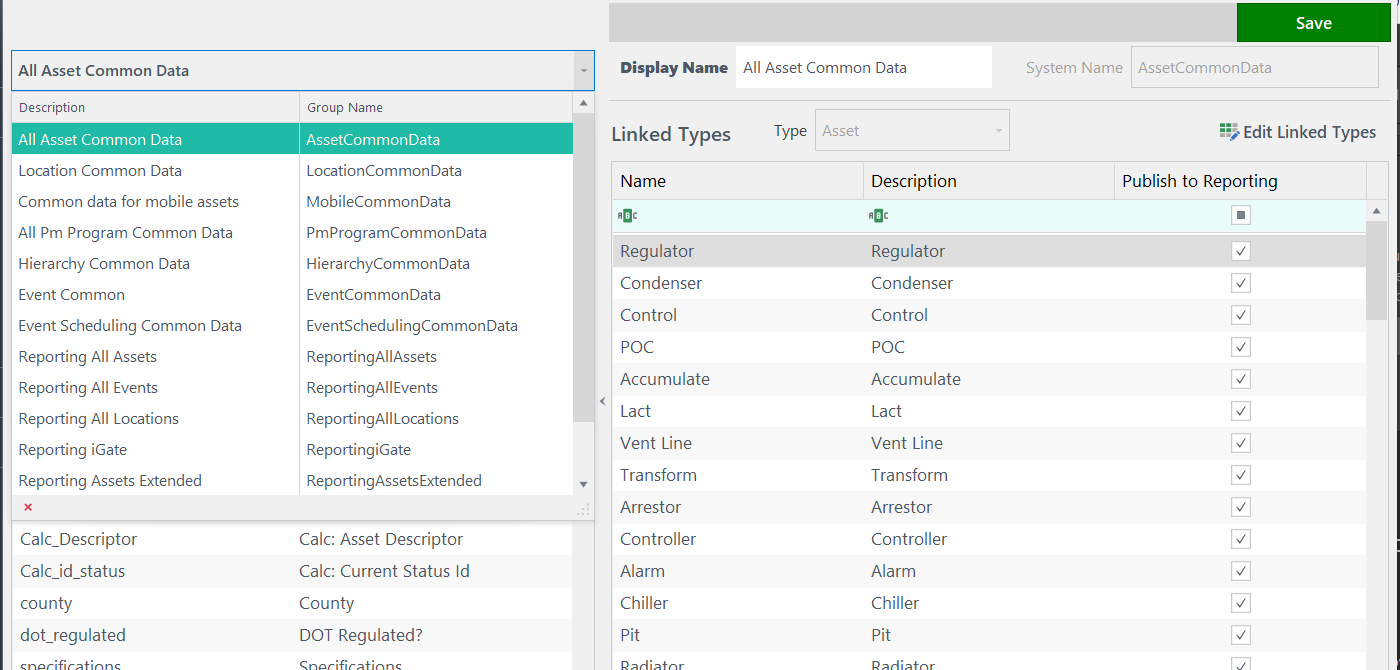
Here you can view the system and display name of attributes belonging to the group.
On the right of your screen is a list of all assets/types belonging to that group.
To edit which linked types belong to this group, choose the Edit Linked Types button which prompts a menu as shown below.
Select or deselect by clicking boxes on the left. Press ok when done.
Remember: Always best practice to restart desktop application after changes made in administration application to allow changes to apply.
Libraries
Libraries are used as picklists for attributes.
When defining an attribute, one of the options is to assign a library to the attribute.
Libraries assigned to attributes allows users to select from a picklist of values to populate the attribute.
It is recommended to apply a library to most text based attributes.
Launch the marsworx administration application. Administrator and Admin Lookups role required.
Navigate to the Libraries tab under the Lookup Lists option
To add a new library, press the New button in the upper left-hand corner.
The window will display the details for the new library.
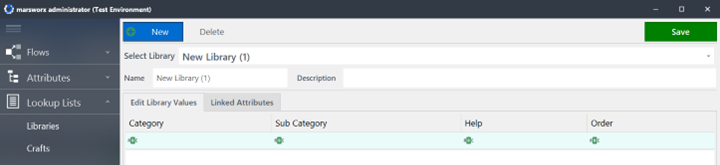
Enter in the Library name, and a description of what the library will be used for.
Press the Save button in the right-hand corner to create the library
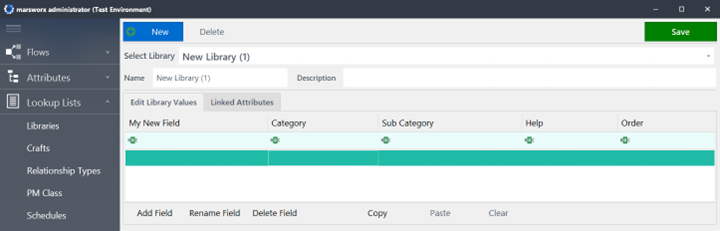
Add a field to the library by pressing the Add Field button in the lower left-hand corner
Fields are where the library values will be stored
Click and drag the new field to be the first field in the list
Start entering data for the Library
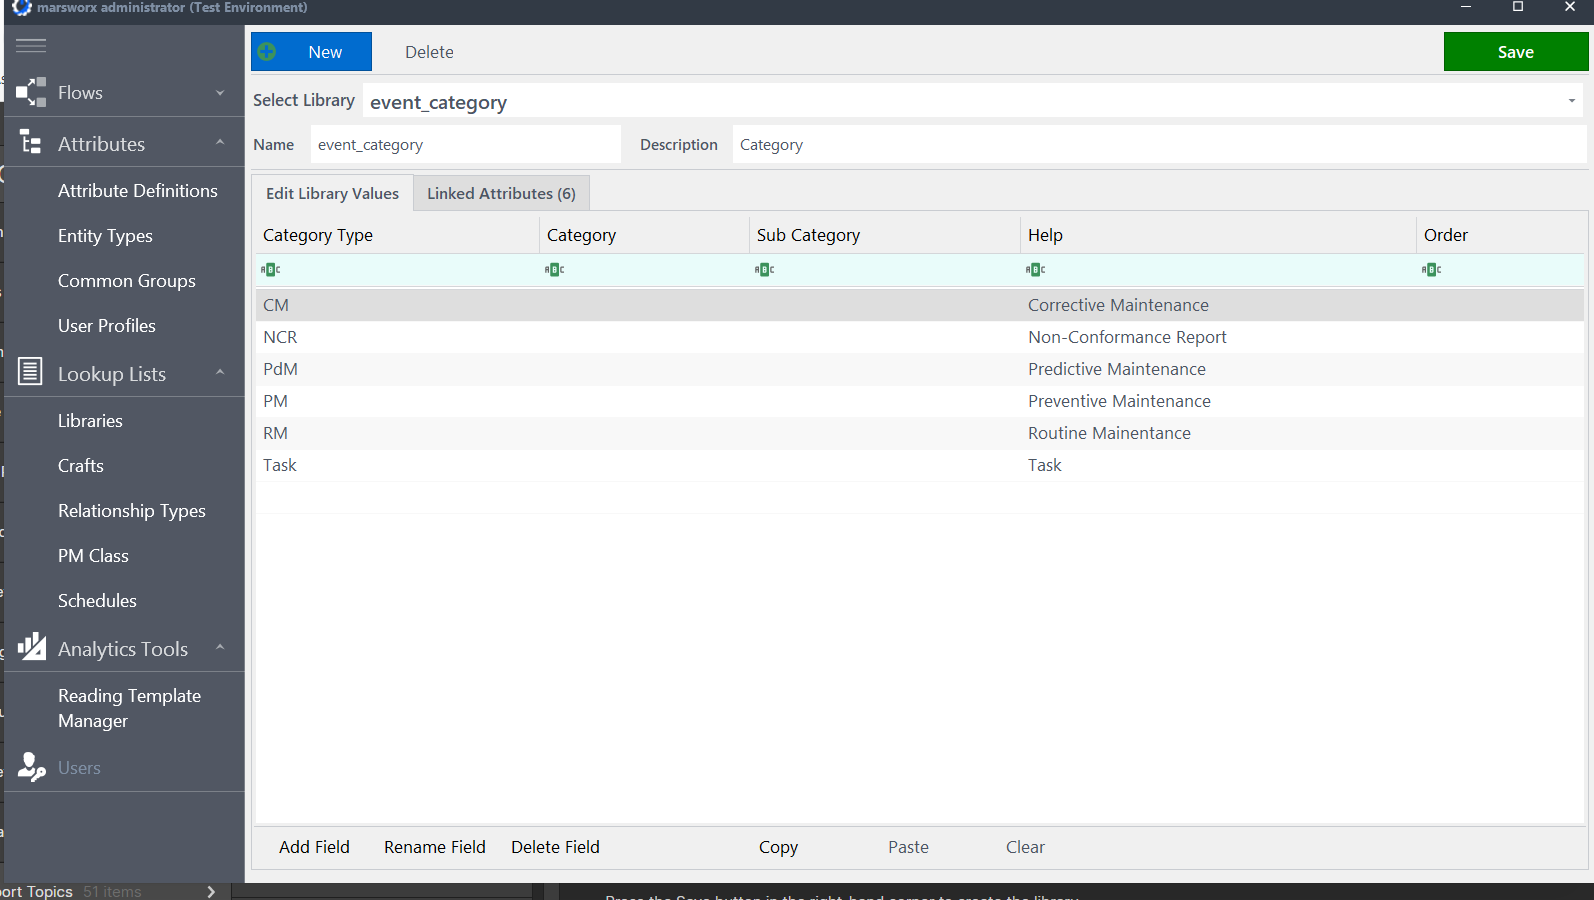
LIBRARY FIELDS
These system fields are optional in that they do not need to be populated:
Category: used to help in filtering and defining what a library value should be used for
Sub-category: related to the category field, used for filtering library values
Help: provides help context to the library value
Sequence: provides an order to the library values, default is alphabetical
NOTE: only fields with data populated will be shown to the user. If a field is left blank, for example the Category field, the user will not see it when they open the library to select a value
One or more custom fields can be added to a library. These fields can all have their own data associated with them. Typically, a library will have one field added.
EDITING LIBRARY DATA
Library data can be edited from within other applications, such as spreadsheets, and the values can be copied and pasted back into marsworx.
Click Copy for all the library data to be copied to clipboard
Choose Paste to paste library data in the clipboard into the library as a new record
Choosing Clear clears all records from the library
Edit existing data by selecting the value and editing it.
Value can be deleted by right-clicking on them and choose the Delete option.
Changing or deleting a library value will not affect any existing data, only new data created with that library.
Press SAVE when done editing the library
Always restart your desktop application after editing in the admin application to load your changes.
User Management
Access information below or in menu on left for managing users.
Always restart your desktop application after editing in the admin application to load your changes.
Managing User Profiles
Profiles are used to control user permissions and privileges within marsworx.
Administrator permissions are required
Users can be granted access to one or more profiles.
🔵Launch the marsworx administration application. You will need to login with a user that has Administrator and Admin Attributes roles granted.
🔵Navigate to the user profiles option under the attributes menu
🔵Use the select profile drop down at the top to pick which profile you wish to view
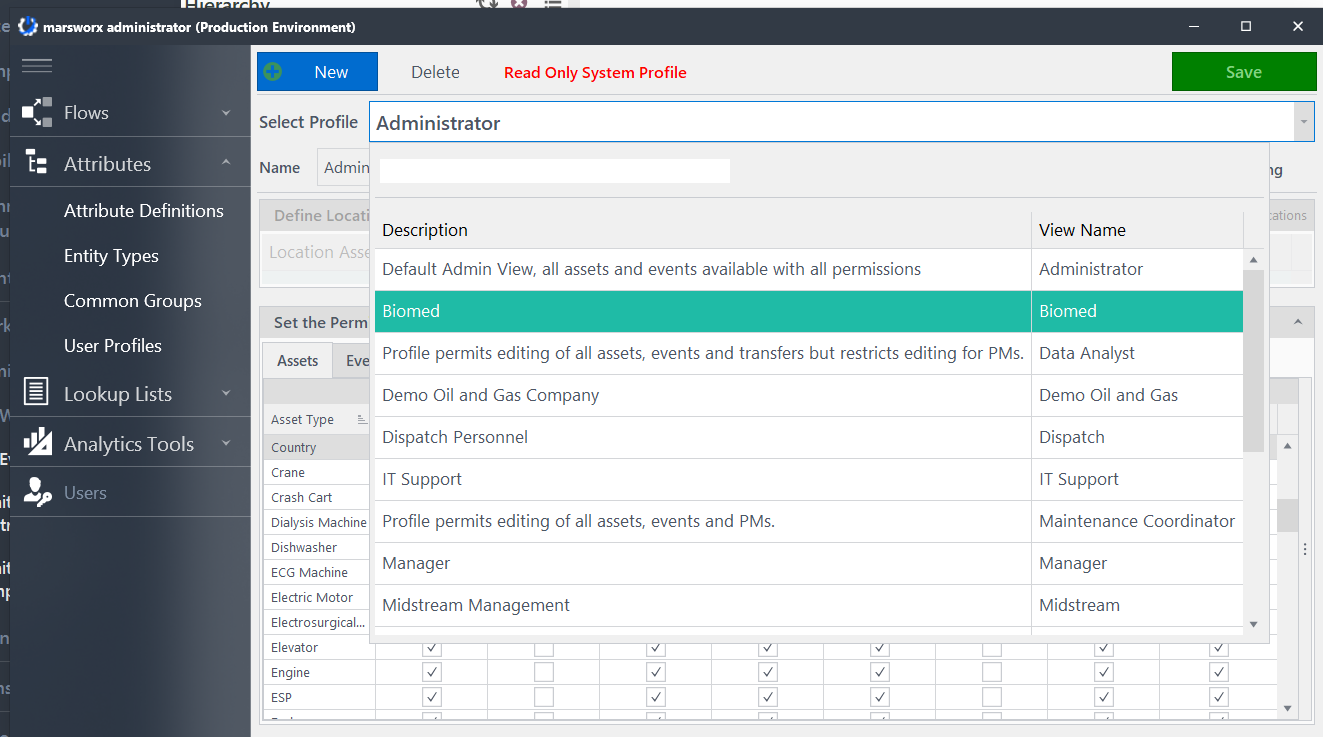
🔵To create a New profile, choose the New button in the top left hand corner.
All user profiles require a unique name.
Profiles have two main sections, location filtering and type permissions.
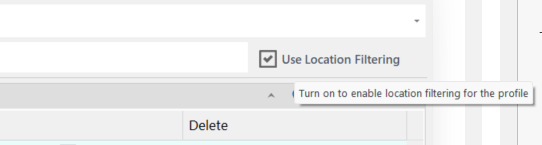
LOCATION FILTERING
Define what areas of the hierarchy the profile can and cannot see.
Once filters are set for areas to NOT be seen, any assets, events, maintenance programs, and documents will not be available to the user when using hierarchy.
🔵Check the Use Location Filtering option near top right of screen.
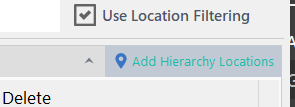
🔵Select by pressing the add hierarchy locations button to bring up a list of all hierarchy areas that can be filtered on.
🔵In the locations grid, select whether or not the user can see the location by pressing the allow option.
🔵To hide a location select the deny option
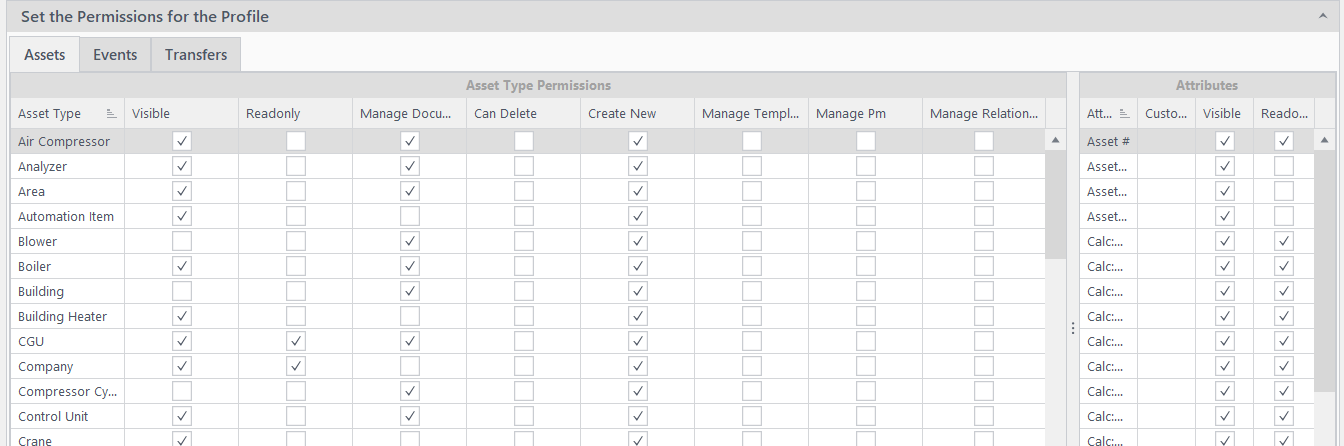
ASSET SETTINGS
Profiles can be granted the following permissions:
Visible: determines if the profile can see the asset type
Read-only: sets all assets of this type to read-only for the profile
Edit PMs: grants the ability to create and edit maintenance programs for the asset type
Edit Events: grants the ability to create and edit any events that are associated to the asset type
Edit Relationships: allows for managing any relationships the asset may have, such as the parent, location, protects, or other relationships
Manage Documents: allows the profile to create and edit documents on the asset
Can Delete: ability to delete the asset
Create New: user can create a new asset
Manage Templates: can create and edit asset templates, which can be used to create new assets
EVENT SETTINGS
Profiles can be granted specific permissions:
Visible: determines if the profile can see the event type
Read-only: sets all events of this type to read-only for the profile
Manage documents: allows the profile to create and edit documents on the event
Can delete: ability to delete the event
Create new: user can create a new event
Manage templates: user can create and edit event templates (templates are the job plans that can be used when creating new events)

TRANSFERS
The ability to create and execute Transfers is granted through the Manage Transfers permission. Profiles without this permission may still be granted access to view and edit Transfers.
For each Transfer type, profiles can be granted specific permissions:
Visible: determines if the profile can see the transfer type
Read-only: sets all transfers of this type to read-only for the profile
Manage documents: allows the profile to create and edit documents on the transfer
Can delete: ability to delete the transfer
Create new: user can create transfers
ATTRIBUTES
For each type (asset, event or transfer), you are able to set permissions on individual attributes.
🔵Select the type to manage in the attributes grid on the lower right-hand side of the screen.
A list of all attributes and permissions are displayed.
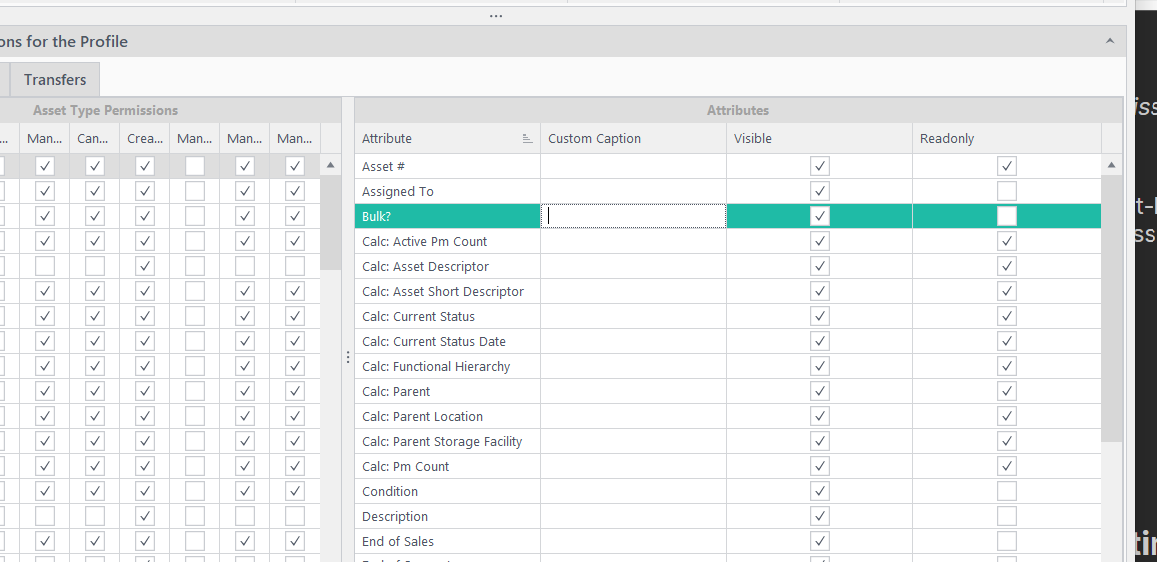
🔵For each attribute you can define by clicking in the box:
Read-only: the attribute will be read-only
Visible: the attribute will be visible in grids and details screens
Custom caption: relate an attribute for the profile
In the example below, the Driver asset has been selected. On the right hand side are the attributes defined for a Driver. The Engineer profile has read only access for a asset # and P&ID fields, however, the quantity on hand and quantity unit fields are not visible.
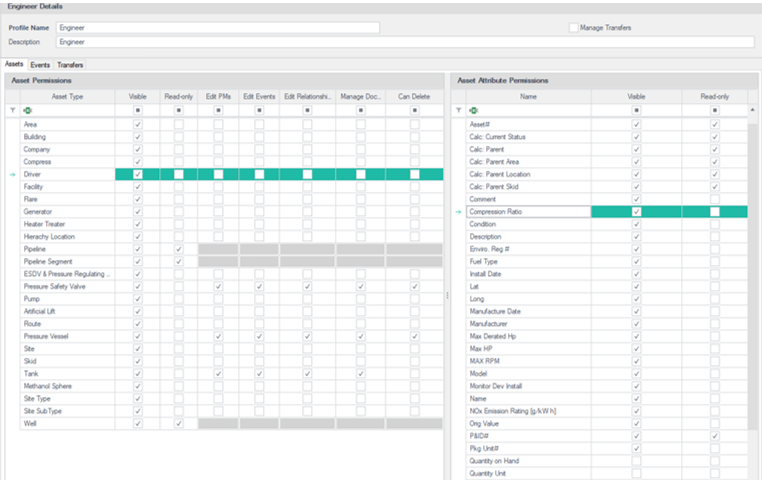
Always restart your desktop application after editing in the admin application to load your changes.
Additional Privileges Defined
marsworx Administration Application provides the ability to apply additional privileges to users via roles.
Administrator User Role
Required to run the marsworx administration application.
Use of this role should be very limited.
Users with this role have the ability to change all data in the administration application
Job Plan Administrator Role
Required for users to be able to create and edit job plans within marsworx
Role is required for Job Plan/Event Templates creation and administration as well as reading type management
Document Administrator Role
Ability to delete documents and manage documents marked as Corporate
Mobile Administrator Role
Ability to recall mobile events and run mobile synchronizer
Report Administrator Role
Ability to modify and share profile reports
Required to create and manage marsworx reports shared to user profiles
Maintenance Program Administrator
Can bulk edit maintenance programs with history
Users with this role can manipulate maintenance programs that have generated work including:
Overriding when a sequence will next generate
Add/remove sequences
Change the interval counter
The following roles supercede user profile security
Event Administrator Role
Edit events regardless of status (this does not include events out to mobile)
Force a status change
Change related asset
Reset location asset
Asset Administrator Role
Edit assets regardless of status including moving assets, forcing status changes
Admin privileges on transfers
Transfer Administrator Role
Ability to create and modify transfers
The following roles define administration privileges
Admin Analytics
Can manage Analytics in the administrator application
Admin Attributes
Can manage Attributes in the administrator application
Admin Flows
Can manage Flows in the administrator application
Admin Lookups
Can manage Lookups in the administrator application
Admin Users
Can manage Users in the administrator application
NOTE: the user will also require the administrator role to launch the application.
Always restart your desktop application after editing in the admin application to load your changes.
Rover
Access information on your left or scroll below for information navigating mars rover.
Rover Installing on a Device
Marsworx Rover is an application that can be installed on a User's device and used like an app.
Rover should be installed to enable offline usage however may also be used like a regular web application.
An additional advantage of installing on a User's device vs simply using Rover in your browser is more screen space as all the browser toolbars/fields are removed resulting in a streamlined "uninterrupted" view.
To install Rover:
Obtain URL from administrator:
URL should appear as one of the below:
Production users: client name-rover.marsworx.com
Test Users: client name-test-rover.marsworx.com
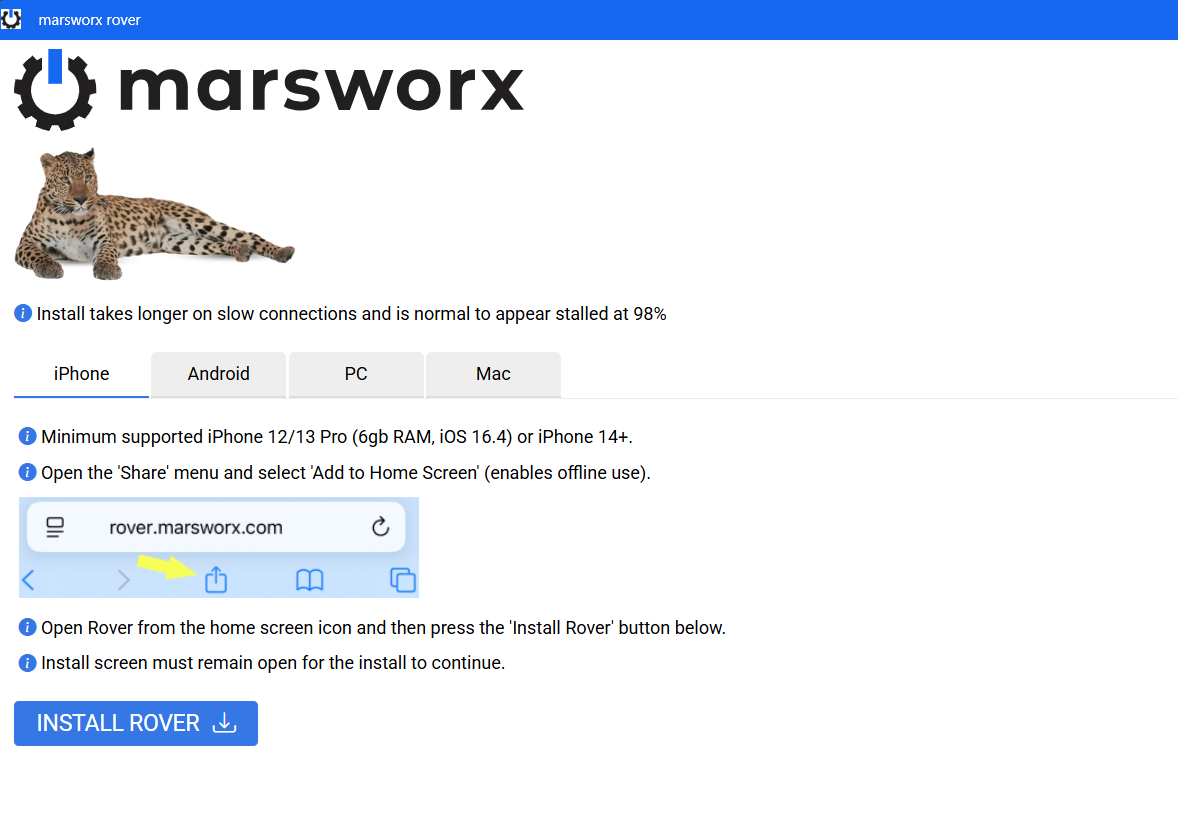
Initial install screen will appear as above for all devices:
To save Rover as a standalone application, follow instructions for your device type
Initial install takes several minutes.

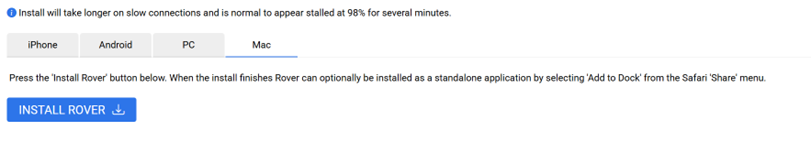
Login screen will appear as below:
User may now login to Rover for the first time with the same Username and password used in desktop
OR
For new Users, confirm Username and password with your Administrator.
Rover Getting Started
Landing page overview:

- Elements Menu. Click here to open the same elements you see on the landing page, in list form.
- Cog icon utomatically moves User back to the landing page from anywhere in the application.
- SYNC button
- Drop down menu to access My Account and Support setting details.
- Enter My Work to view work assigned Onself.
- Enter Group Work to view work assigned to a Group one belongs to.
- Open All Work to view all work assigned to oneself AND work assigned to a Group one belongs to.
- Create device initiated Work.
- Asset lookup screen visible ONLY when chosen in My Account screen. Typically only sued by Administrators. This tile may be hidden.
- Recent History opens menu of last visited Work for easy access.
- See Work on Map view.
- SYNC
- My Account contains User Settings, System information, the ability to add Signatures, Certifications and more.
Color Legend for Statuses and States in Rover:
🟥RED: Requires Attention
🟪PURPLE: Modifications waiting to be synced
🟧ORANGE: Warning
🟩GREEN: File or Image has been downloaded to device
🟨YELLOW: Caution AND/OR File or Document has been added to incoming
GREY: File or Image not downloaded to device.
Rover My Account Details
My Account Details contains a User's personal information and settings. Signatures, certifications, and equipment can be managed here.
Settings information available is dependant on a User's profile and permission.
My Account Details is accessbile either from the home screen icon or at top right of screen under login name.
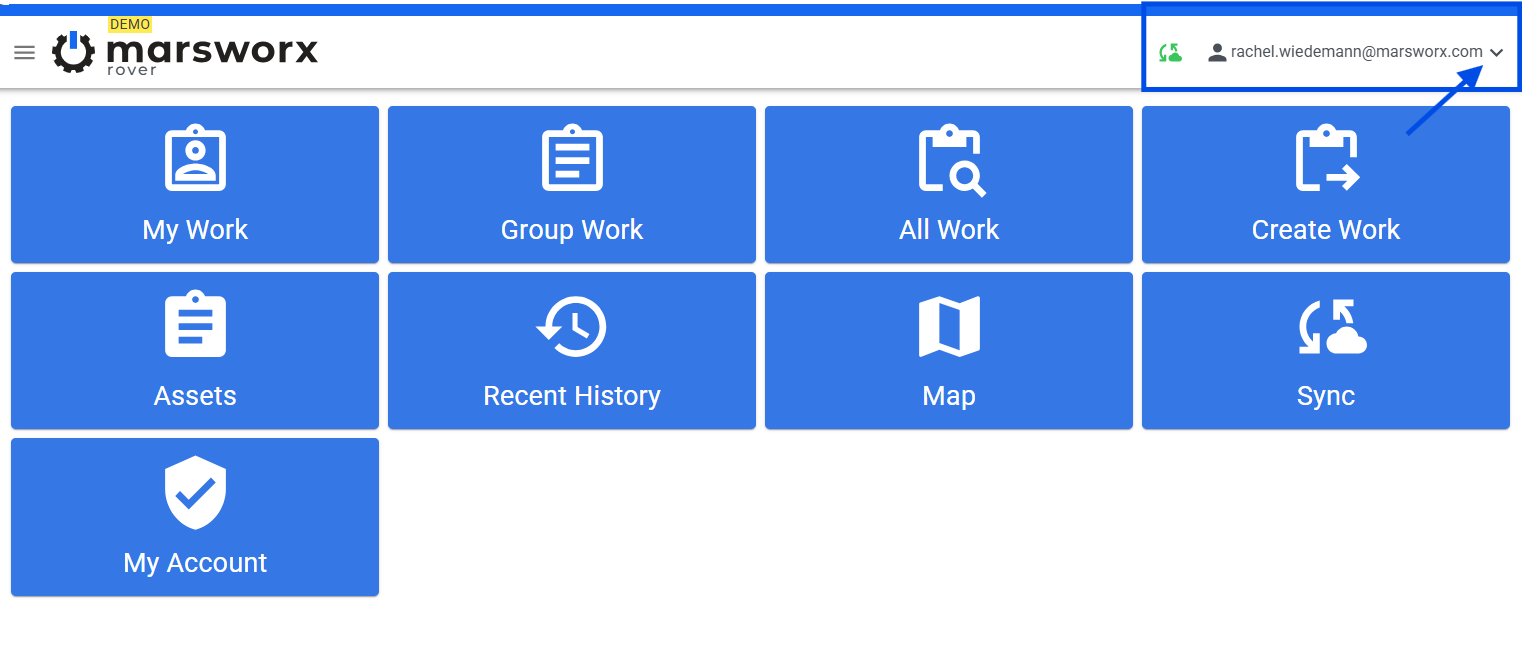
Below is an example of how a User's My Account Details may appear.
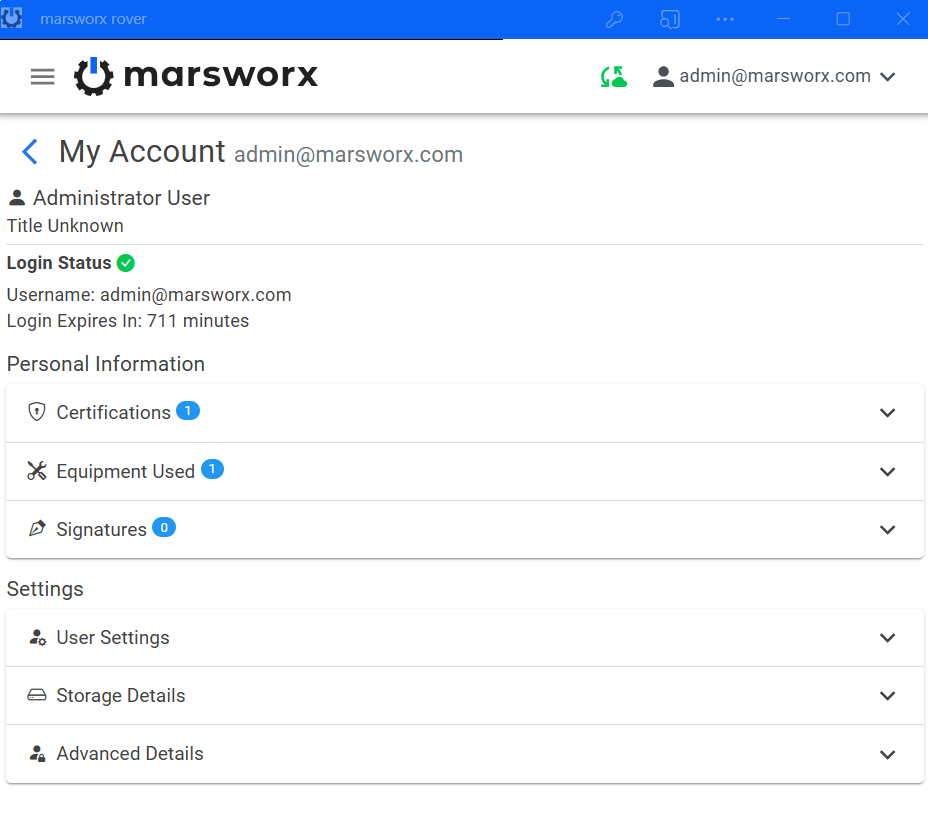
Choose the drop down on the right to manage personal information.
Add new or manage existing.
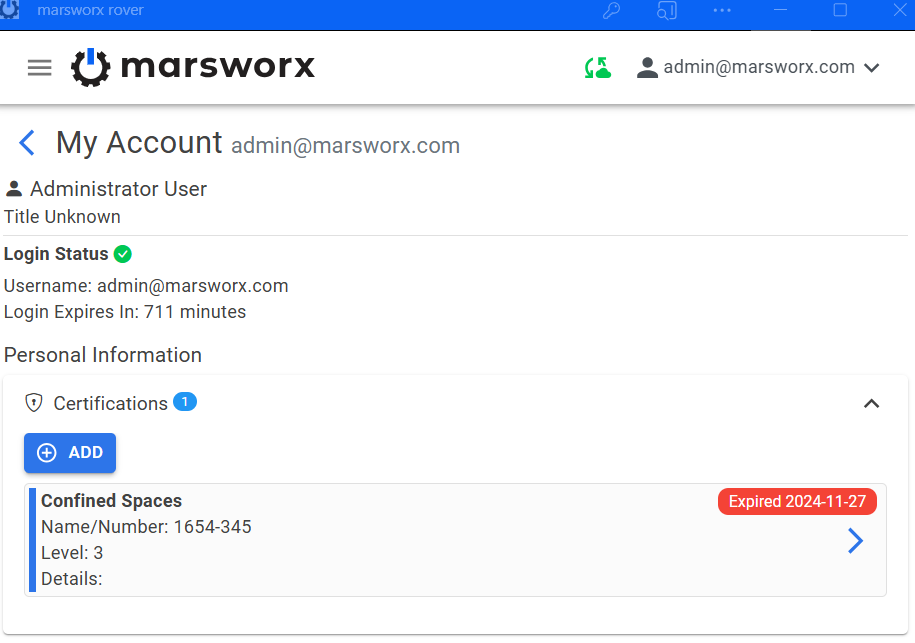
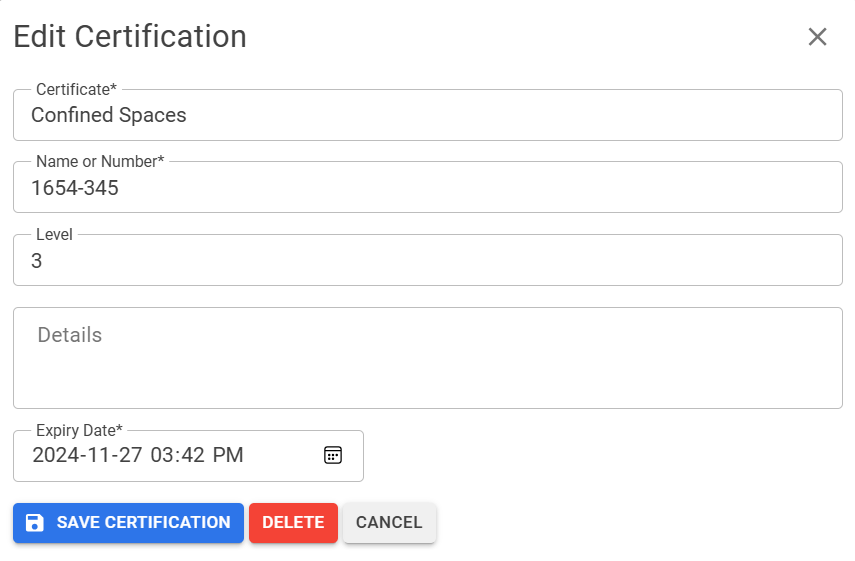
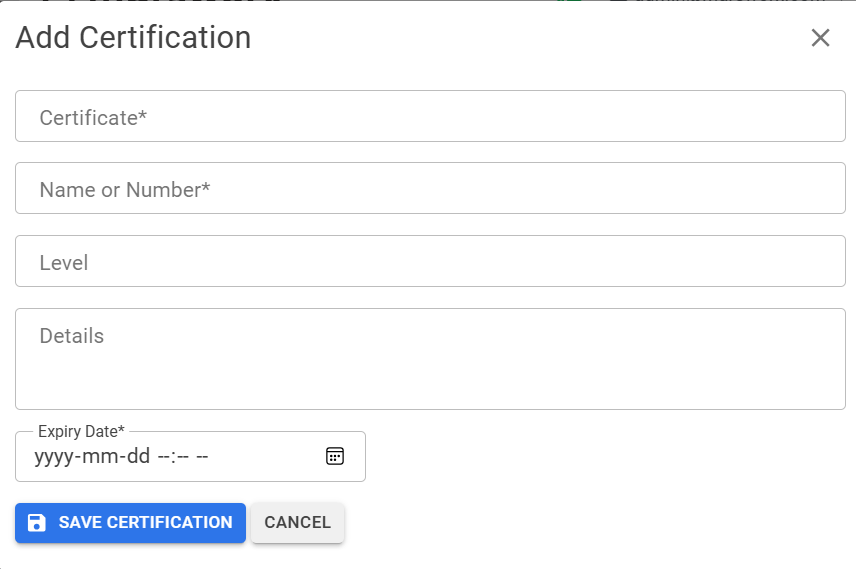
Signatures are added here and stored for each User.
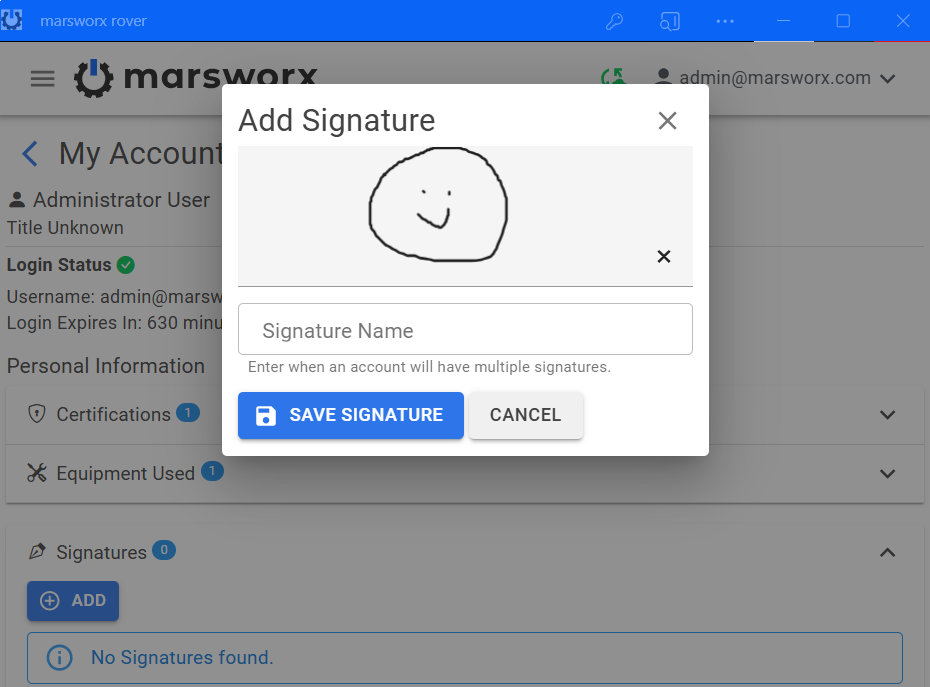
Settings menu appears different depending on a User's profile and permissions.
Settings include the ability to configure a User's home screen view and UI as well as system information used for trouble shooting purposes.
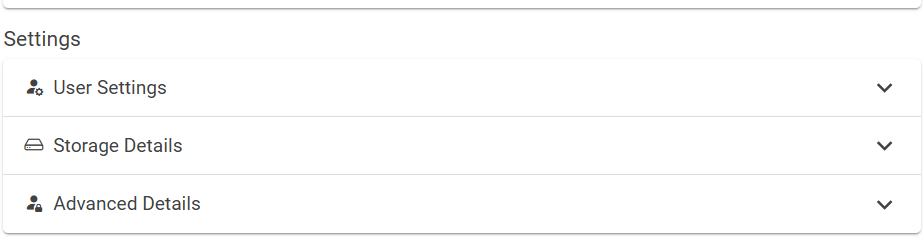
Under User Settings is where a User may turn on and off different tiles aailable on the home pae dependant on profile and permissions.
Admin mode is only avaiable to those with Admin privileges.
All Users may turn on Support mode. This allows many features including:
A ? Question mark to be visible throughout Rover allowina Admin or a marsworx Team member to better assist an issue A User may have.
Support Mode allows for Support Tools available for resetting data when appropriate or required.
Support sync becomes available which allows a User to sync chosen specific data. NOTE: This would generally be at the advisement of and Administrator or marsworx Team Member.
Dark mode allows screen background to appear black or white.
Auto Sync on Event Finish allows for two(2) buttons to appear when syncing an Event. Finish button and Finsh & Sync button. Note: One Finish & Sync button is the default choice.
Show Assets Lookup. Typically accessed by Administrators only.
Show Hierarchy. Typically accessed by Administrators only.

Storage Details drop down includes storage information for a User's device.
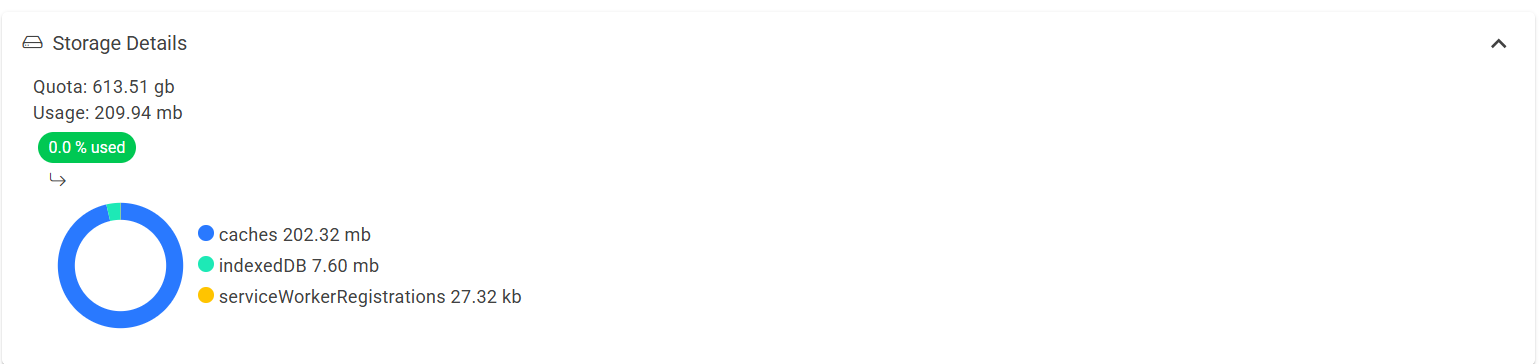
Advanced Details drop down allows a User to view which profiles and privileges they are curently assigned.

FAQs Rover
Q: How do I change my personal settings?
A: At the top right of screen, beside your email address, is a drop down which takes you to personal information and settings as shown below:
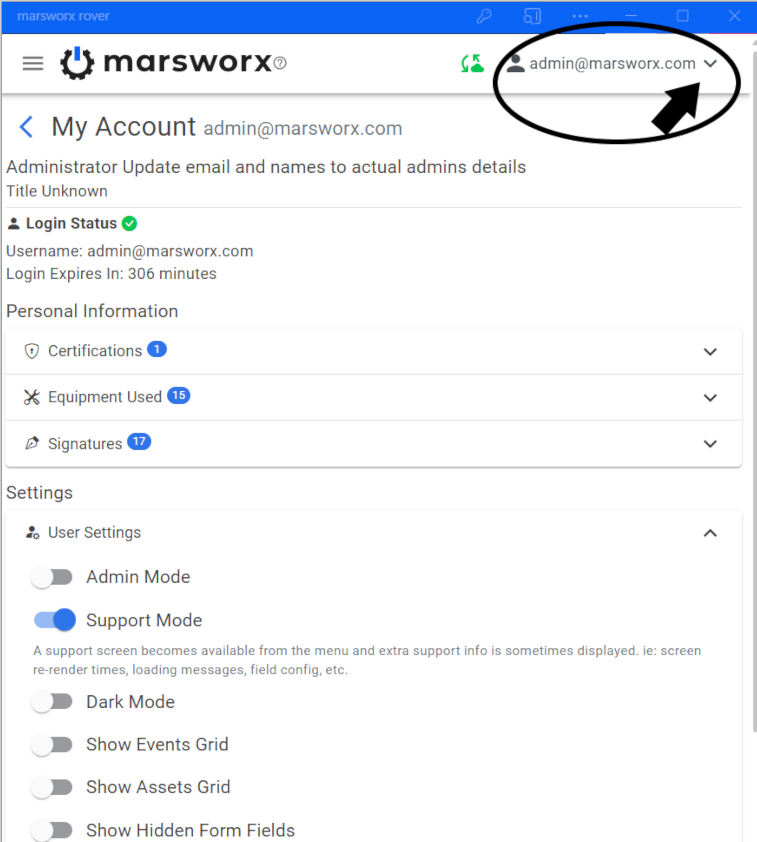
- Add certifications, equipment used, or add User's signature to be added to completed work.
-Turn on Support Mode which will assist in trouble shooting if User encounters an issue.
-Change the UI to be dark or light mode screen.
- NOTE: User's permissions and profile determines what is visible or manageable on this screen and is defined by your Administrator.
Q: How do I add my signature to an event?
A: A User's signature must first be added to a User's Account Details.
In the finish tab of an event, there MAY be an opportunity to add User's signature. The screen may appear similar to below:

Click on the Add Signature box
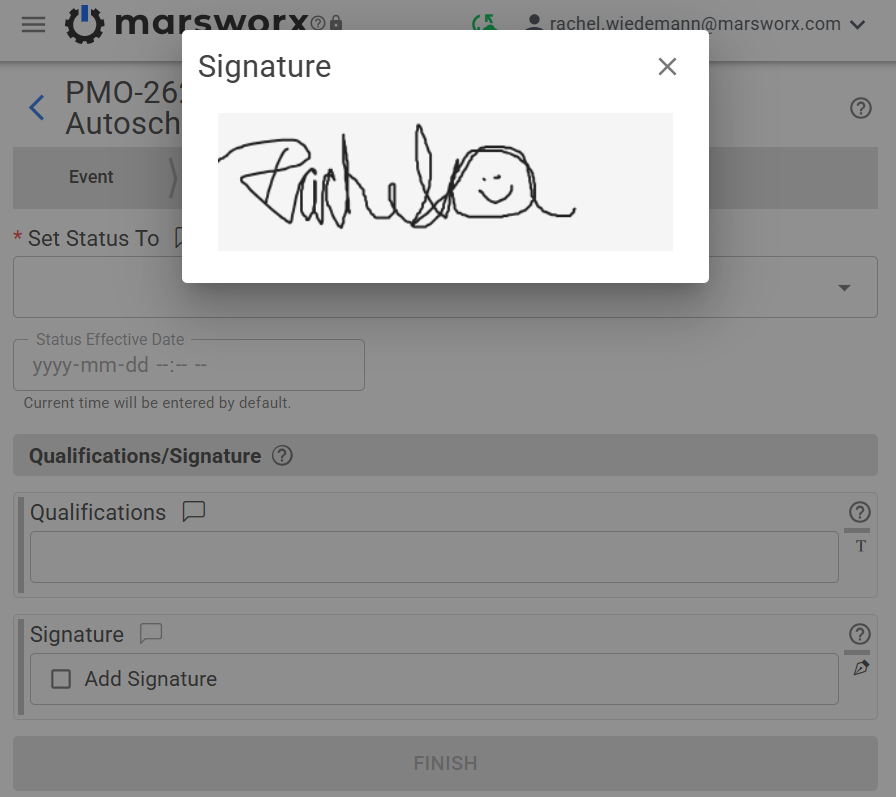
Press on the signature and it will be added to the event and available for viewing in reports in the event editor in Desktop.
Q: How do I reassign work to another User on Rover?
A: Open work event you wish to edit the Assignee. Scroll down on Event tab to Assigned field
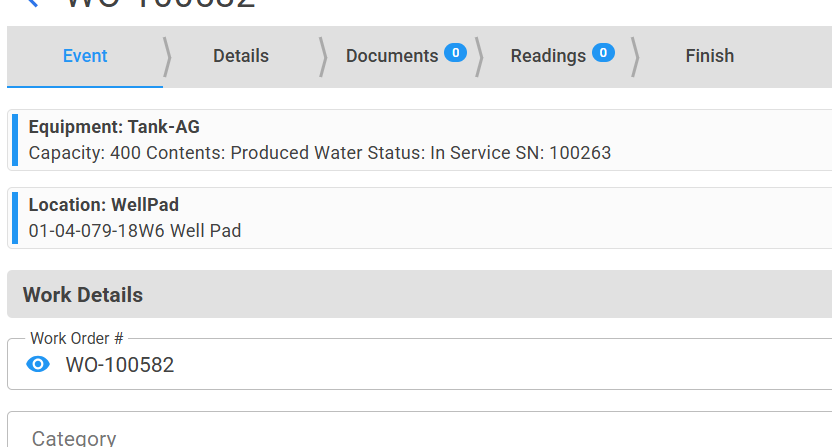
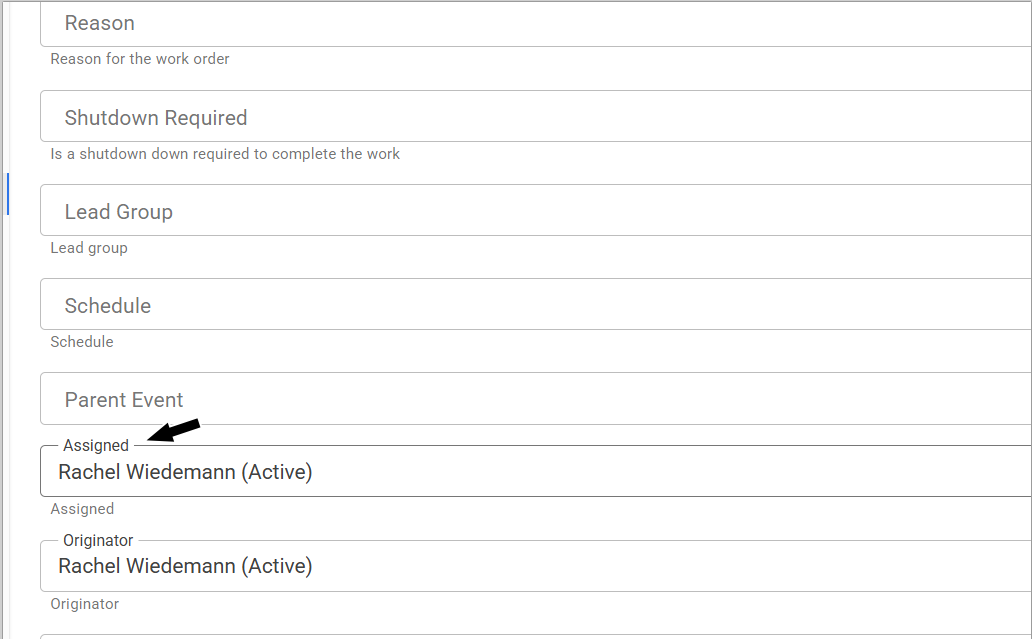
Choose the Assignee from the drop down menu on the right. Filtering is available to narrow your search.
Quick SYNC your device and the Event is now successfully reassigned.
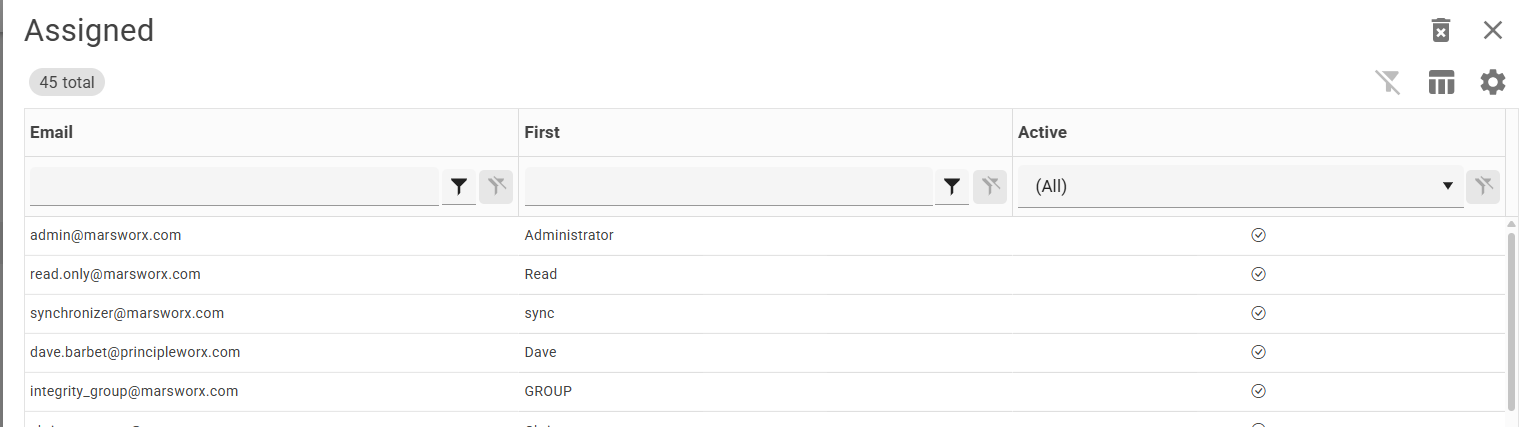
Q: How do I edit photos?
A: Navigate to the photo to edit by opening the event and navigating to the Documents tab
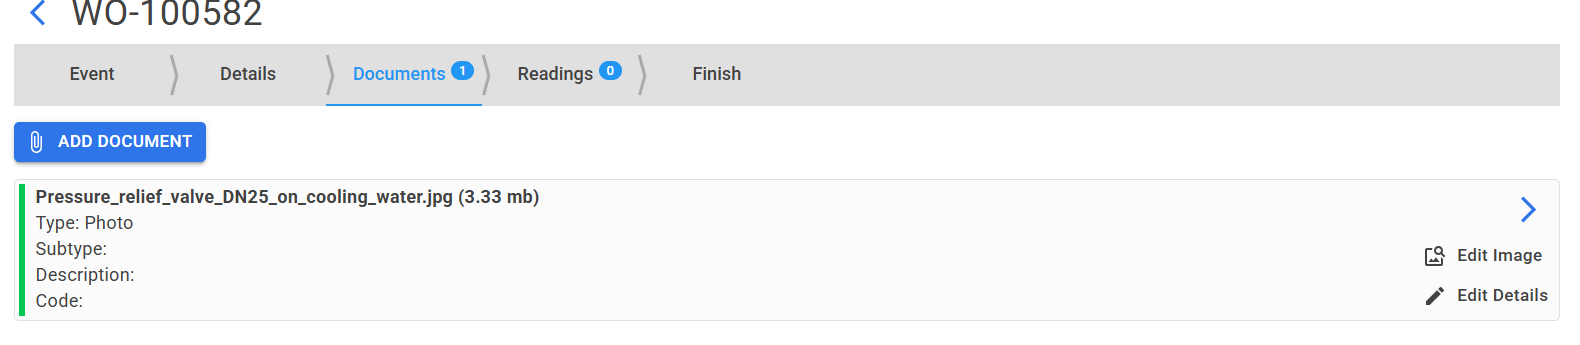
Here you have the option to add another document or open the existing document by choosing Edit image on the right.
When Edit image is chosen the screen will look similar to this
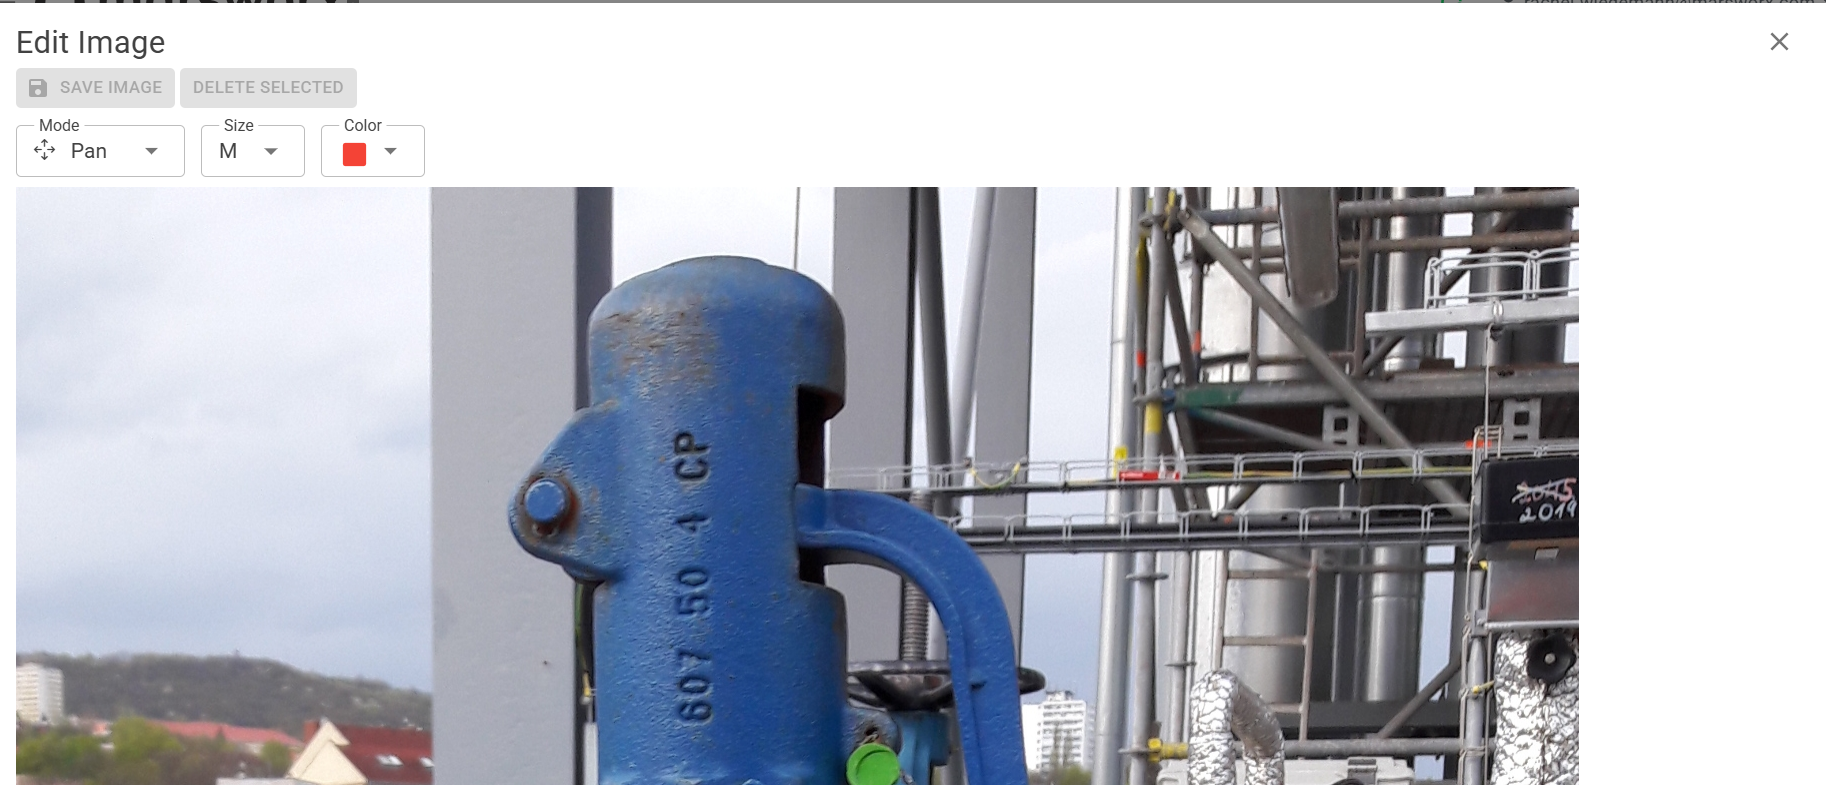
In the Mode filter a User may choose the following:
Pan - allows you to move photo around with finger or mouse to focus on a desired area
Circle - Choose circle and hold down finger or mouse to choose location of circle and zoom circle to size desired.
Arrow - Choose Arrow and hold down finger or mouse to position arrow and choose direction of arrow.
Text - Choose Text and double click to produce a text box to enter text then cick away from text box. User may now move text box to desired location on photo.
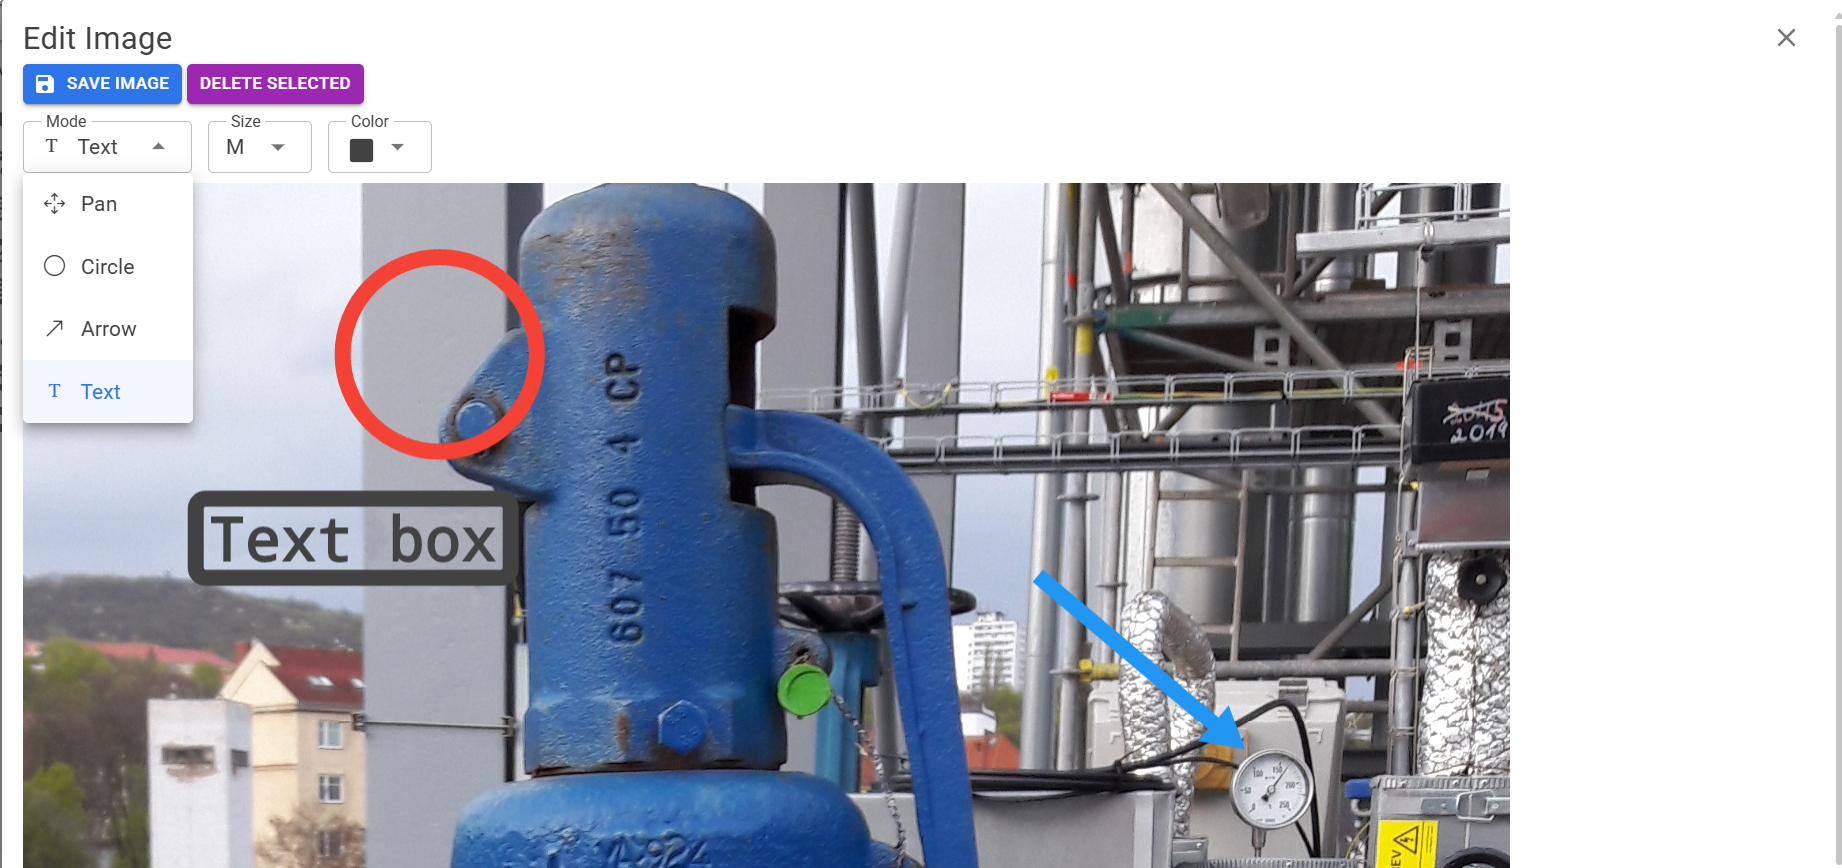
The Size filter allows User to choose the size/thickness of the circle, the arrow and the text.
The Color filter allows user to choose the color for the mode you choose.
Size and Color must be chosen BEFORE choosing the mode.
To delete a circle or arrow or text box, click to select until appears with dotted line as shown below, then select Delete Selected at top of screen.
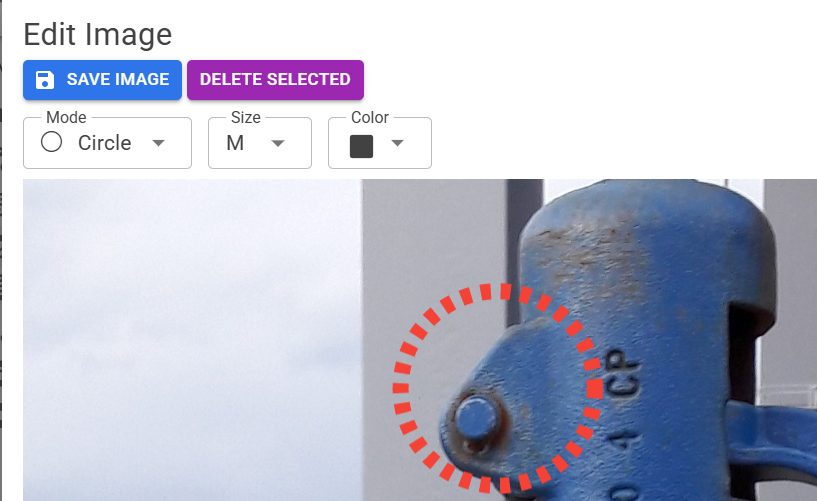
When editing your image is complete, choose Save Image at top of screen.
Rover Event Management
Rover Finding & Completing My Work
Navigate to the My Work Screen from the home page.

My Work page will display all work assigned to oneself.
Below is an example of how a User's My work screen may appear.
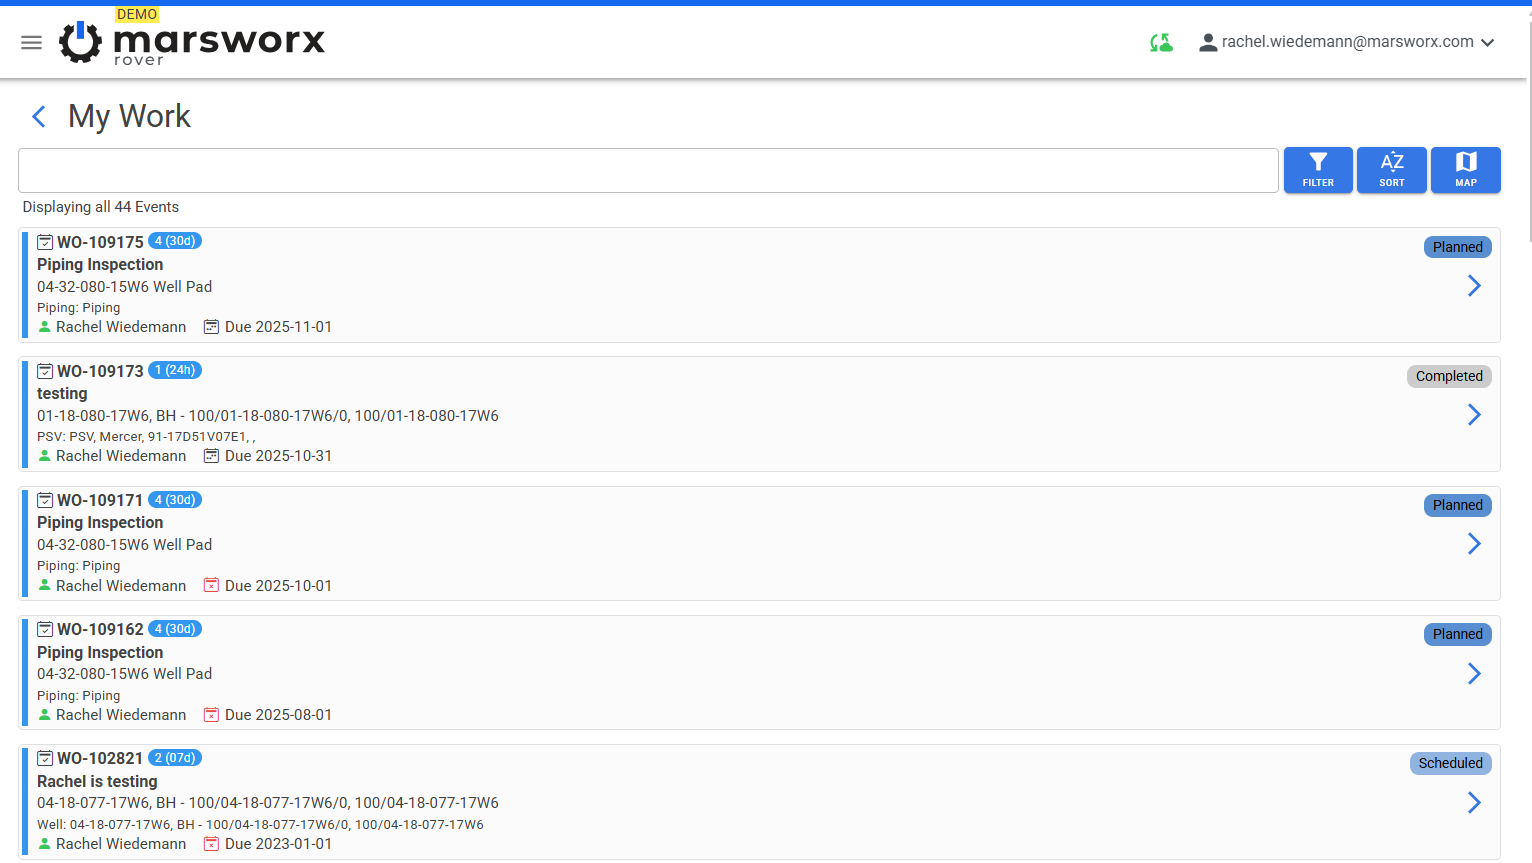
Use the global search to filter by any information found in Event tiles. Example with the above screen could be name of Location or description of Event.
The filter icon opens a window similar to below.
Check one or several boxes to manage your My Work screen view then X out of window.
Below, Scheduled is chosen.
Press RESET to clear filter.

Sort allows User to sort by Ascendng or Descending a selection of choices.
Click the selection to sort by. Click again to switch sorting up or down.

Choosing Map Icon from top left of screen opens My Work on a map view. User may view work at a Location and open Work to complete.
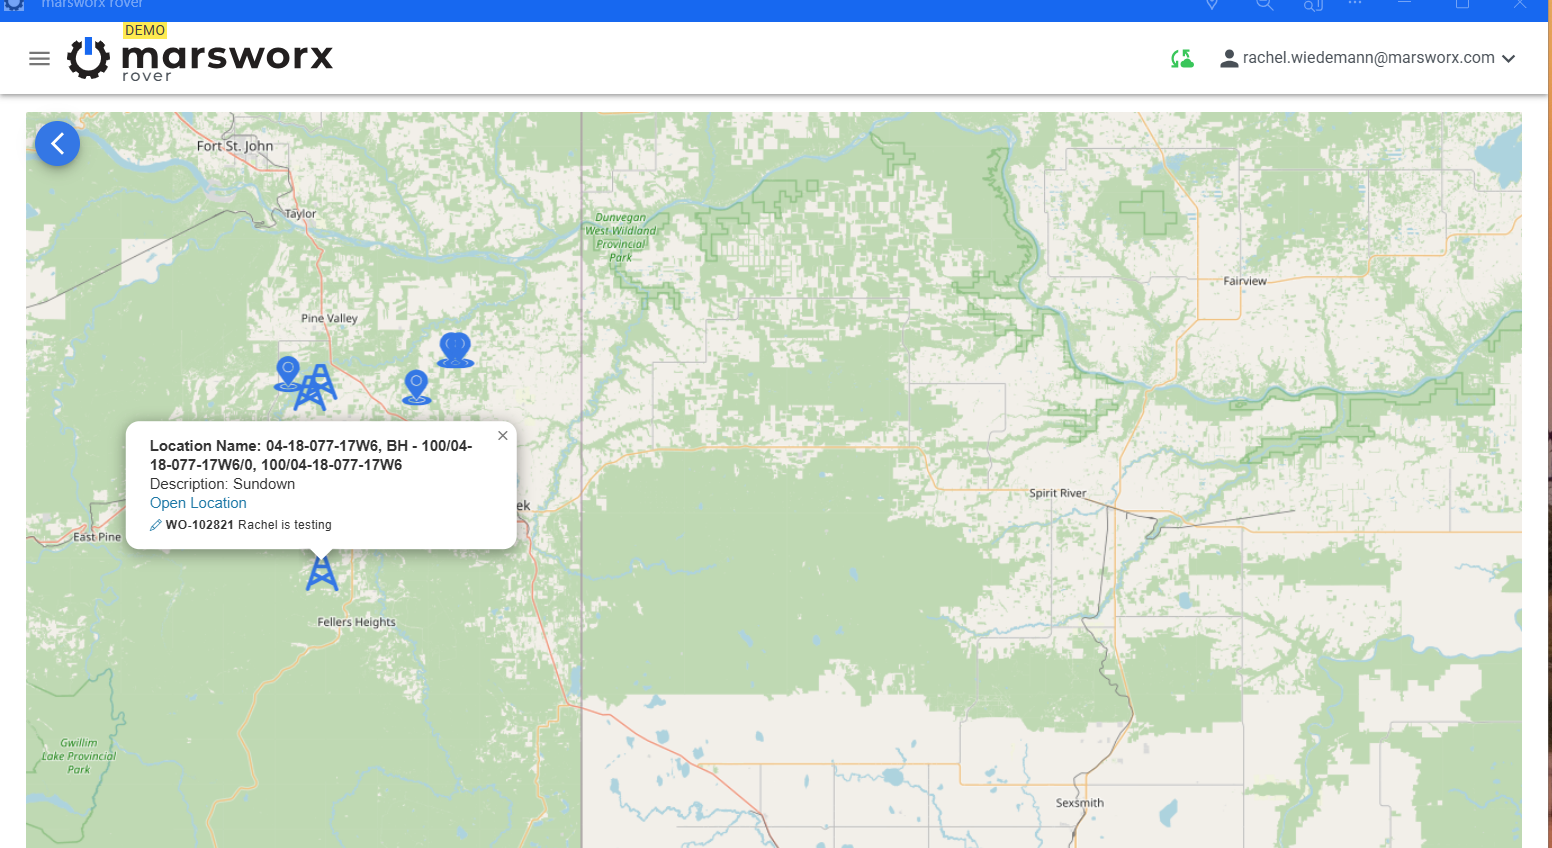
Once User opens a Work Event, the screen may look similar to below.
Note: the view of a Work screen is configurable and managed by Administration.
Work screen may contain no Tabs or up to 5 as shown below.
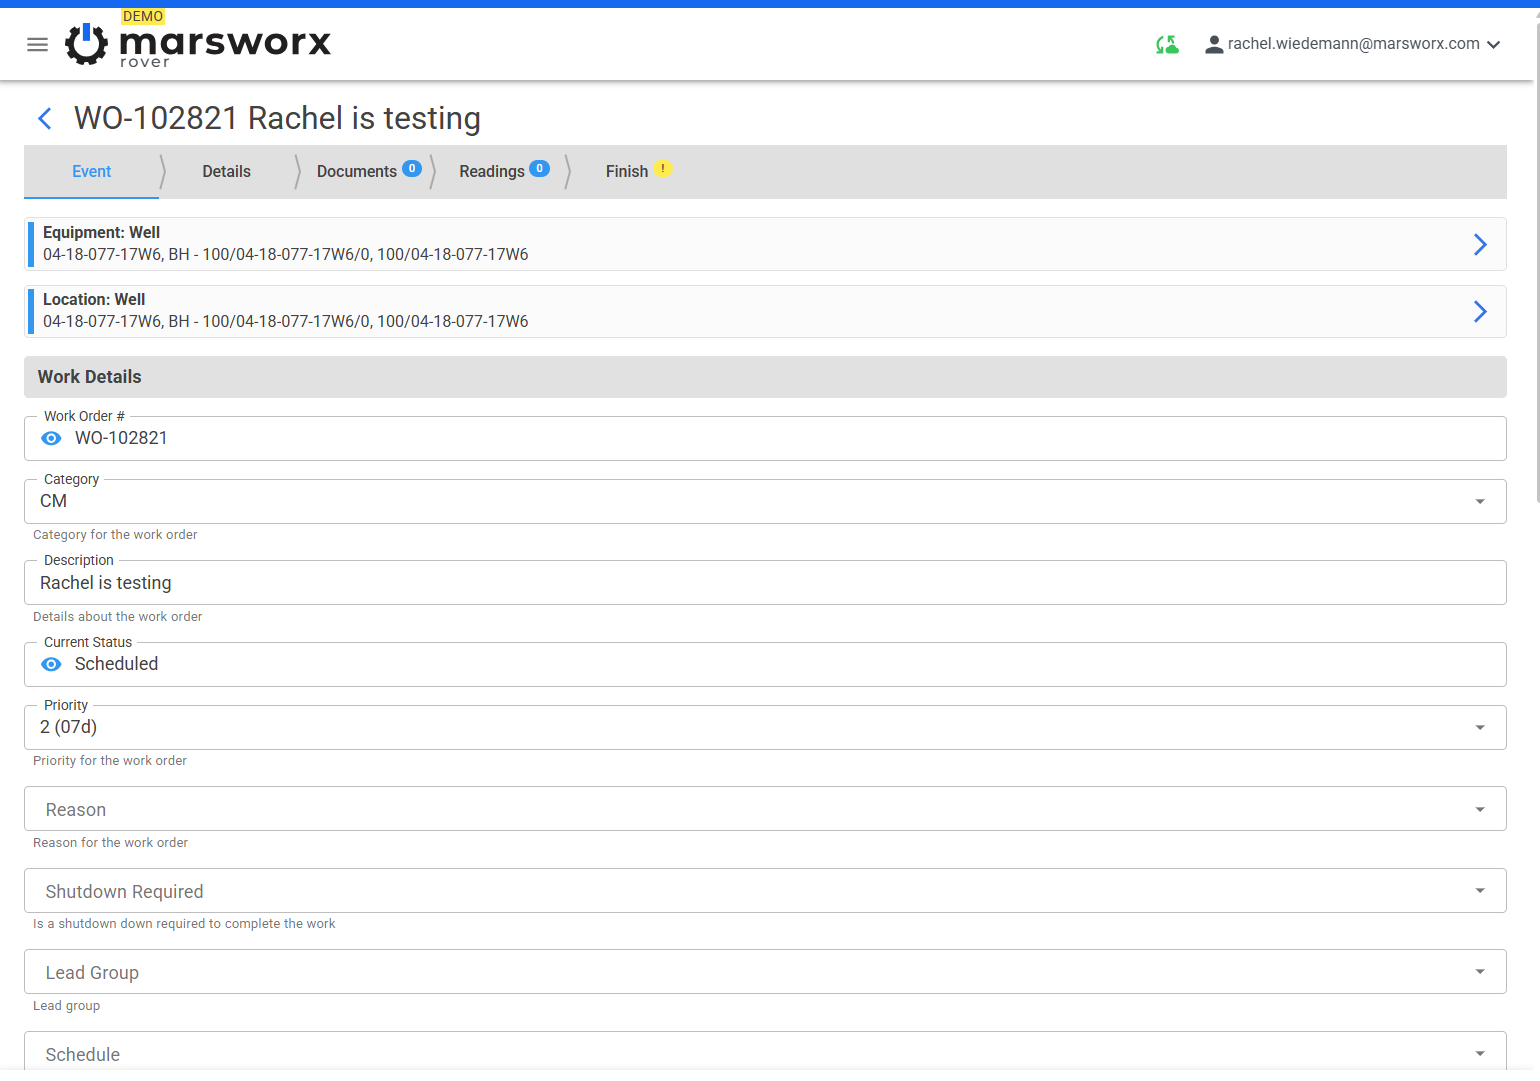
Event Tab - displays typically, Work details, Planning & Scheduling information, Completon Details. The Information and data shown on this screen is configured by Administrators. There may required or non required fields to populate on Event Tab.
Details Tab - Contains Safety, Tasks, Instruction, Material, Tools, Costs and Certifications. Please see Support Page on Details Tab for more info here.
Document Tab - User may add Photos here or have required Documents to review.
Readings Tab - Contains all the Readings for a Work Event to be completed.
Finish Tab - Used to change and Save Status change and SYNC Work Event. May also contain completon readings.
Completing a Work Event
Navigate to the Readings Tab.
All required Readings are denoted in RED. Non required Readings are denoted in Grey.
In the Below example, The first Reading "Issue Description" is a required field AND the comment box is required also. User must fill in field and click on comment box to provide a comment.
The Unit Operating Hours has already been filled in so the red bar goes away but the red asterisk indicates this was a required Reading.
The Reading " Photo of Issues" is not a Required Field as indicated by Grey.
Complete all required Readings before advancing to the Finish Tab.
Note : Reading Tab at top of screen contains a purple circle with a 6. This indicates there are 6 Readings to complete. The purple color denotes these Readings have not yet been saved, synced, uploaded.
The color purple in Rover denotes data waiting to be synced.

Navigate to the Finish Tab. Note the yellow ! in Finish Tab header. Yellow in Rover denotes Attention is required.
Below is an example of how a Finish Tab screen with Readings may appear.
Note: the Readings are not required. The Set Status to IS required.
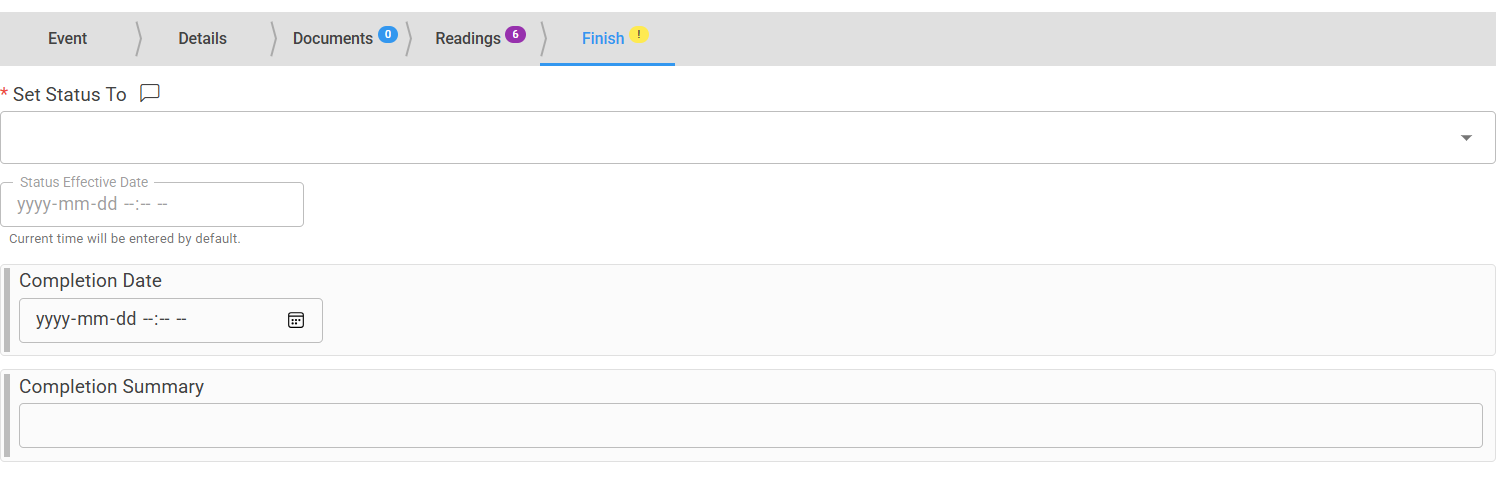
Choose Status to change this Work Event to with the arrow drop down to the right of screen.
Available Statuses will appear.
Choose appropriate Status.

Once Status is chosen, the FINISH AND SYNC button appears in blue at bottom of screen.
Click here to save the Status chosen AND Sync this Work Event.

Rover Assign Group Work to Oneself
From the Home Screen, choose Group Work.

Screen will appear similar to below.
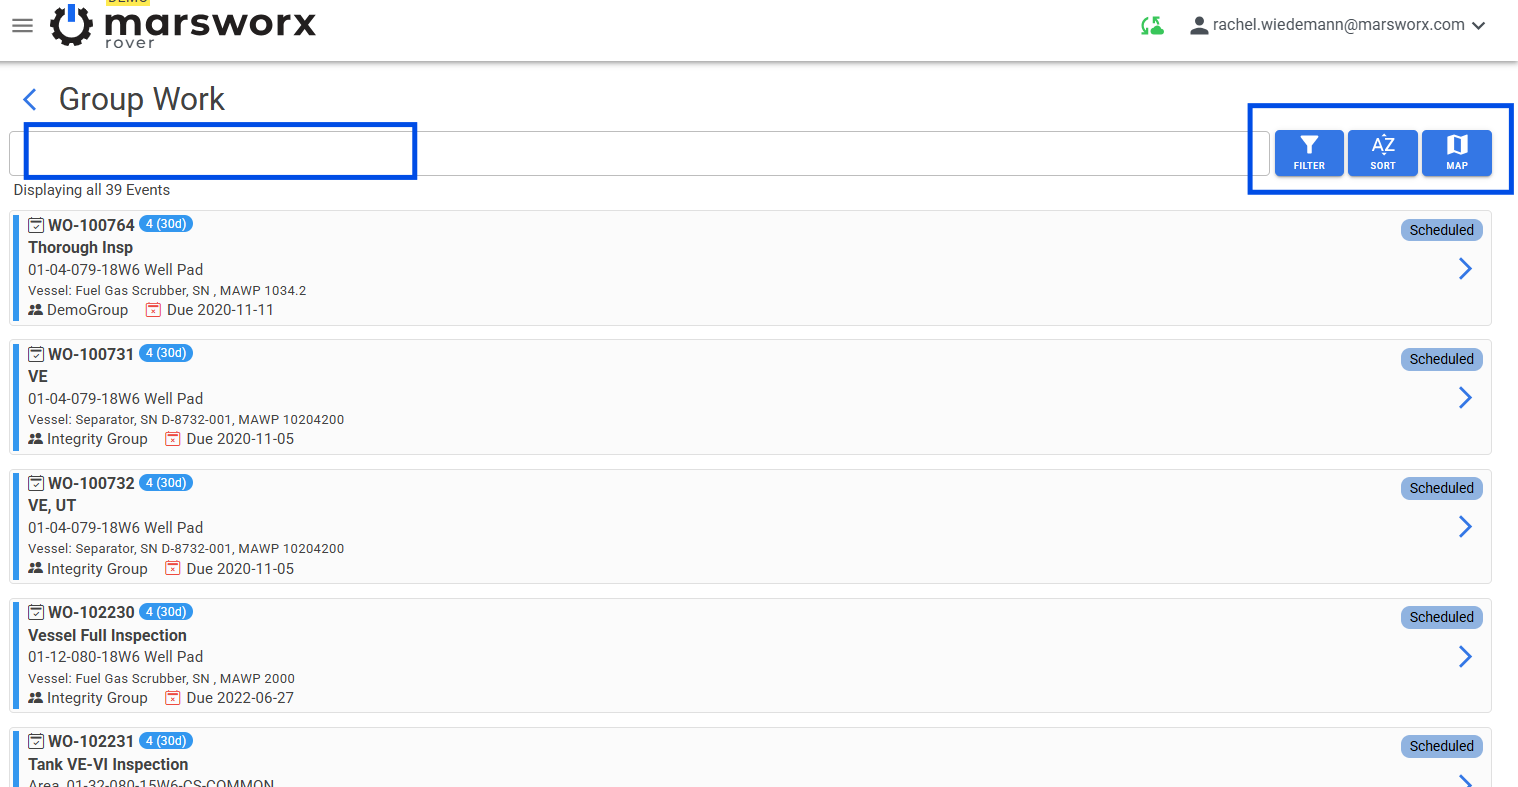
Use Search bar to filter your view by data found in Work tiles.
Access filter icon on the right to choose a Status or specific Group(s).
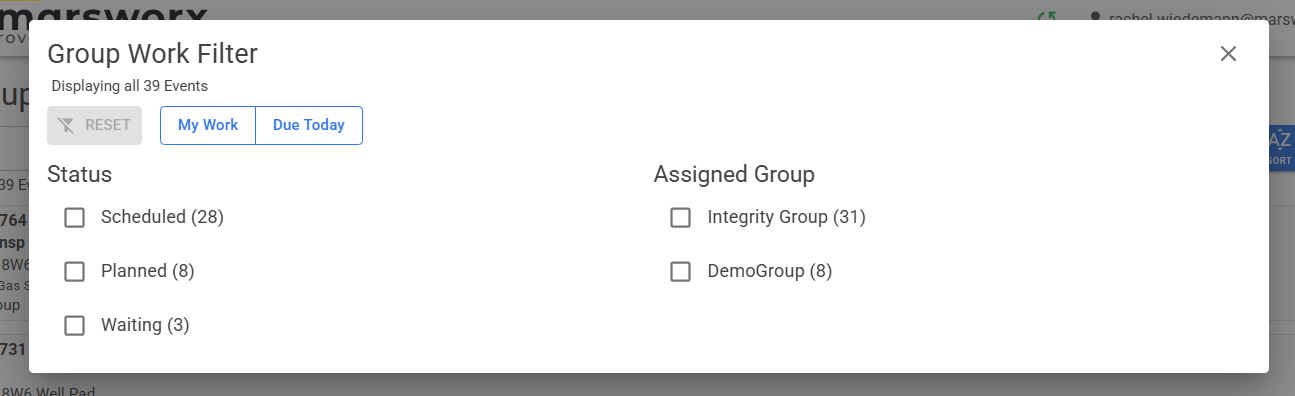
Choose Sort A-Z to filter by descending or ascending on a selection of choices.

Choose Map icon to see all Group Work in a map. This is useful for view all Work in a broad area.
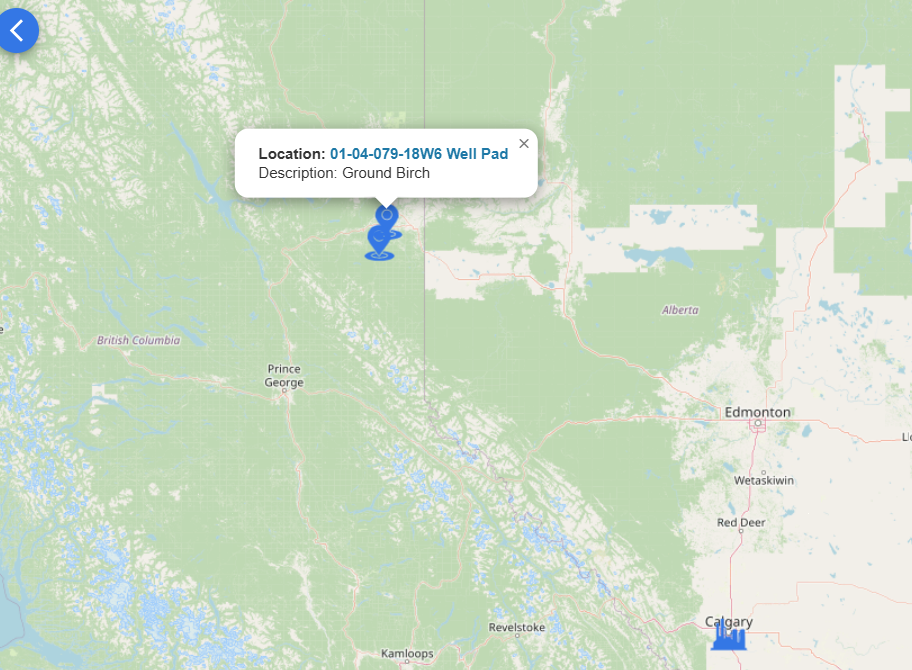
In below example, Work is chosen from Group Work Screen and entered into via arrow on far right.
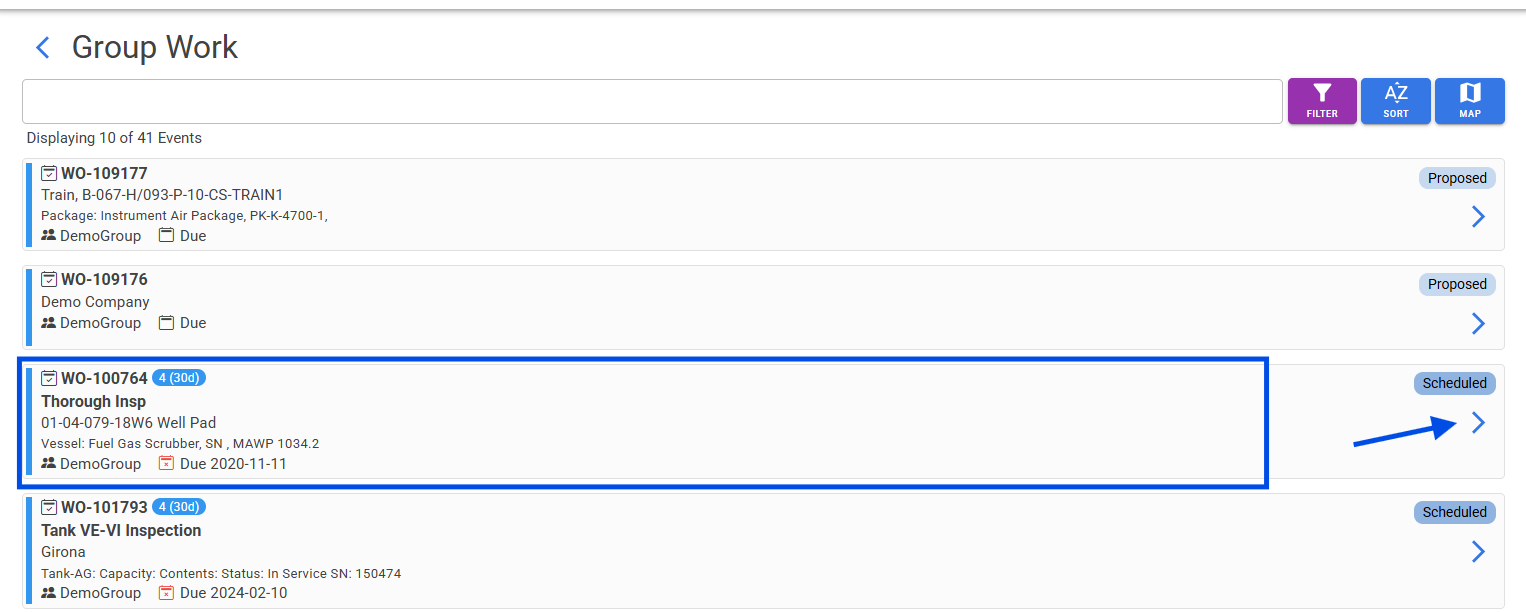
Screen will be similar to below.
Note: this is a subset of data. All data will be loaded once SYNCed. This avoids large quantities of Group Work on a device taking up too much storage. Instead, Rover syncs all data as Group Work is Assigned AND synced.
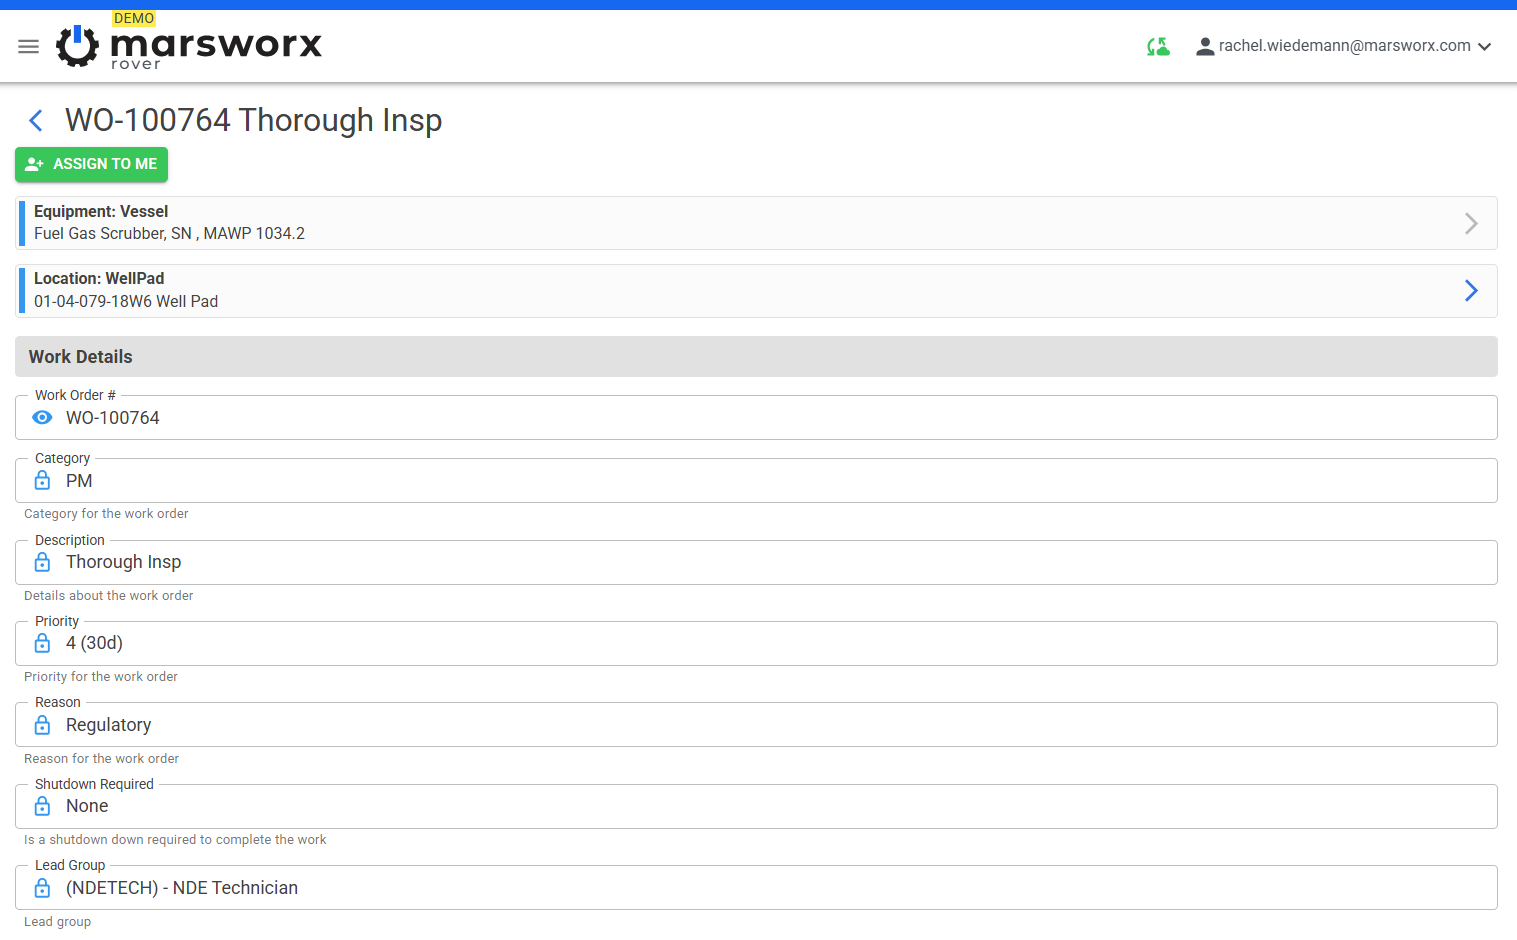
Choose ASSIGN TO ME at top of screen. Event is now added to the My Work screen.
Notice top of screen allows User to ASSIGN TO GROUP if desired to switch back.
Event is now added to the My Work screen. Choose SYNC. Device must be synced to load all Work Event data for User to complete Event.

After device is SYNCed, reassigned Group Work is now visible and ready to complete in My Work screen.
Details in tile indicate this Work was Assigned to Demo Group and reassigned to Rachel

Rover Create an Event
Creating an Event from Home Screen
Navigate to the Create Work tile on the Home screen

The followng screen will open to Choose Location and Equipment.
Use drop down menu to choose a Location or the Search bar or use both.
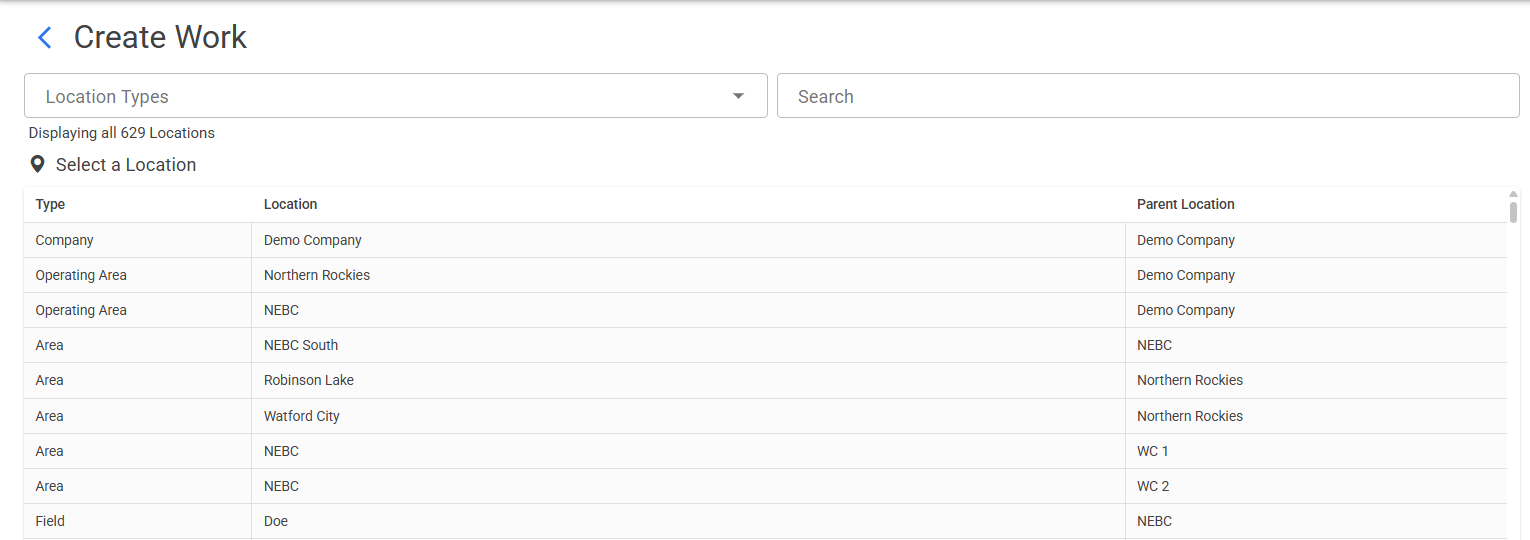

Once the Location is chosen, the associated Equipment appears.
Use the dropdown flter to choose Asset or the Search to narrow your result or both.
Note: Asset at top of list is the Location that was chosen. User may choose to create Work to Location here.
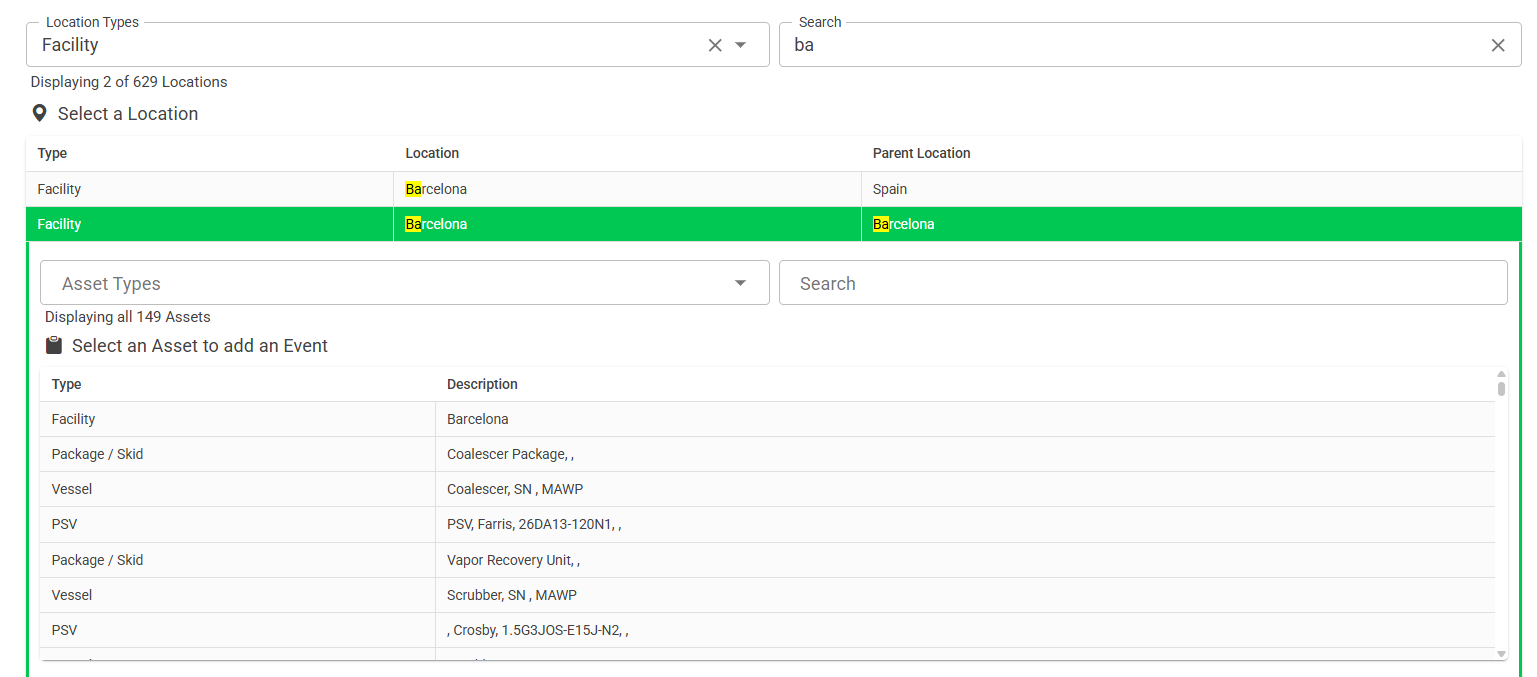
When the desired Equipment is chosen, the ability to Add Event appears.
Choose ADD EVENT

The Add Event from Template screen opens similar to below
Templates available are determined at the Group Template level in Admin in Desktop.
Note: please see Can Create New Templates via Groups support page for more info.
Choose desired Template from below.
Note: Templates are organized by Category.
Use Search bar to locate Template if desired.
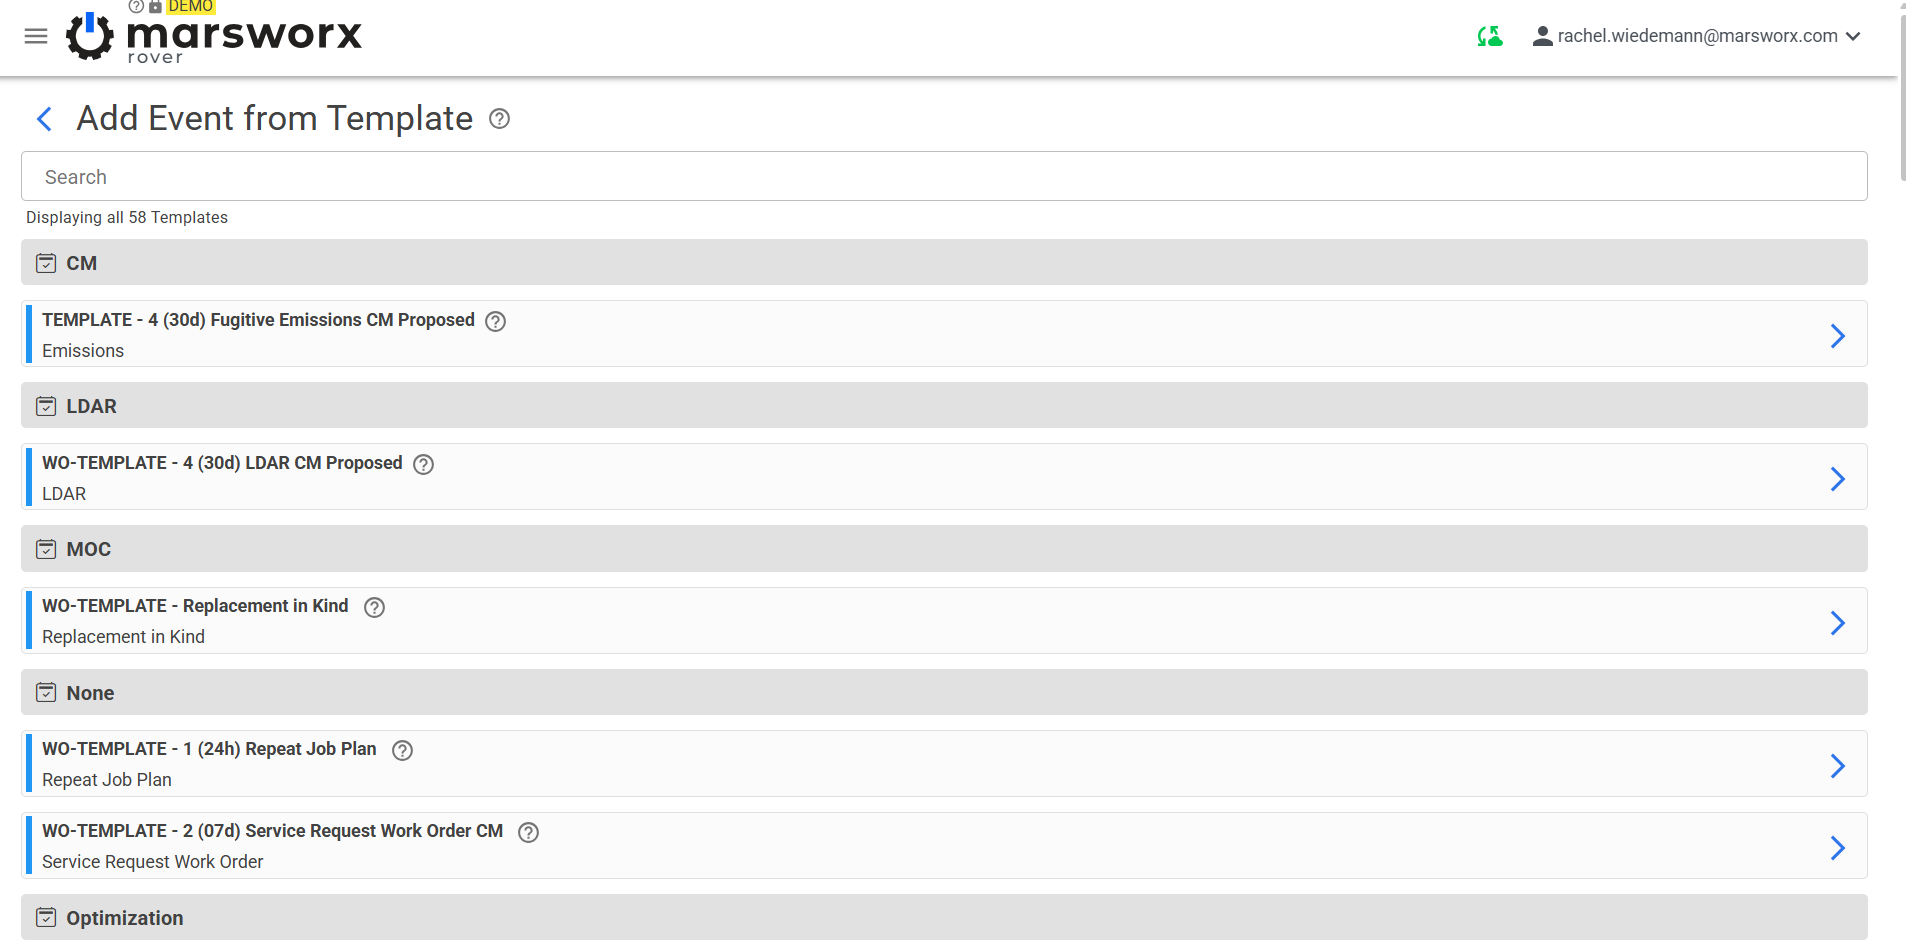
Once Template is chosen, a Work Event will appear.
Screen may vary greatly depending on which Template is chosen.
Below example is a Routine Work Request Template with 3 tabs.
Note: UNSYNCED Work Event may be deleted by choosing garbage can icon at bottom of screen. User may then choose another Template if desired.
User fills in required fields.
Go to Finish Tab and change Status and SYNC.
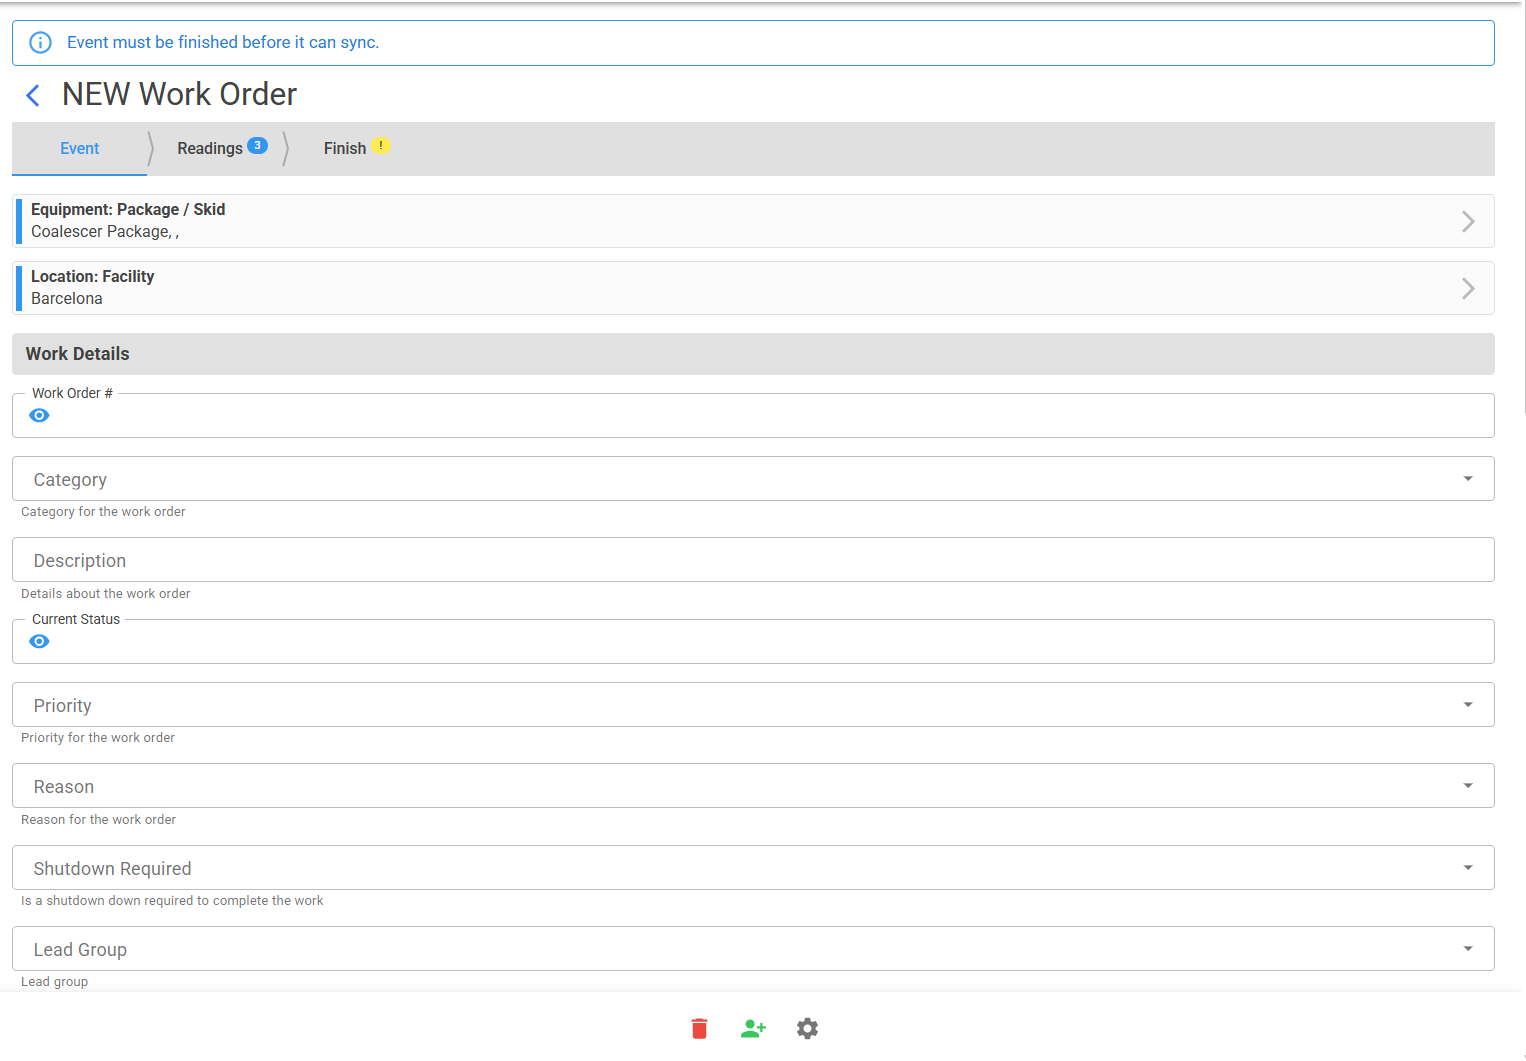
In the above Template, first, the "Assigned" was chosen on the Event tab.
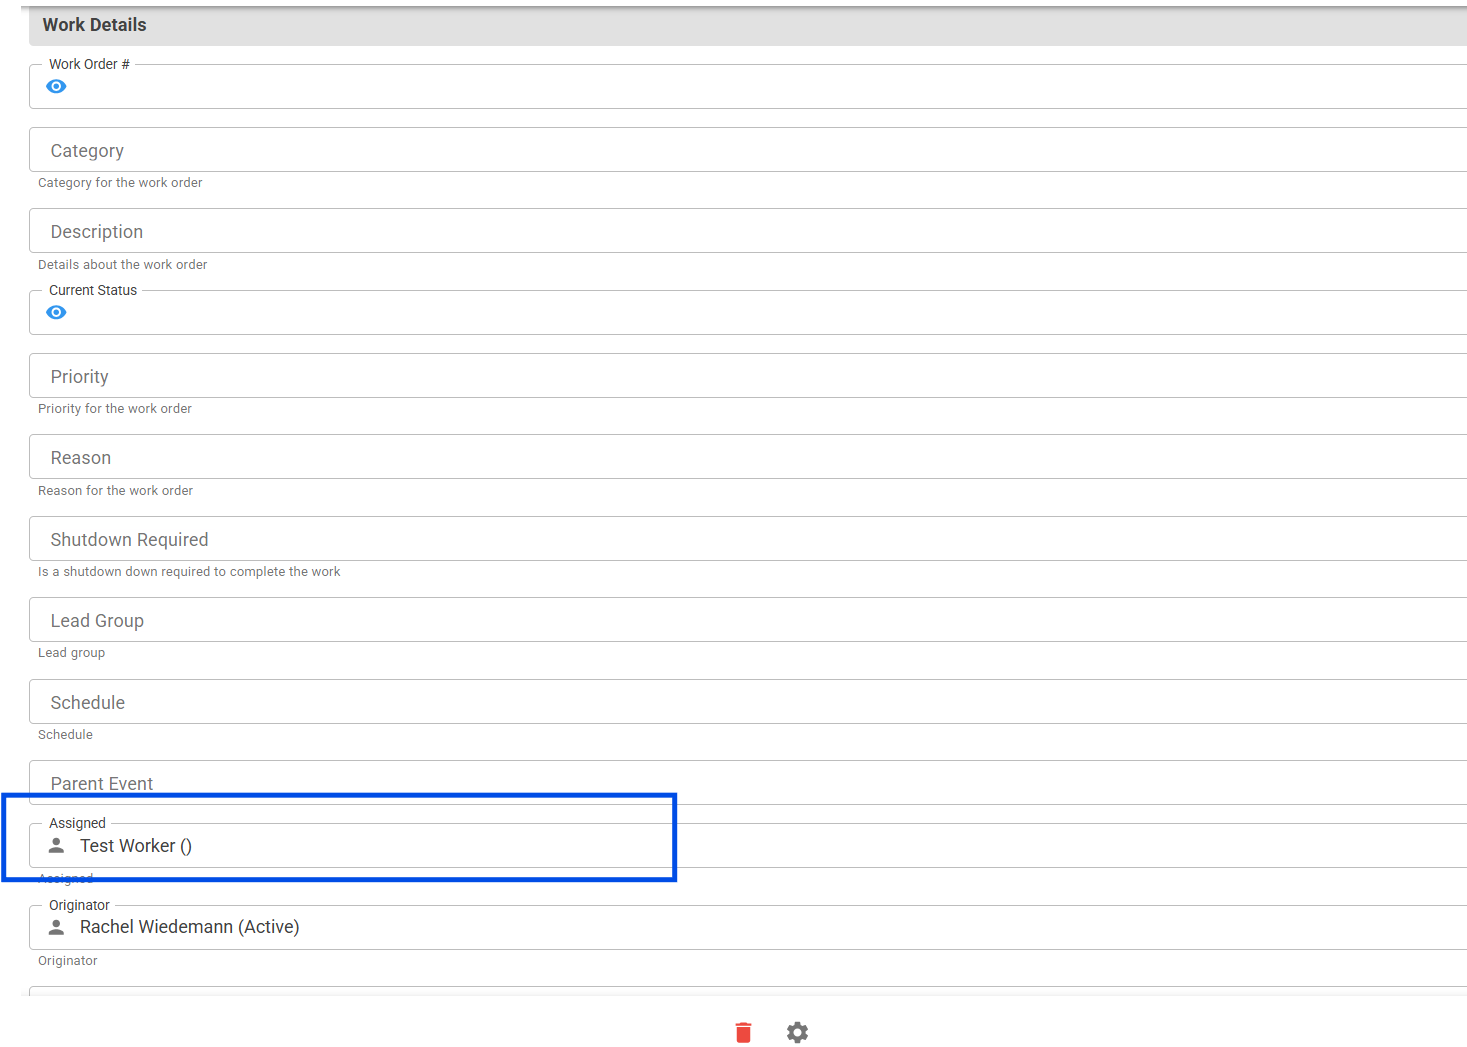
Then the required Readings were completed on the Readings tab. Red indicates required fields.
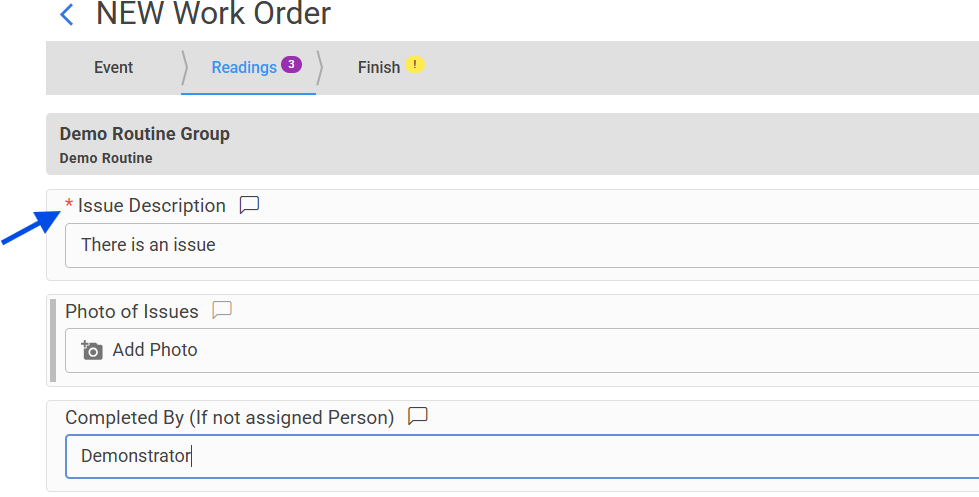
Go to Finish tab. Choose Status and FINISH & SYNC
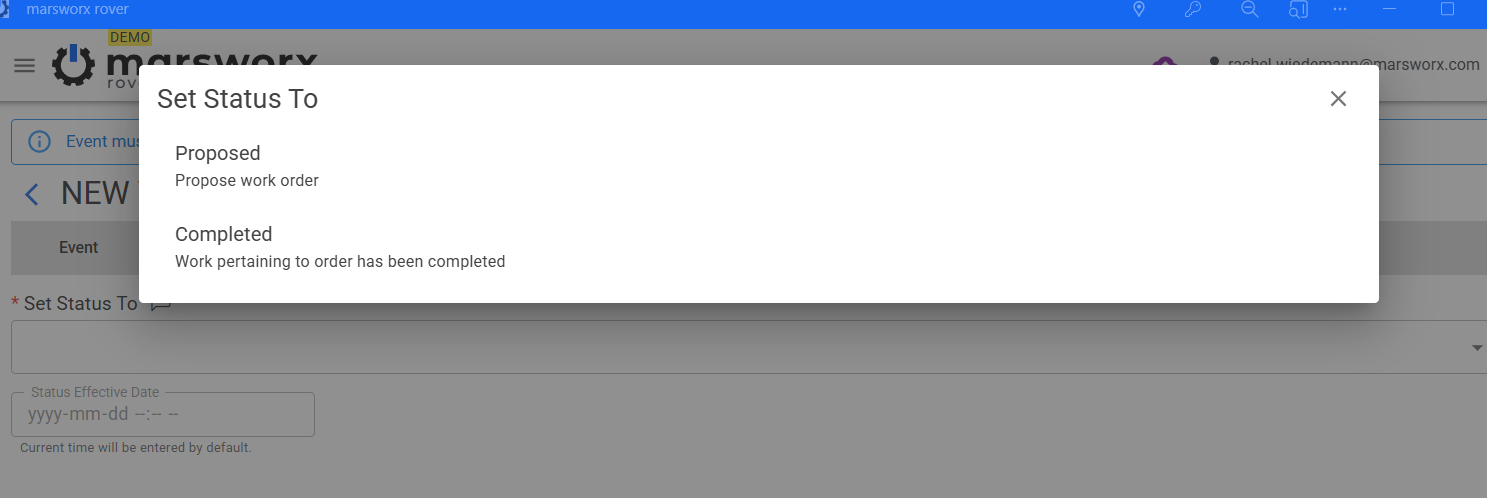

Please refer to all Support Pages on Event Management in Rover for best understanding and success.
Rover Details Tab
mars rover Details Tab
The Details Tab contains valuable information pertinent to Events and personal Accounts.
For Administrators, some Detail Tab information is managed in the desktop application when creating Event Templates such as Tasks or Safety instruction.
Details information is also managed in My Account Details.
Information populated in the Details Tab will be included in the Completed Event Report in desktop.
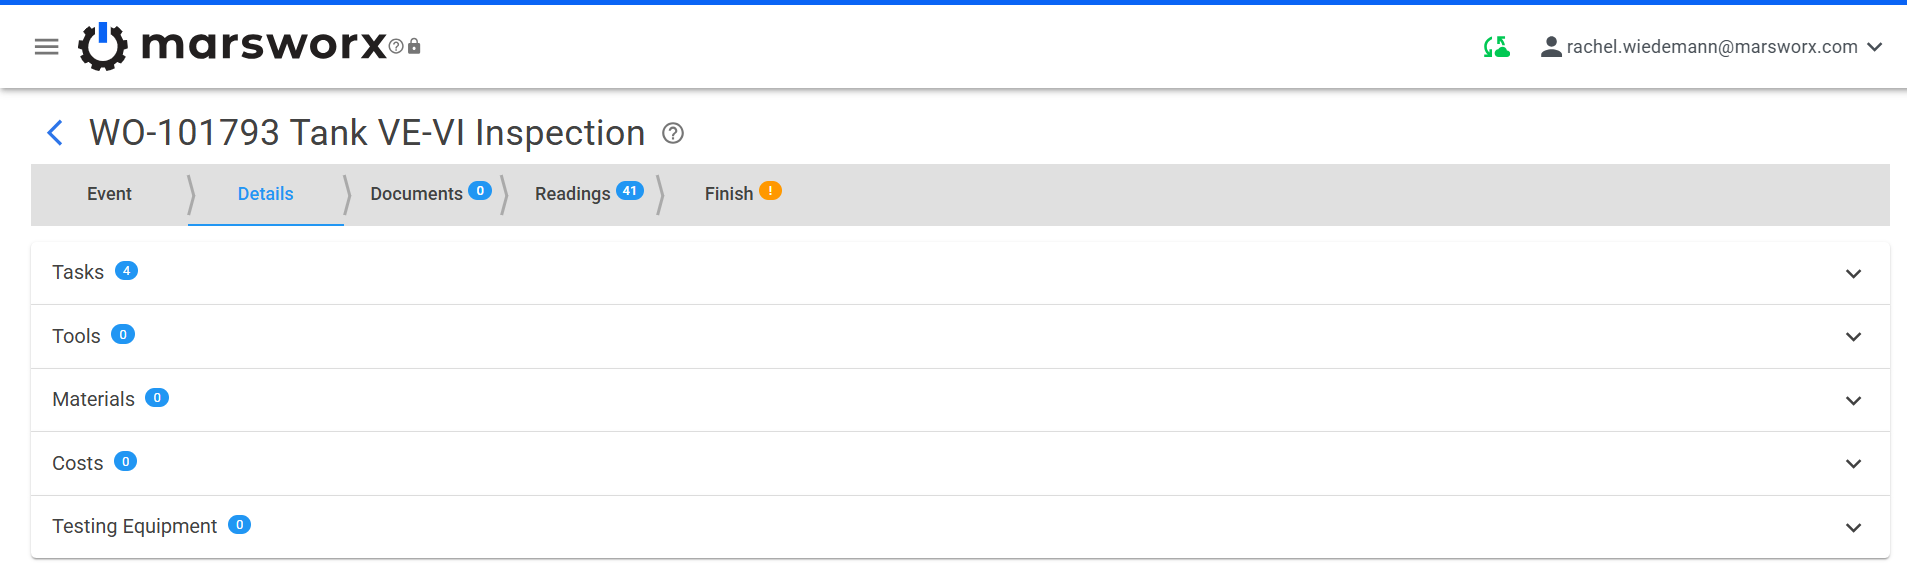
Above is an example of some of the details a User may find in this tab.
Users access the drop down menus to manage or edit or populate.
Tasks are identified in the job plan/Event Template and may be indentified as required by a certain status.
Safety instructions would be housed here also and would appear as a red notification on the Details Tab header if required by User to view before beginning work.
Below is an example of a Task needing completion. Fill in the fields and close.
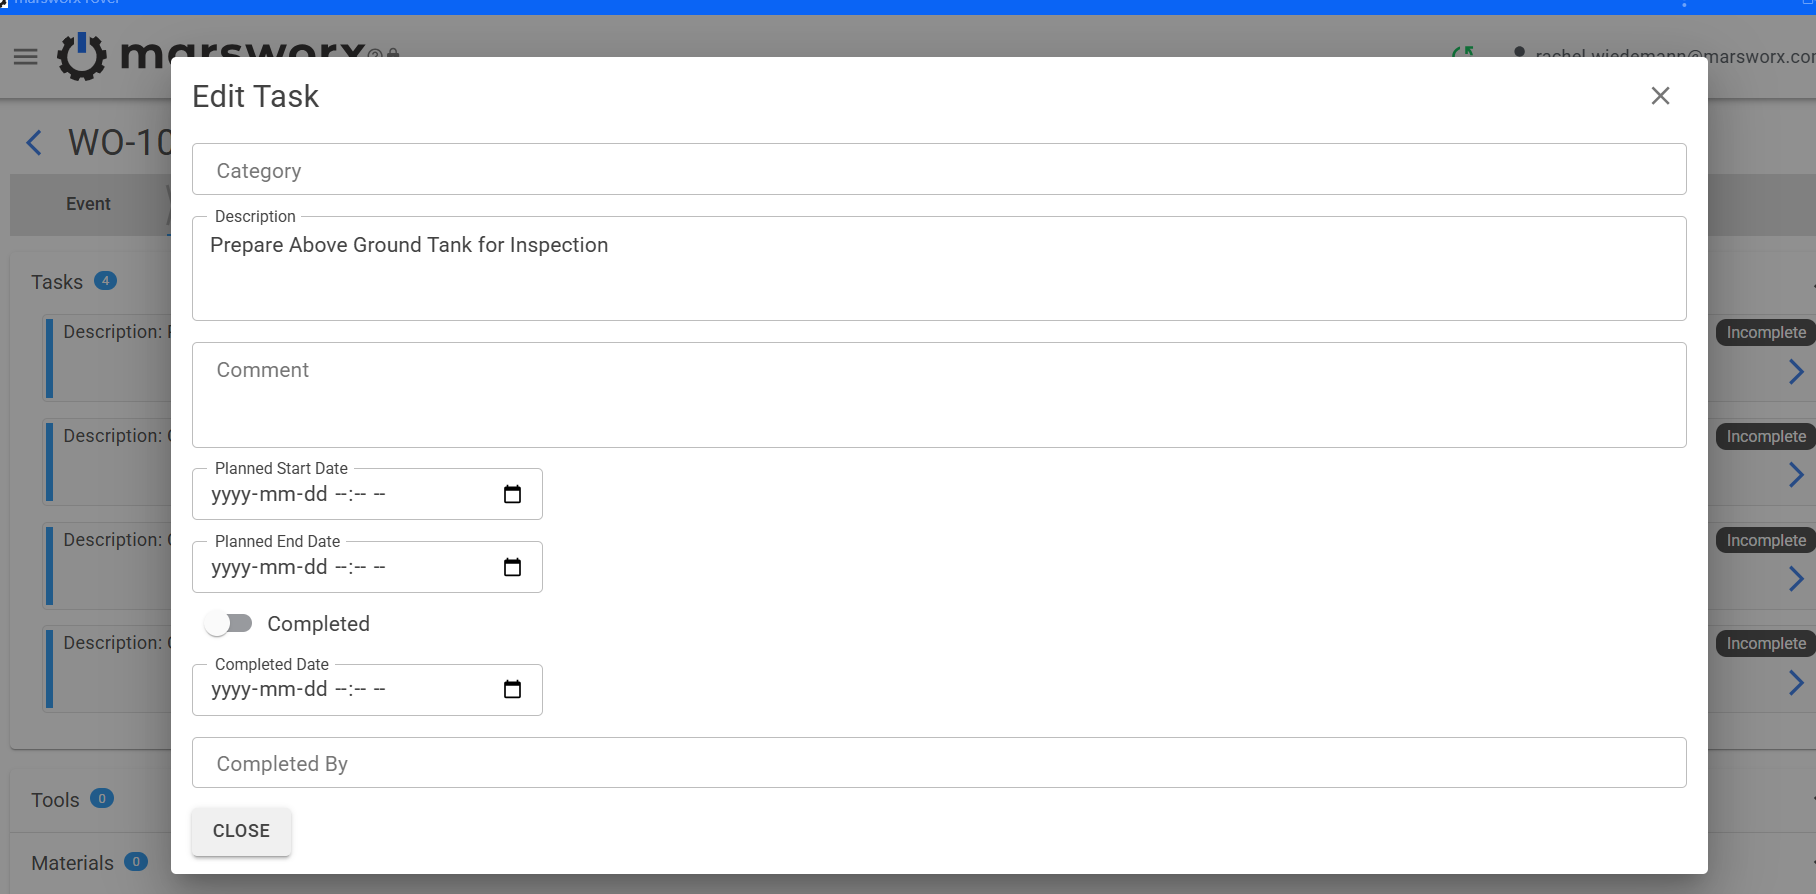
All options in the Details Tab contain a drop down menu as above.
The Add Tools window appears as below:
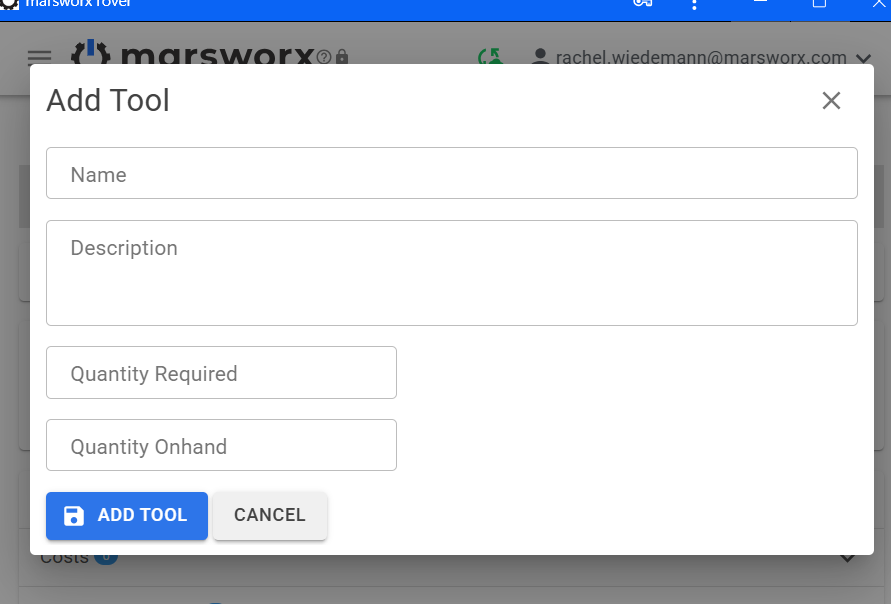
The Add Materials window appears as below:
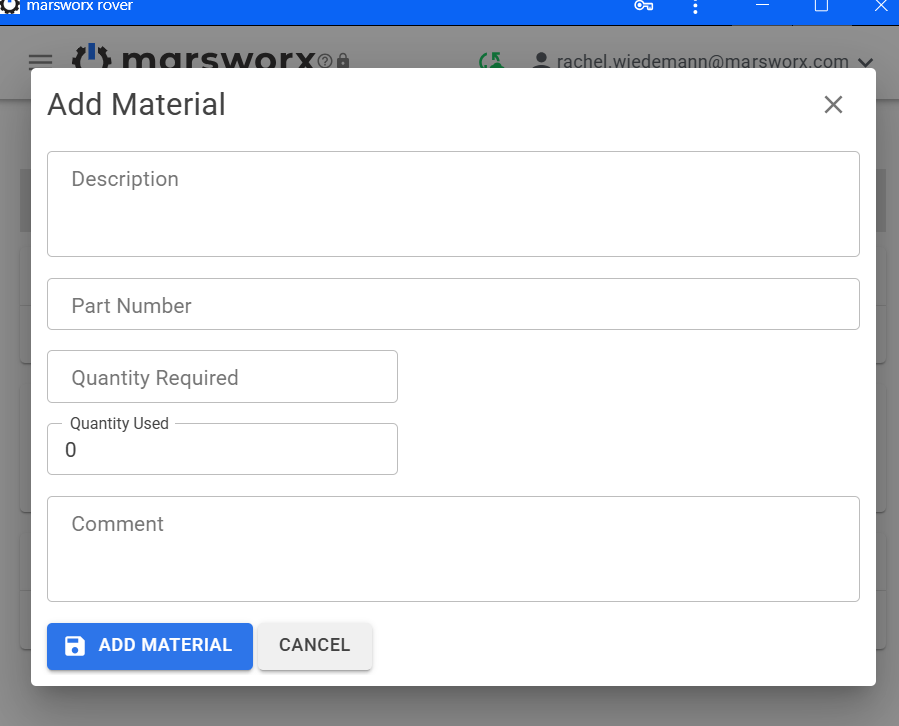
The Costs Window appears as below:

Testing Equipment window will allow for adding Testing Equipment that has been added at the Entity level in the Admin app.
Generate a PDF Report for Completed Events
Ability to generate PDF reports from Rover completed Event is managed in the Desktop Application.
Reports may also be generated from new Events created in Desktop.
Open the Desktop application.
Choose the event or events to generate a PDF report for by highlighting in grid then choose Generate PDF Report at top of screen.

Window will appear as below.
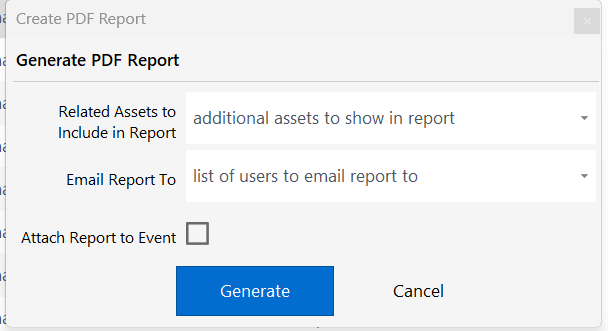
The ability to add related Assets in a Report is available with the drop down menu.
Choose, if desired, one or more email recipients for the Report.
Check the box beside Attach Report to Event.
Press Generate.
After one or two minutes, The PDF Report is available for viewing in Event Editor.
Note: The configuration of what data appears in a PDF Report is managed by and Administrator at the Entity Level.
Rover Documents Tab
The Documents tab in a Rover event allow User to add documents and or photos.
There may be relevant documents already included in the event for the User to reference or consult. Rover is able to display text, image, or PDF files. Other formats require downlaoding to device to view.
Please see FAQ page for managing Photos.
Consult the below color chart which is also available on the "Getting Started" page.
Color Legend for Statuses and States in mars rover:
RED: Requires Attention
PURPLE: Modifications waiting to be synced
ORANGE: Warning
GREEN: File or Image has been downloaded to device
YELLOW: File or Document has been added to incoming
GREY: File or Image not downloaded to device.
Click on the Documents tab in an event in marsworx rover.
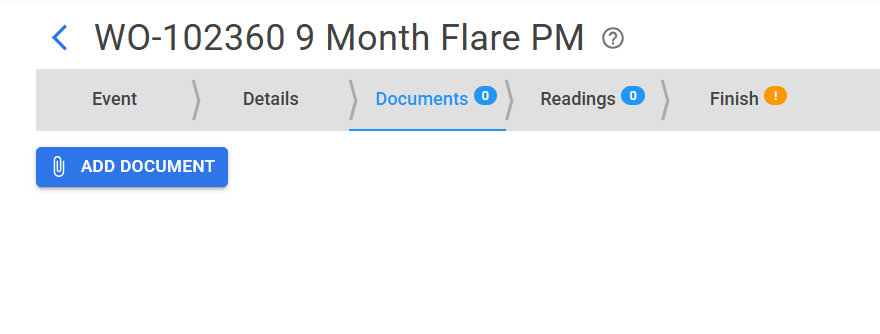
Click on Add Document and choose add Document from file ( this can be document or photo) or choose take photo.
Fill in desired fields and choose Add Document.
This automatically downloads the document to User's device.
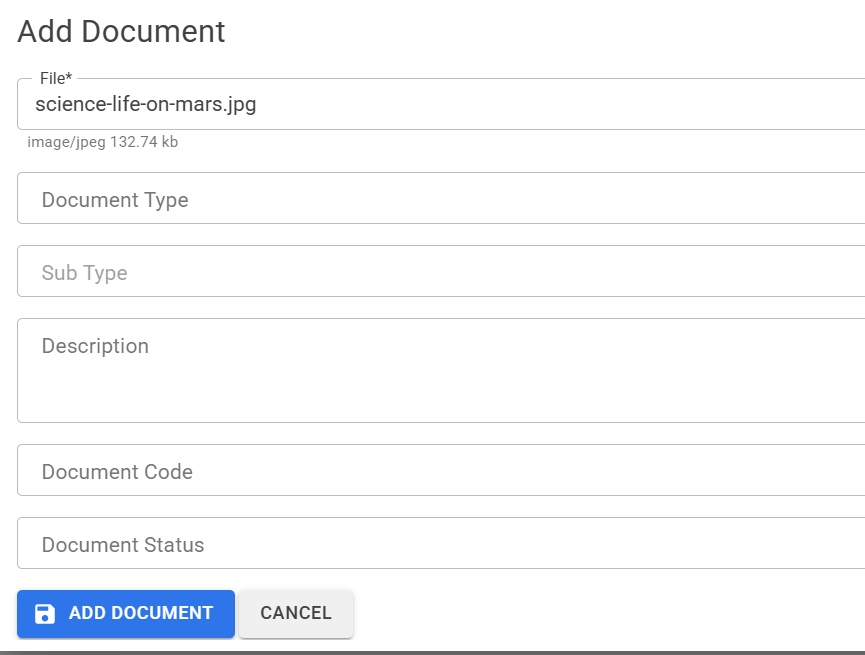
Your screen will now appear similar to below.
As purple denotes changes waiting to be synced, The tile lights up purple on left and there is a purple 1 on the Documents tab header.
You may now re enter this document and edit details or mark up the image.
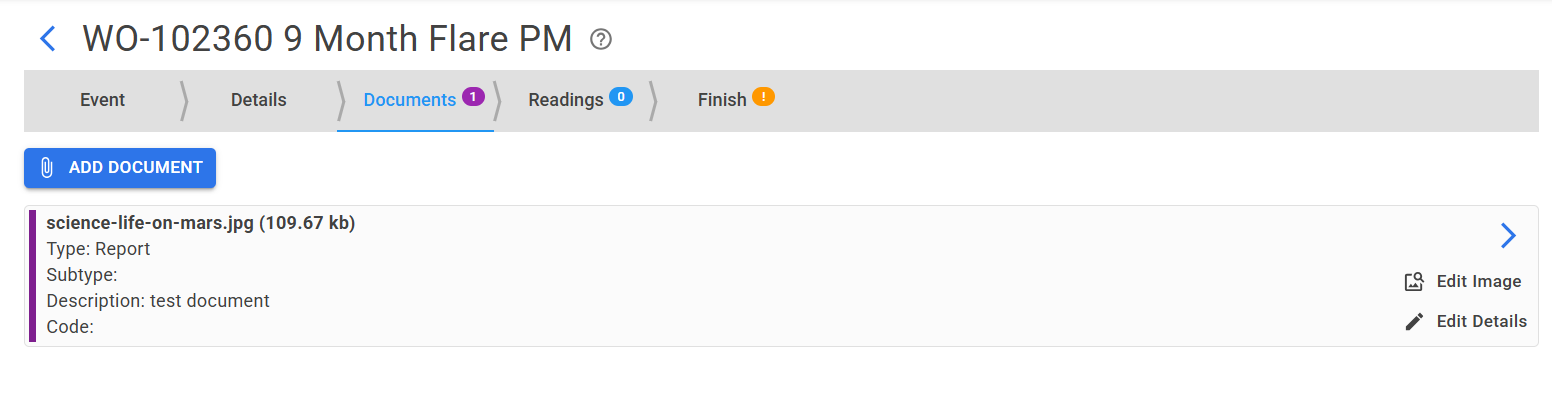
Full size is useful for mobile devices allowing for a larger view on some images and documents.
Save to file refers to saving to a User's device. This can be useful with safety instructions for example.
NOTE: removing a saved document or image from a User's device does not remove it from the database.
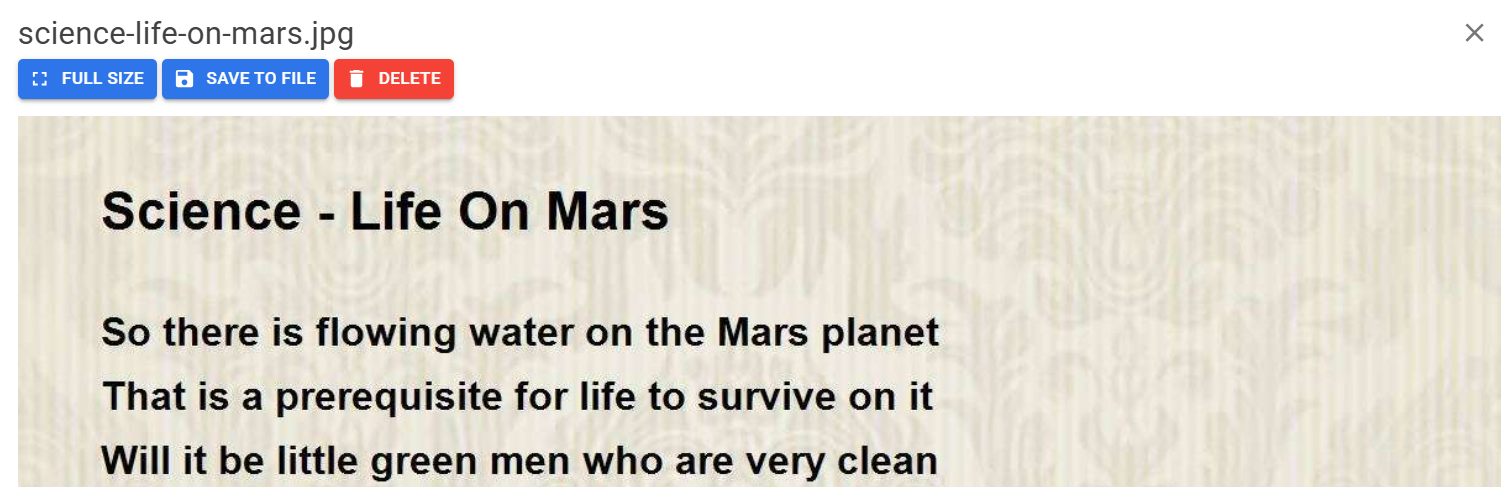
User may also choose to delete this document or image from device IF not yet synced.
X out when done and tile will now appear green denoting a file or image has been auto downloaded to User's device.
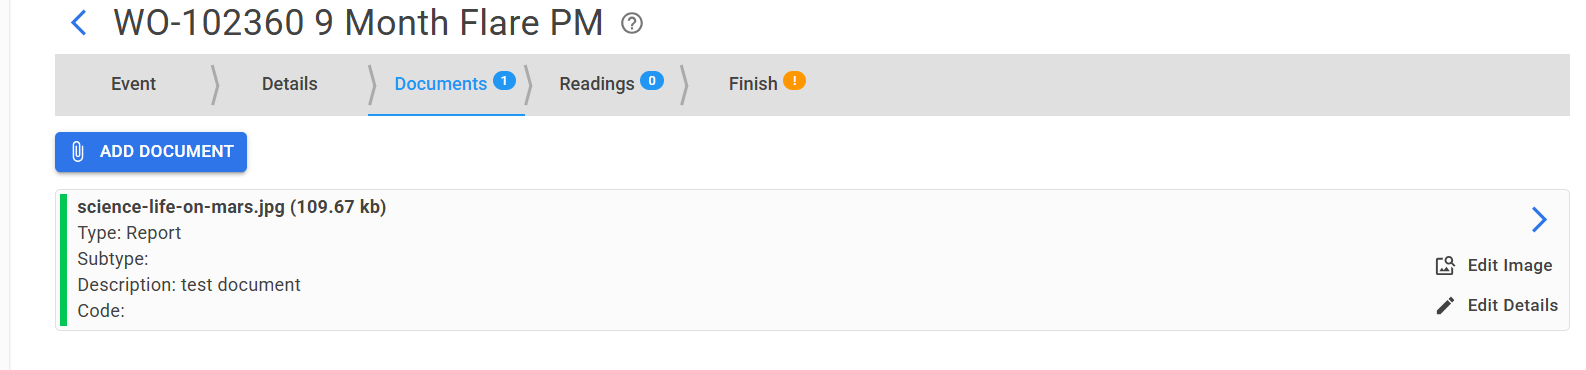
If User wishes to clear this document from one's own device, click the arrow to enter back into document and choose CLEAR. This removes the document from User's device however does NOT remove it from the event itself. This allows User to free up storage particularly on a mobile device.
The tile now appears with a grey bar denoting simply the document is no longer downloaded to the device.
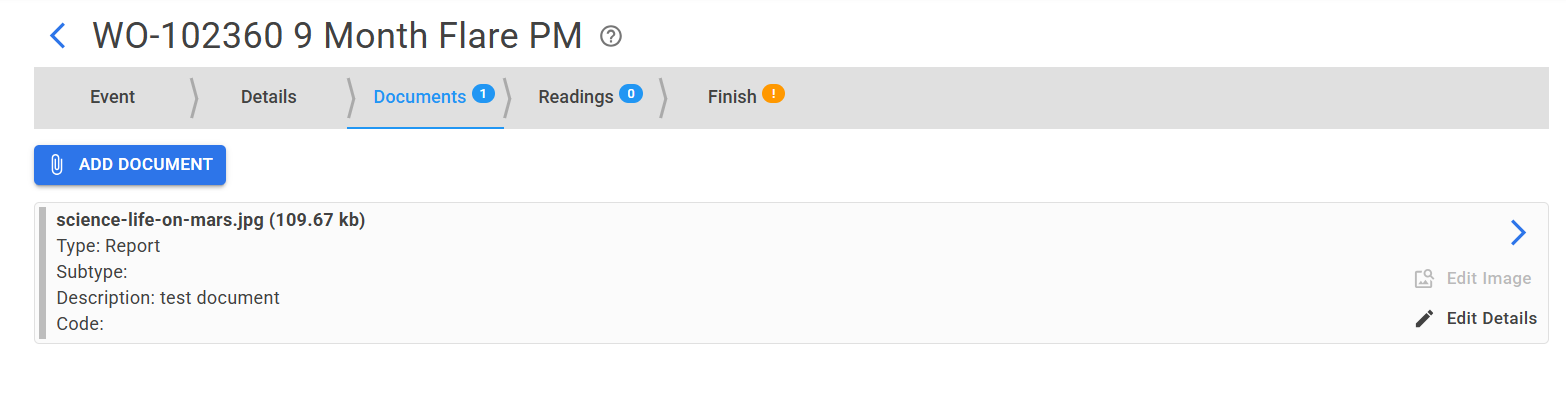
Enter back into document again and get the choice to Add to Incoming. Useful when User does not have connectivity and wants to ensure document(s) download on next sync.
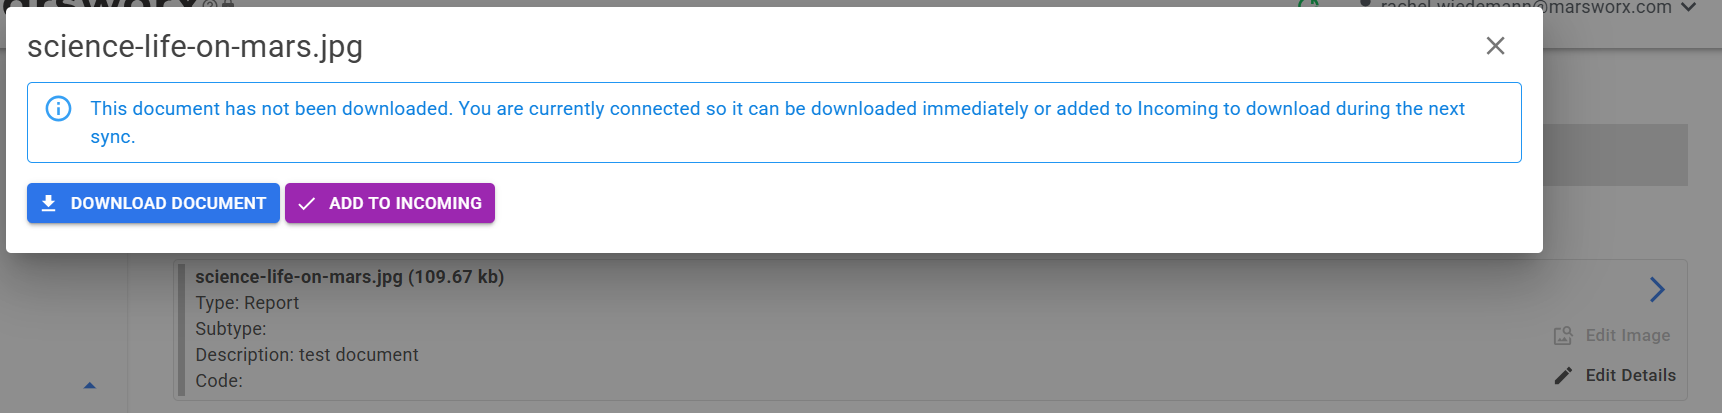
Choose Add to Incoming which will then light up tile with yellow bar denoting a file or document has been added to Incoming.
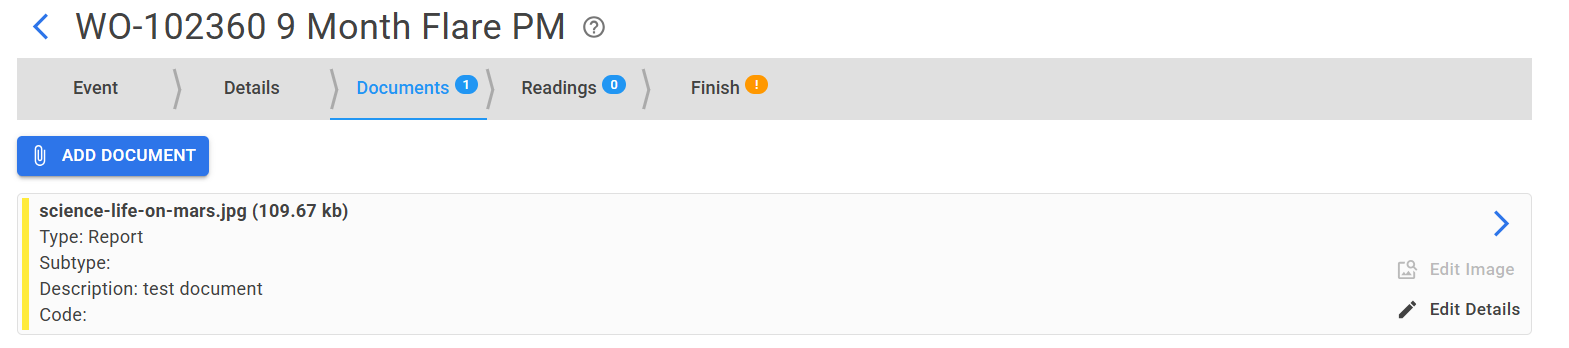
Pathfinder
Contains Administrative Tools for Creating and Managing Templates, Reading Types, Reading Groups, and Libraries in Rover.
See Pages below or choose from menu on the left.
Pathfinder Reading Types
Reading Types may be created and/or applied to Reading Groups.
Creating New
Navigate to Reading Types from menu on left within Pathfinder
Best practice is to ensure the Reading Type required does not already exist.
Use Column Chooser on the right in addition to filtering in Columns to locate desired Reading Type.
Press +ADD NEW from top left of screen
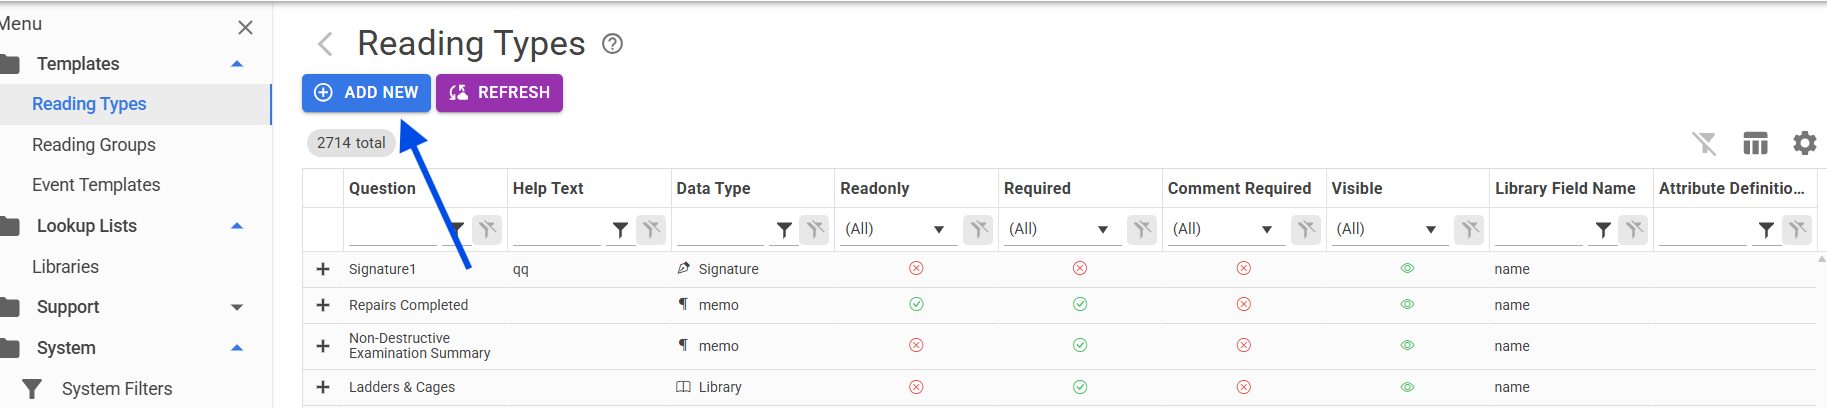
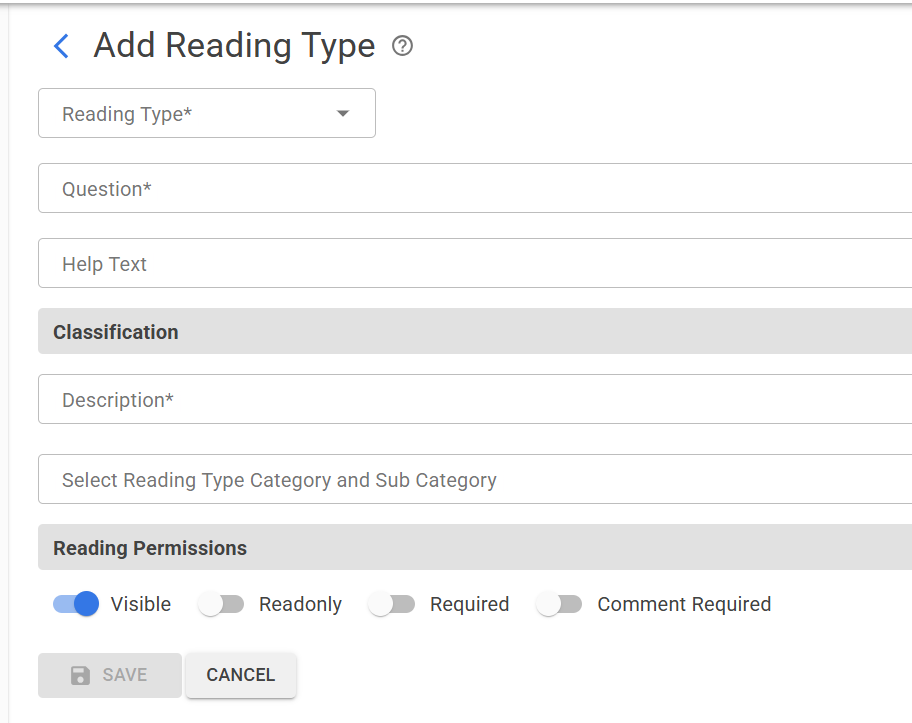
Choose Reading Type from drop down menu
Fields marked with * are required
Name the Question of the Reading as it will appear in a Work Order
Help Text is visible under Reading to give more detail to User, if needed
Add Description. May or may not be same as Question
Select Reading Type Category and Sub Category is optional. Choose from drop down menu. Data here is specific to the Client.
All Reading Types are Visible by Default.
Choose Read Only or if Reading is Required or if Comment is Required
Library Reading Types:
Drop down menu will appear to choose from a grid selection of Libraries as per Client data
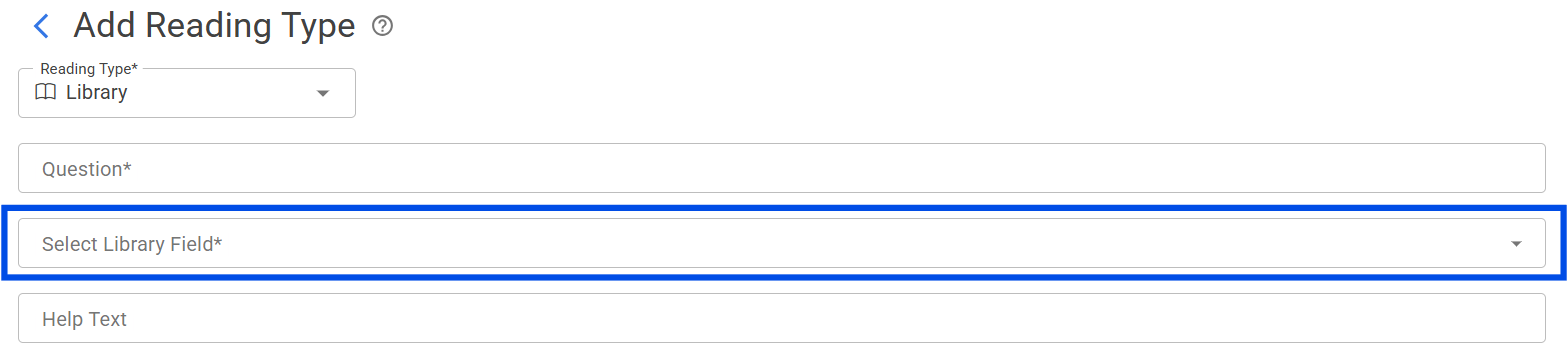
Numeric Reading Types:
Admin User may choose a Custom Unit Type by turning on toggle.
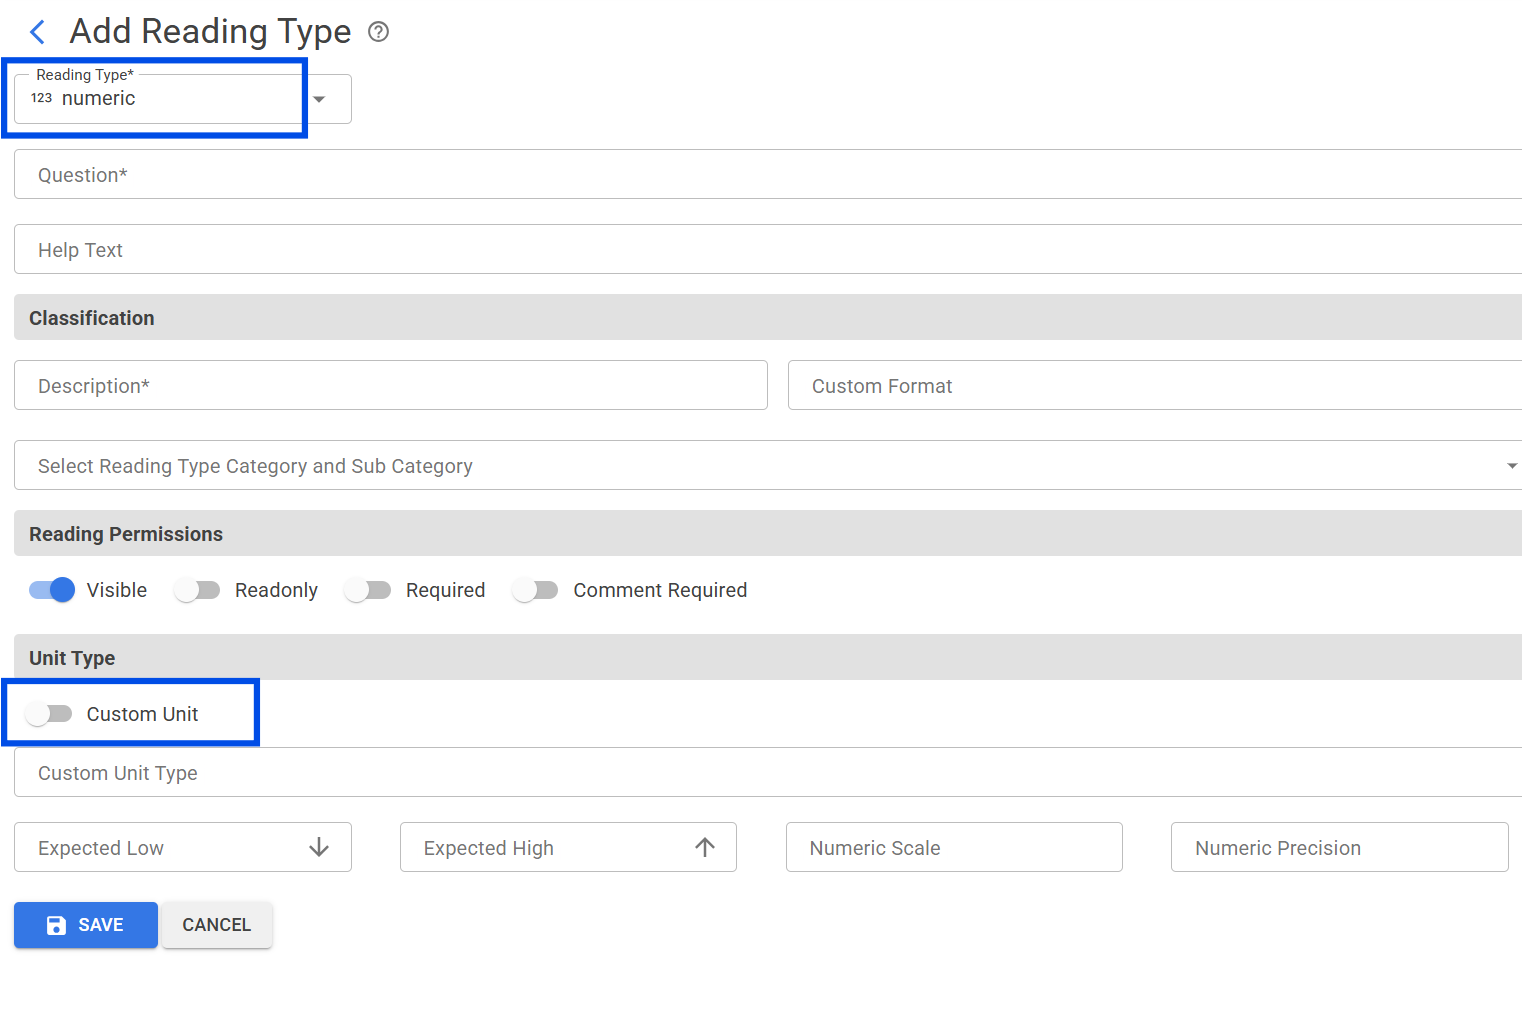
Once Custom Unit is turned on, Choose Base Unit Set from drop down
Then, choose Metric or Imperial OR both.
When both are chosen, User completing Work Order contaning Unit Reading may switch back and forth between Units of Measure to see difference in real time.
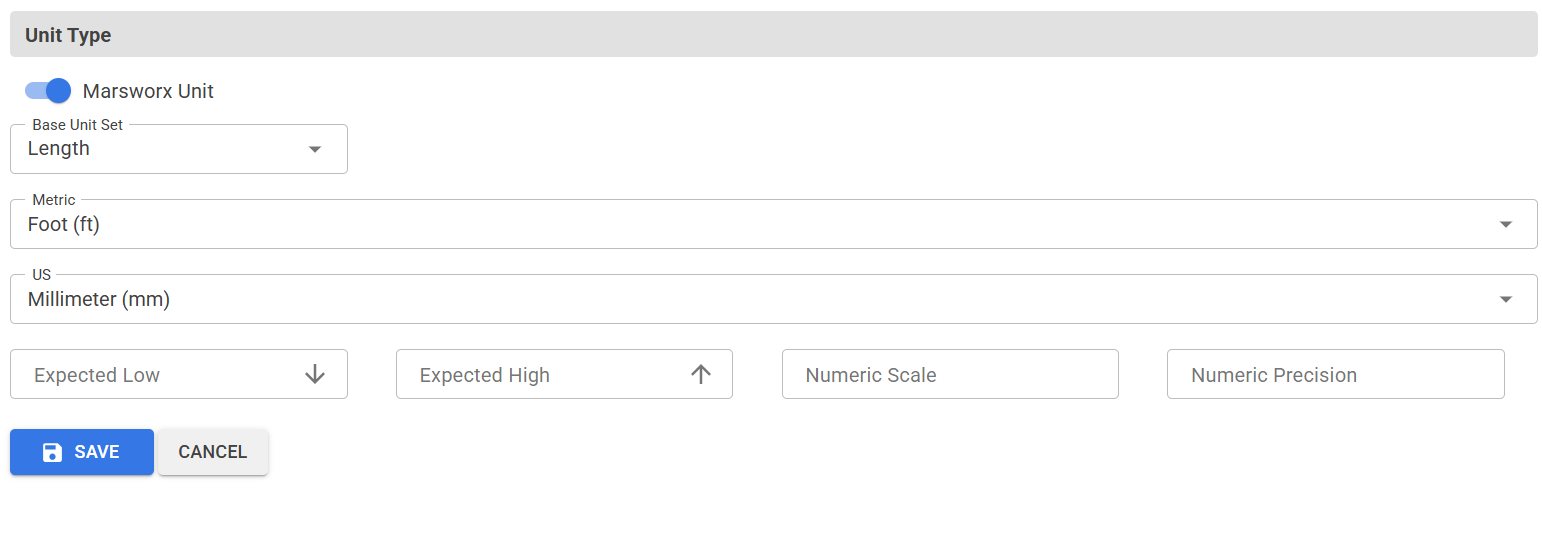
The below example shows Units of Measure in inches or centimetres. Pressing the indicator icon allows User to choose back and forth and Measurement changes instantly in Field.
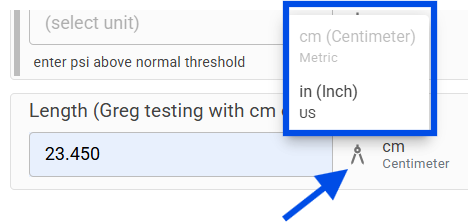
If several Units of Measure were required to be available on a Reading Type, Admin User would continue to add Units of Measure as required. Multple selection is available.
In this case, the User completing Work on Rover with this Reading would be prompted to FIRST press the indcator to choose the Unit first to alert Rover which Unit to display as shown below:

Expected Low and Expected High as well as Numeric Scale and Numeric Precision may be populated with free text to identify parameters for specific numeric Reading Types which will prompt the User completing Work on Rover to stay within parameters dentified or receive a warning.
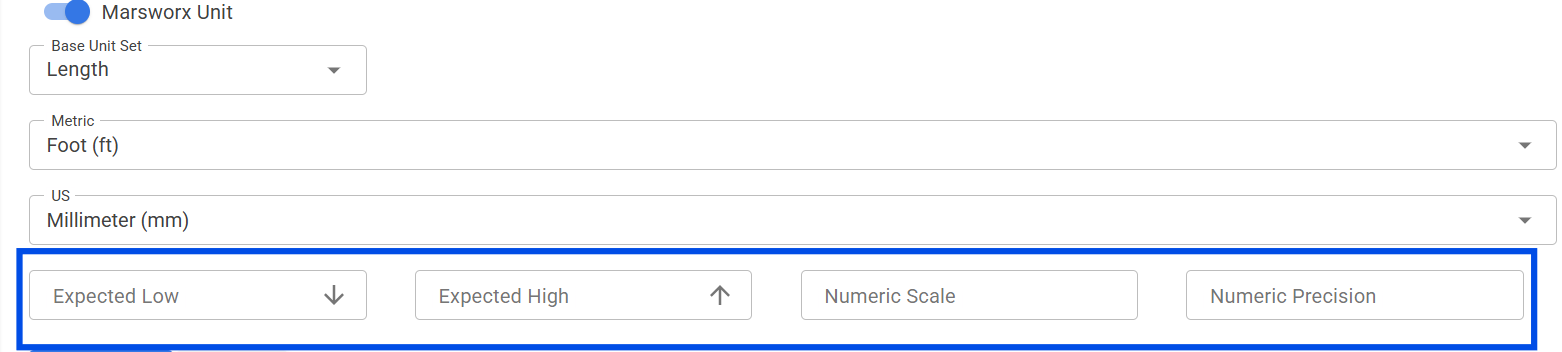
Once Reading Type information is complete, press SAVE, This saves this Reading Type to Pathfinder and is ready to be added to a Reading Group.
Pathfinder Reading Groups
Reading Groups are comprised of a selection of Reading Types
Please note: the role of Administrator is required to manage Reading Groups.
Open Reading Groups from menu in Pathfinder

Before creating a new Reading Group, ensure it does not already exist. Use filtering to locate.
To create new, choose the "Add New" button at top left. The screen should appear as below.
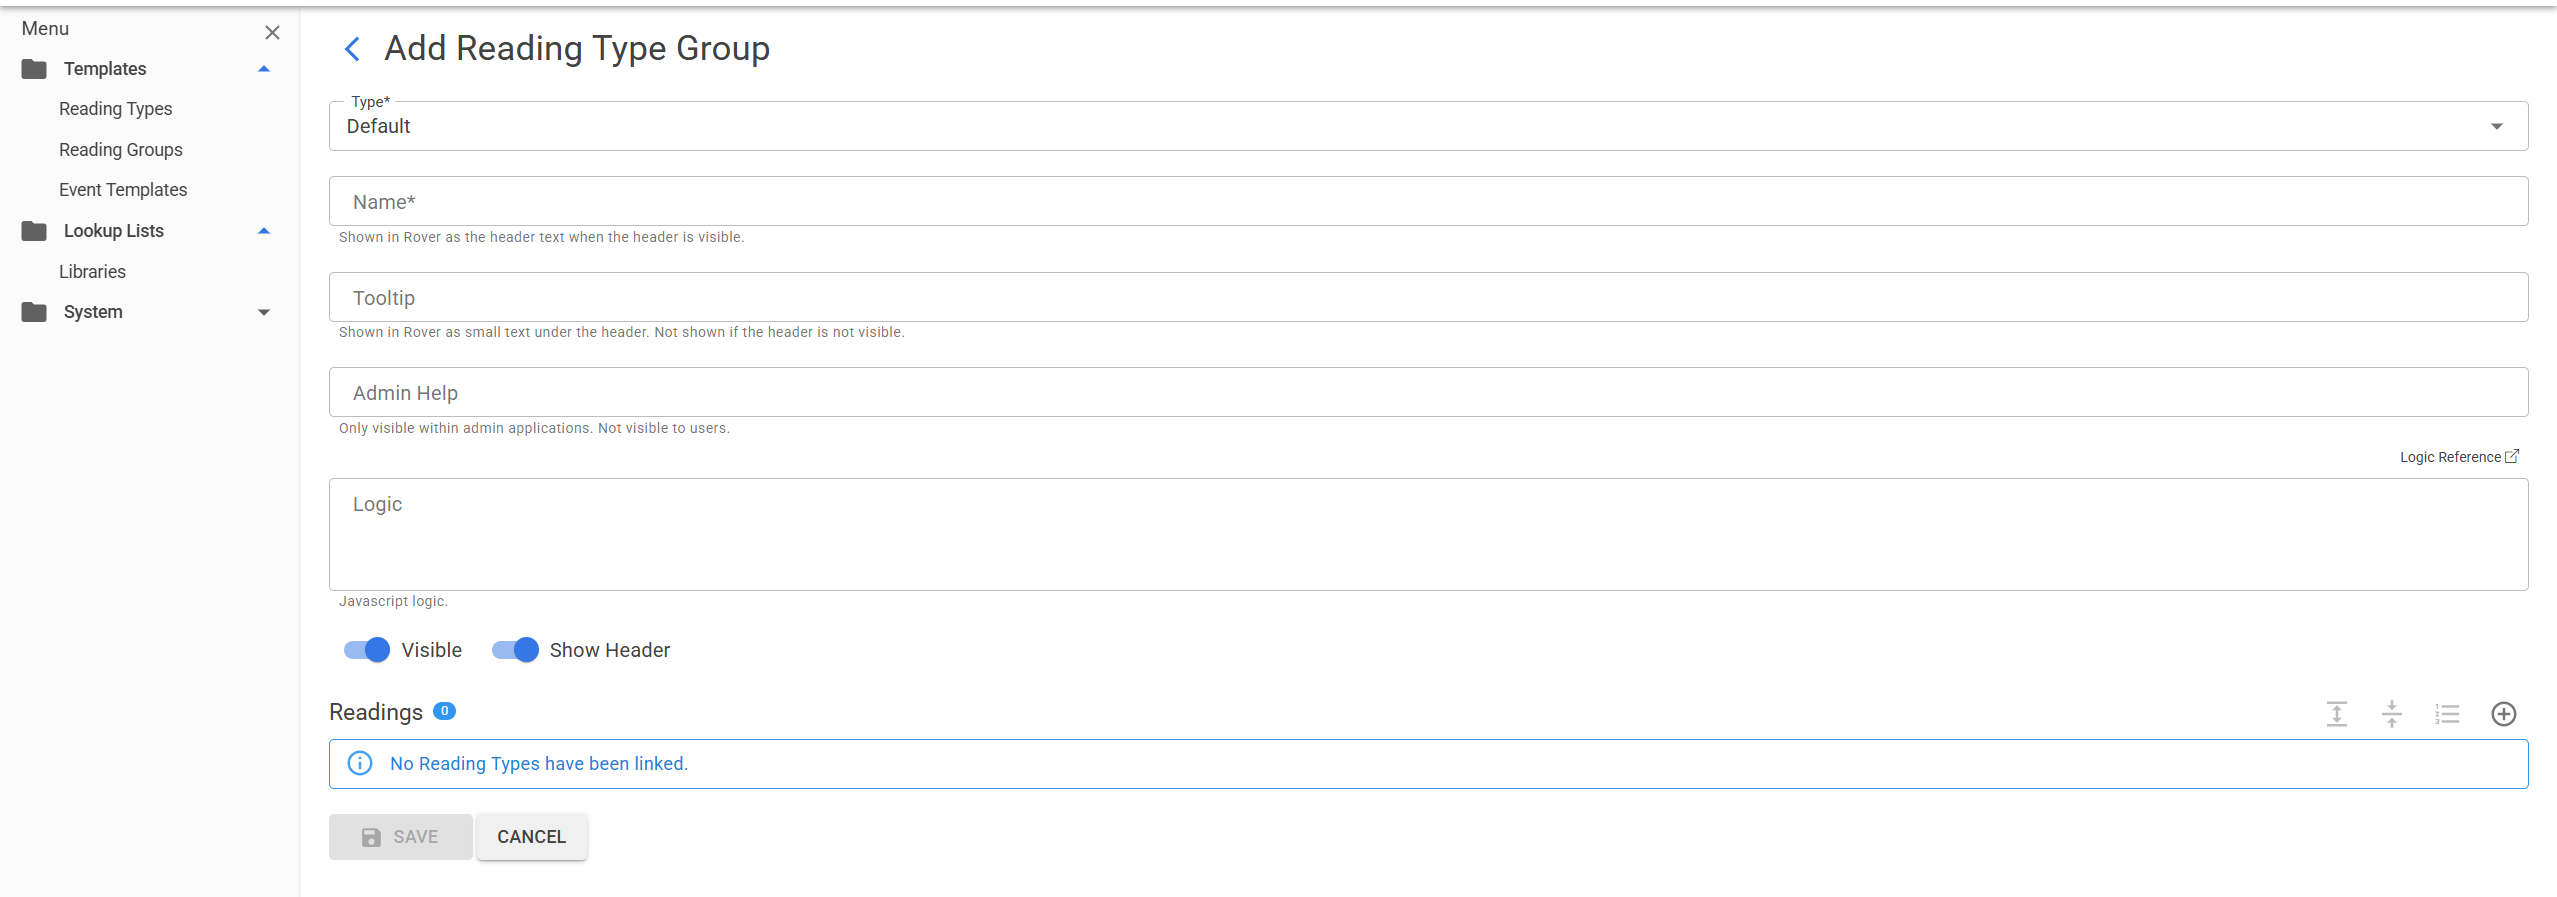
Type: Choose Default Option. The "tabular" choice is for future use.
Name: This is a required field. Name your Reading Group here. (Users are able to filter by name to locate a Reading Group in a grid.)
Tooltip: Optional field which will be shown in marsrover if header is chosen as visible.
Admin help: Only visible with Admin applications. Not visible to Users.
Logic: Javascript code for this Reading Group would appear here in Admin mode only.
Visible: This toggle allows the below Readings to be visible for this Reading Group
Show Header: This toggle allows the header of below Readings to be visible for this Reading Group in Rover Events.
Next step is to add Readings to the Reading Group. Choose the + button on the right to open up the Readings Grid.

Use filters to narrow search for desired Reading Type.
Click on Reading in grid to add to Group
Only one Reading may added at a time.
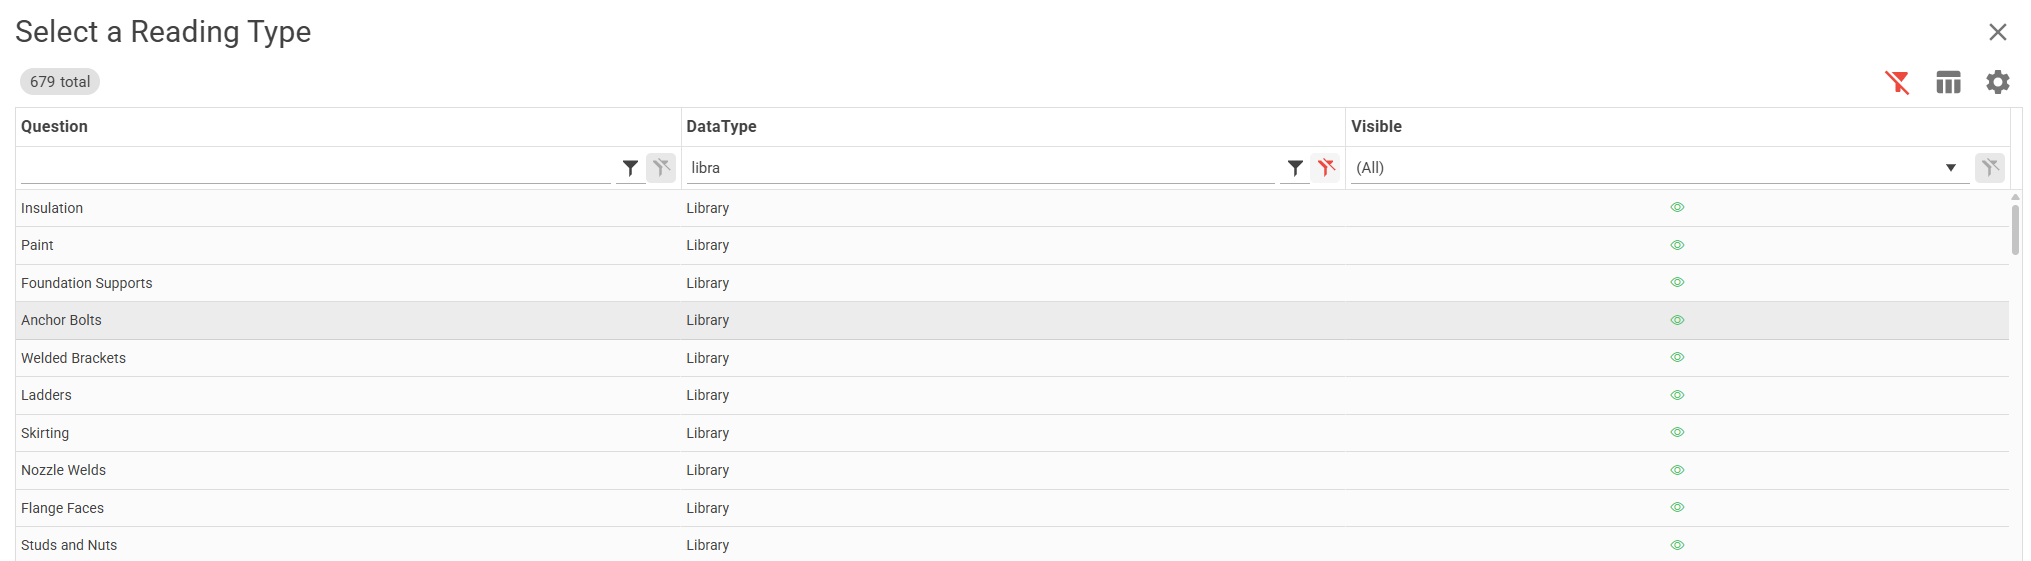
When all selected Readings are chosen, the screen will appear similar to below:
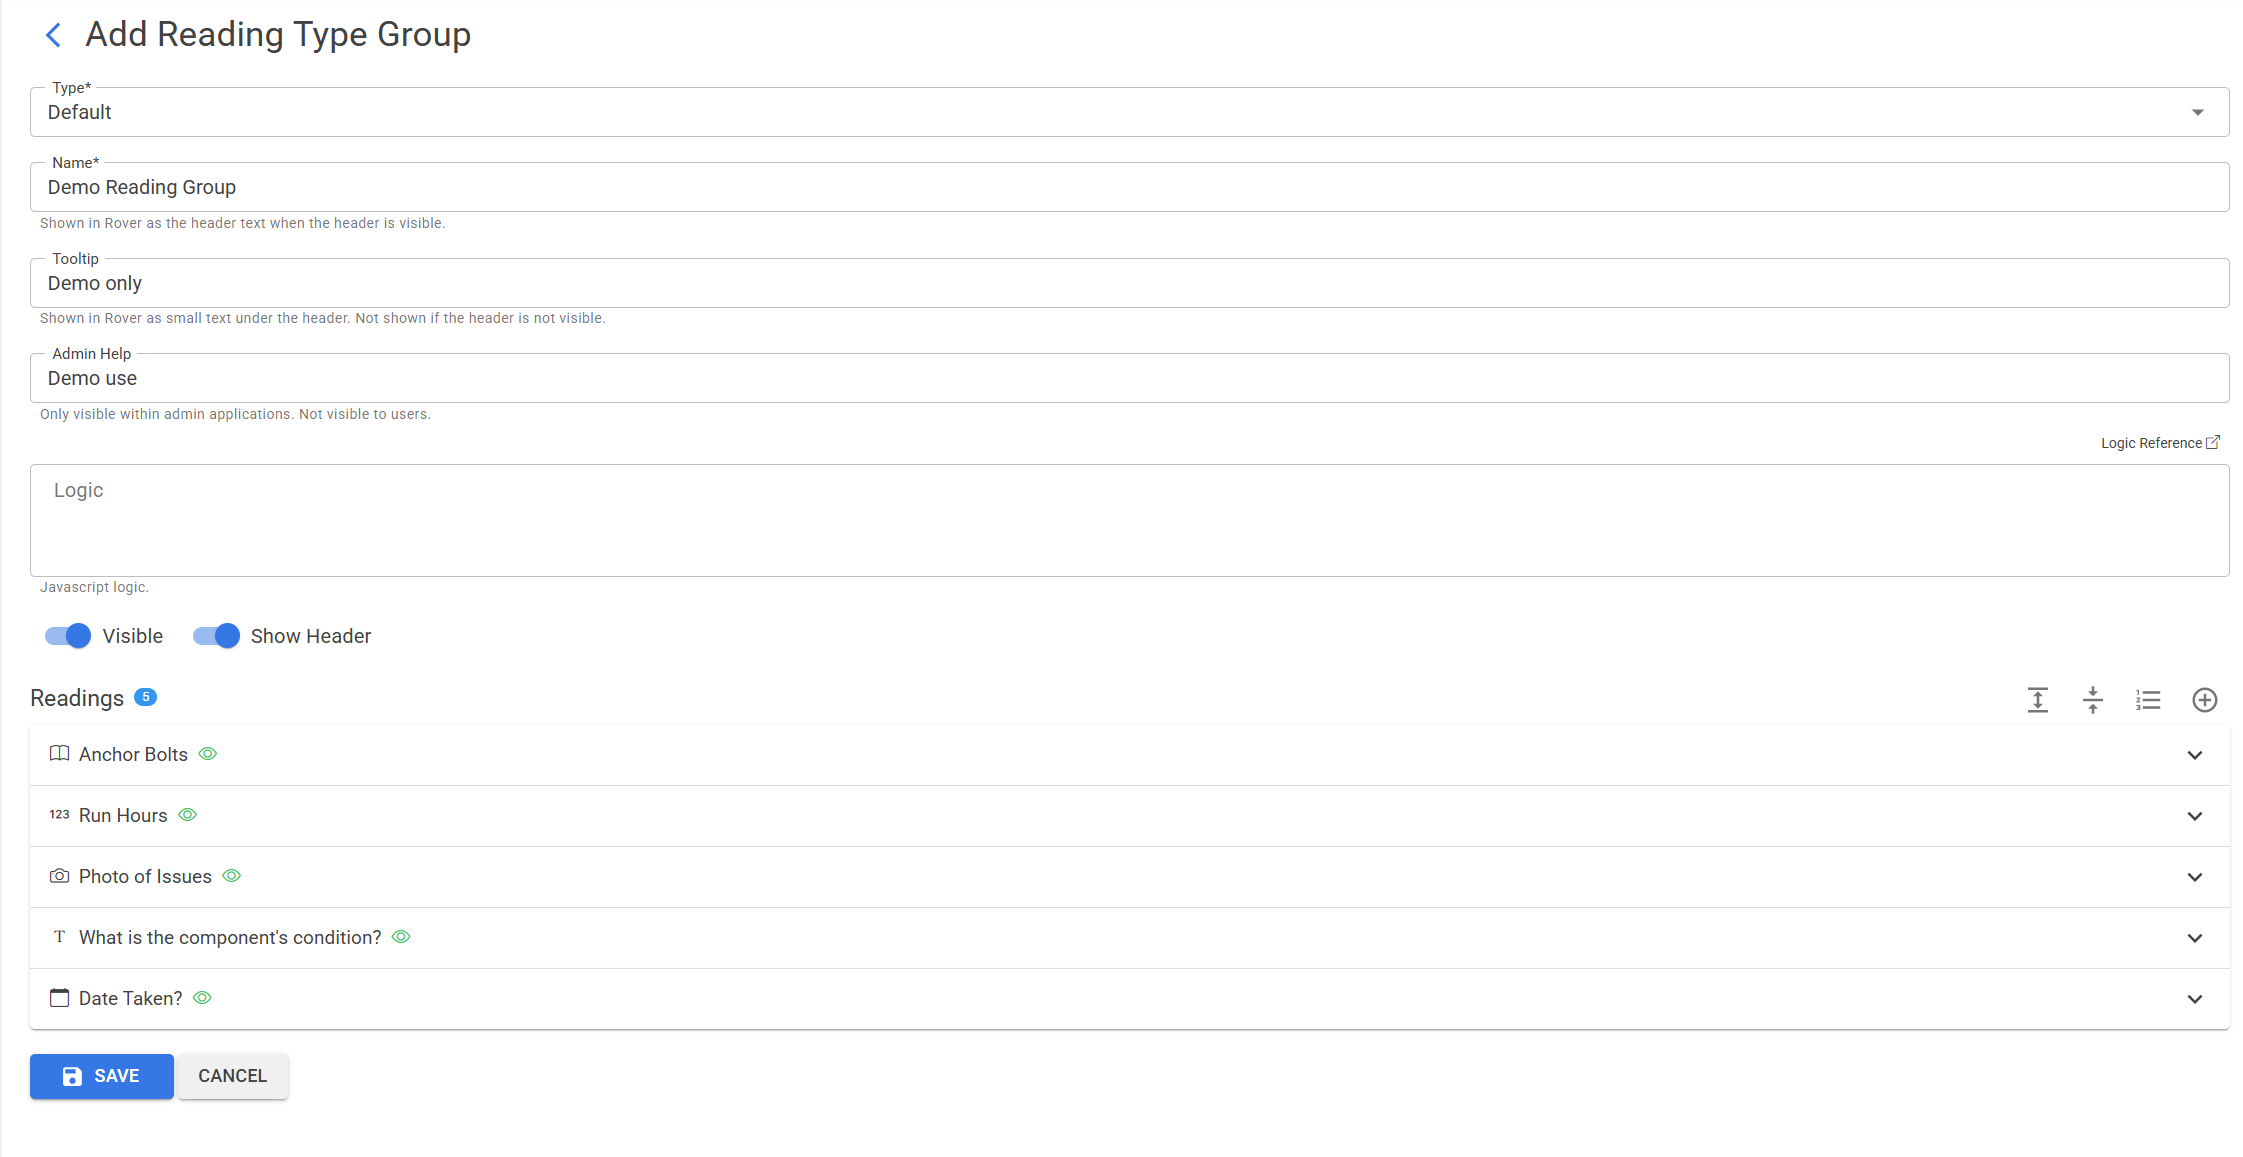
Admin User may further manage Reading Types
To change the order of appearance of the Readings, choose the icon directly left of + button.
A window appears as below. Click and drag Reading Types as desired. Be sure to APPLY and SAVE your changes.
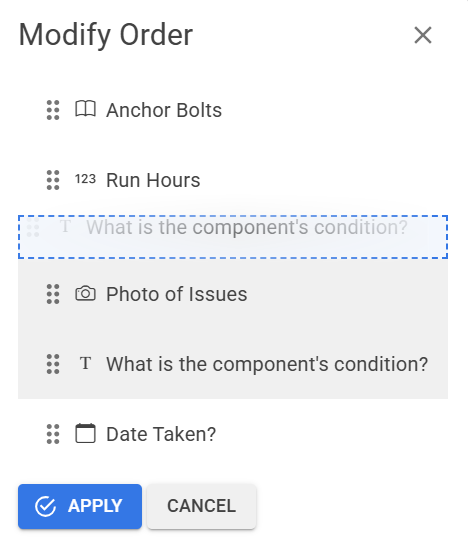
The two arrow icons to the left of Modify Order icon allow User to expand all the Reading types to manage and/or Collapse back again.

Choose whether the reading is required or a comment is required or both.
Click on the palette in the field Background Color to have this reading appear with a colored background to stand our or help identify.
Add optional help text for additional info on this reading.
Click on palette in the Help Text Color field to highlight the help text for better visibility.
Delete this reading by choosing the garbage can in bottom right corner.
The icons beside the + button where readings are added allows a User to modify the order the readings appear in the User's Event view.
Up and down arrows simply allow for better navigation of the readings in this group.
When editing and adding readings is complete, choosing the SAVE button to save this Reading Group as a draft that may be edited at a later date.
Choosing PUBLISH after SAVE allows this Reading Group to create a version that may be applied to a Web Layout.
Please note: Published Readings Groups are indeed editible however, marsworx recommends to keep this practice at a minimum as re-publish creates a new version each time.
Choose cancel during creating or editing to clear your progress and start over.
Pathfinder Managing Libraries
Libraries may be created new in Pathfinder. Libraries may be added to an Attribute or Reading Type.
Navigate to Libraries from menu on left in Pathfinder.
Before creating a new Library, confirm it does not already exist. Use filters to narrow search.
Choose ADD NEW at top of screen.
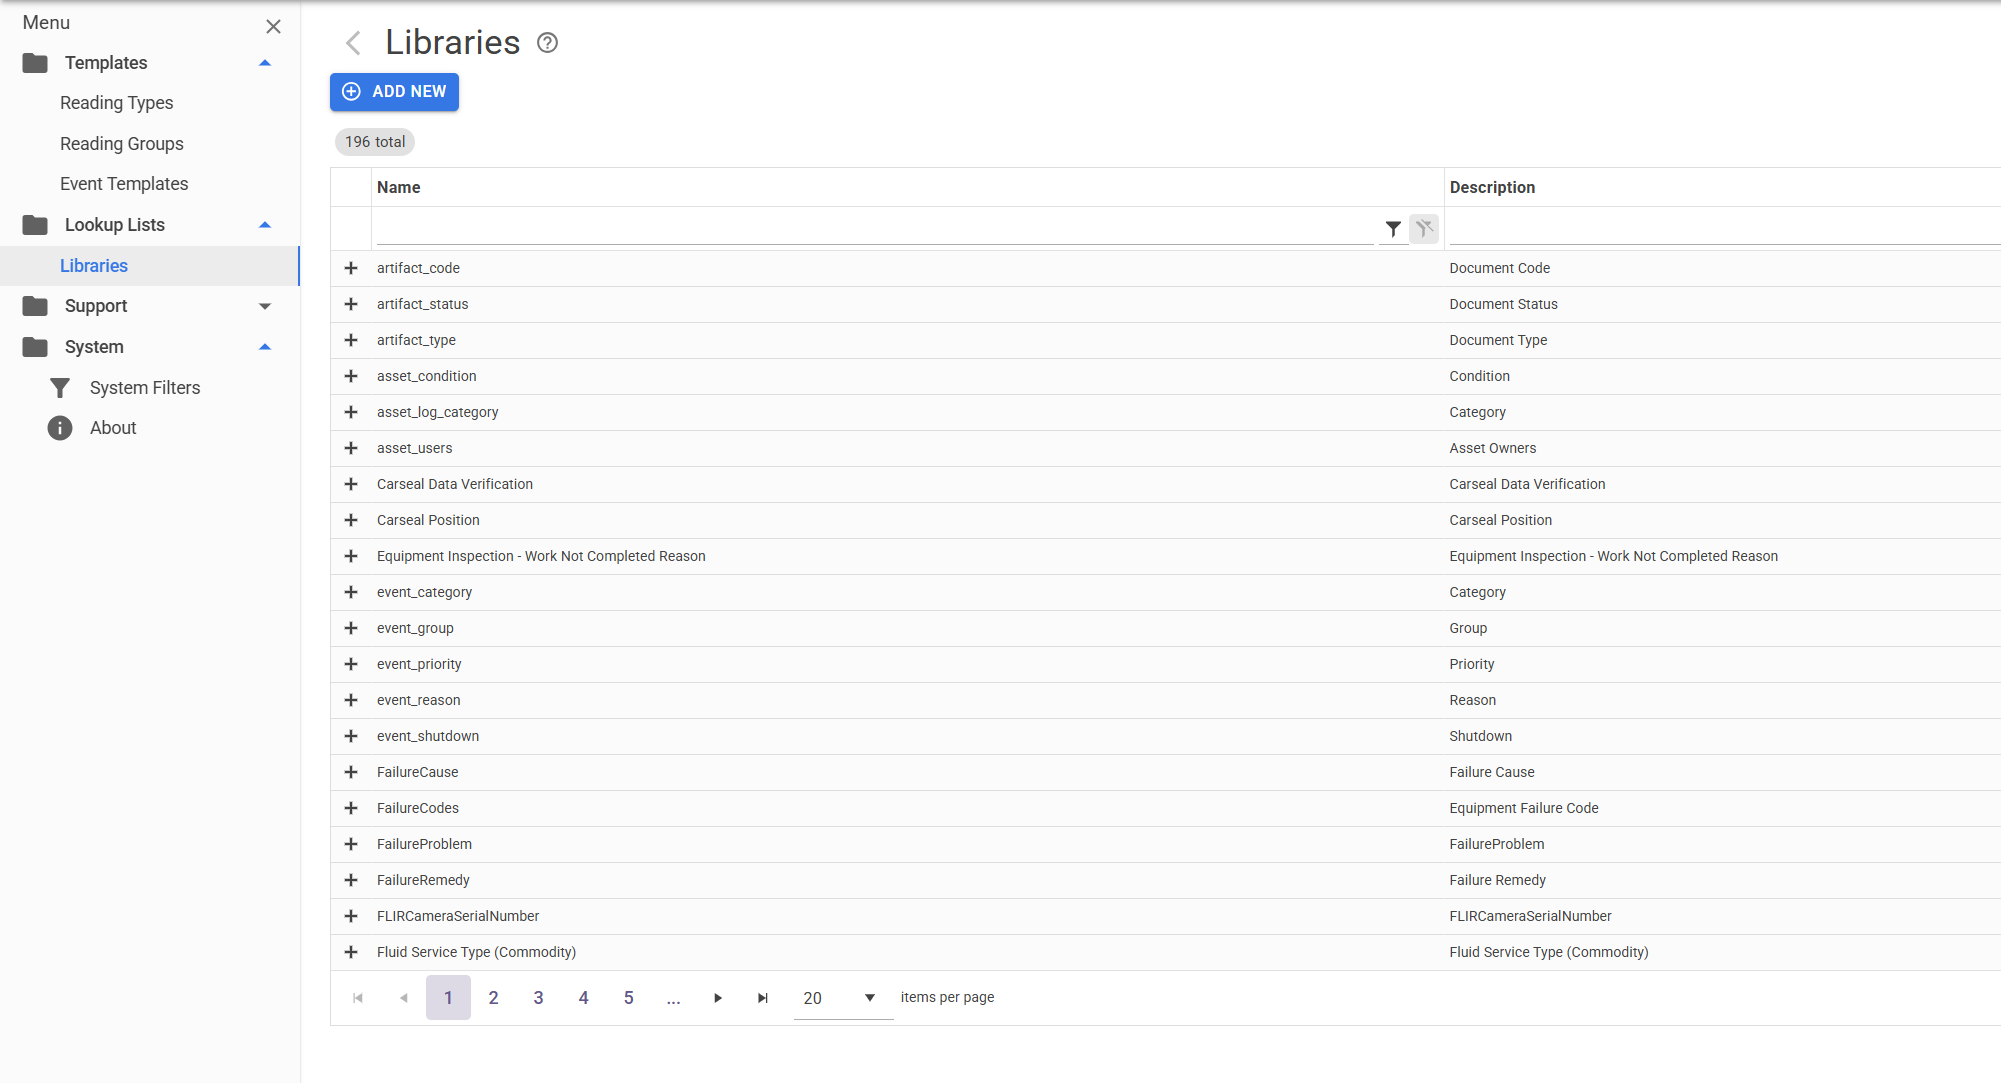
There are three tabs at the top of Library Editor screen.
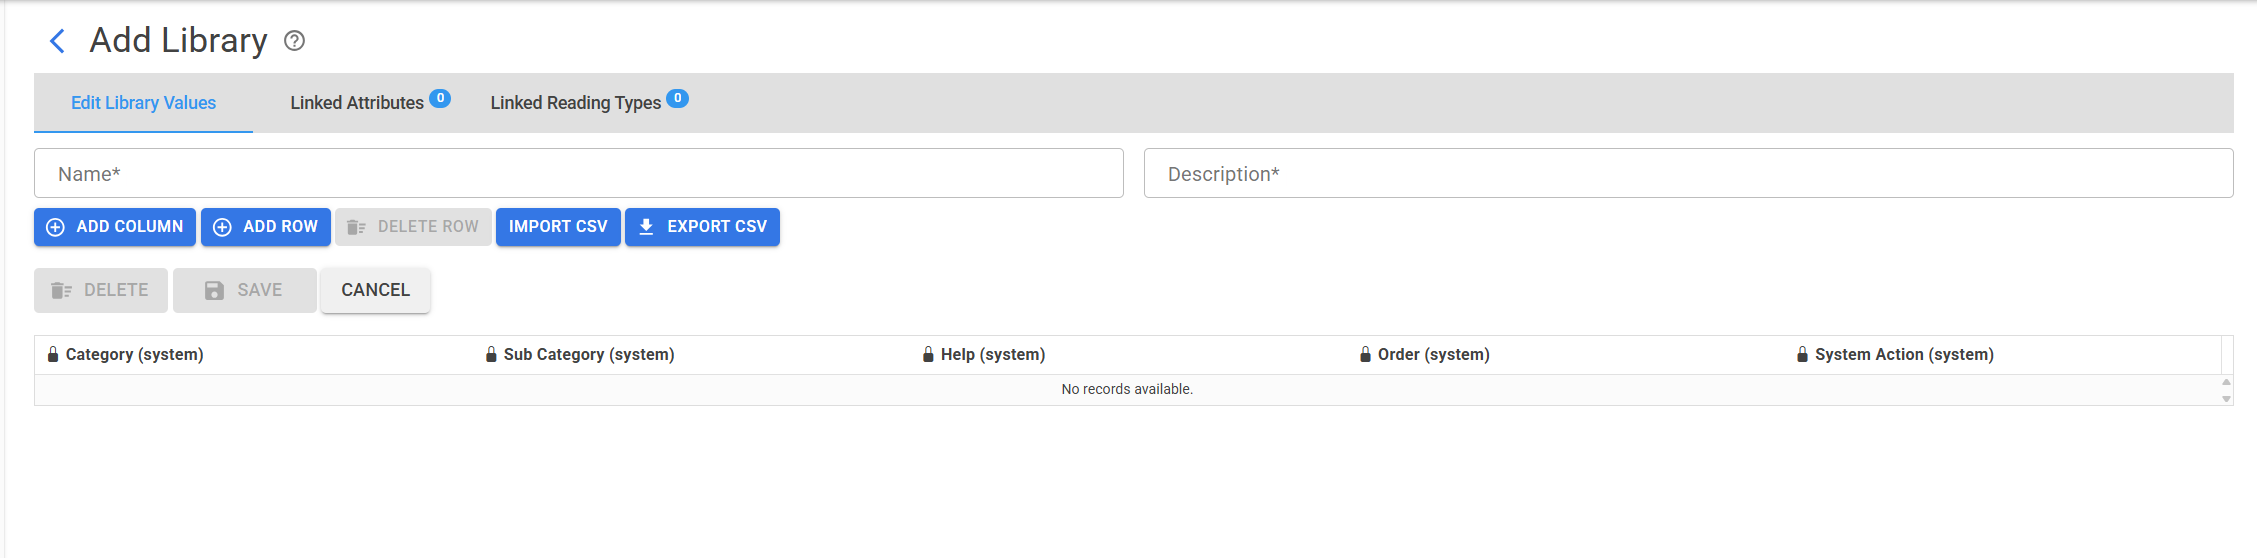
Edit Library Values - this is where new Library information is created or existing Libraries are edited.
Linked Attributes - will open a grid of any Attributes linked to an existing Library.
Linked Reading Types - will open a grid displaying all Reading Types which have existing Library applied.
Give New Library a Name and Description.
New Library begin with default Columns as show below.

Use these columns to create Library and/or click ADD COLUMN to add a new Column.
A New Column must have both Field Name and Display Name populated.
Press Save
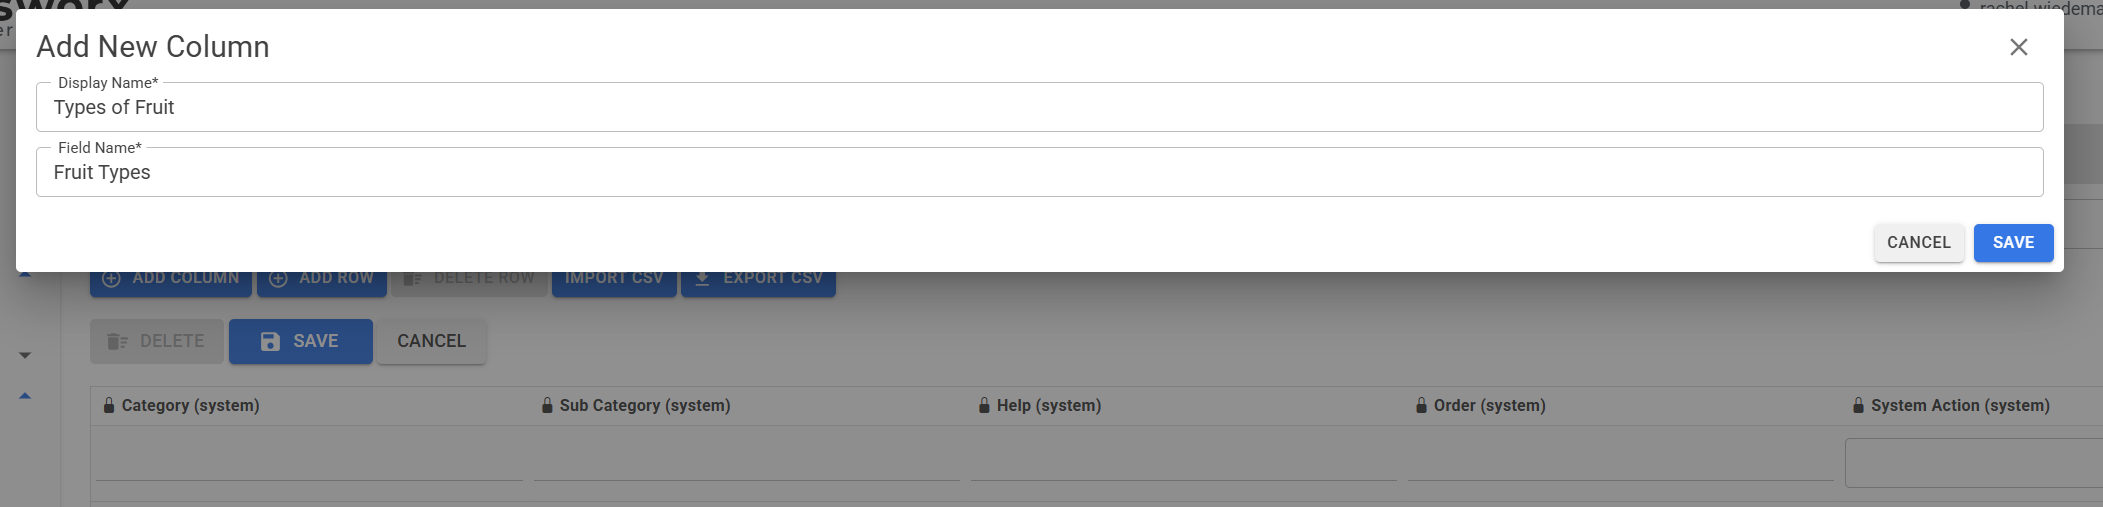
New Column will now appear on screen. Click and drag Column header Name to arrange in desired order.
This Column is not a System Column and may be deleted by pressing the gear icon to the left of Column Name

Press ADD ROW button to add rows below Columns to create Library. Continue to press ADD ROW for desired number of rows.
Below example has 3 rows added.
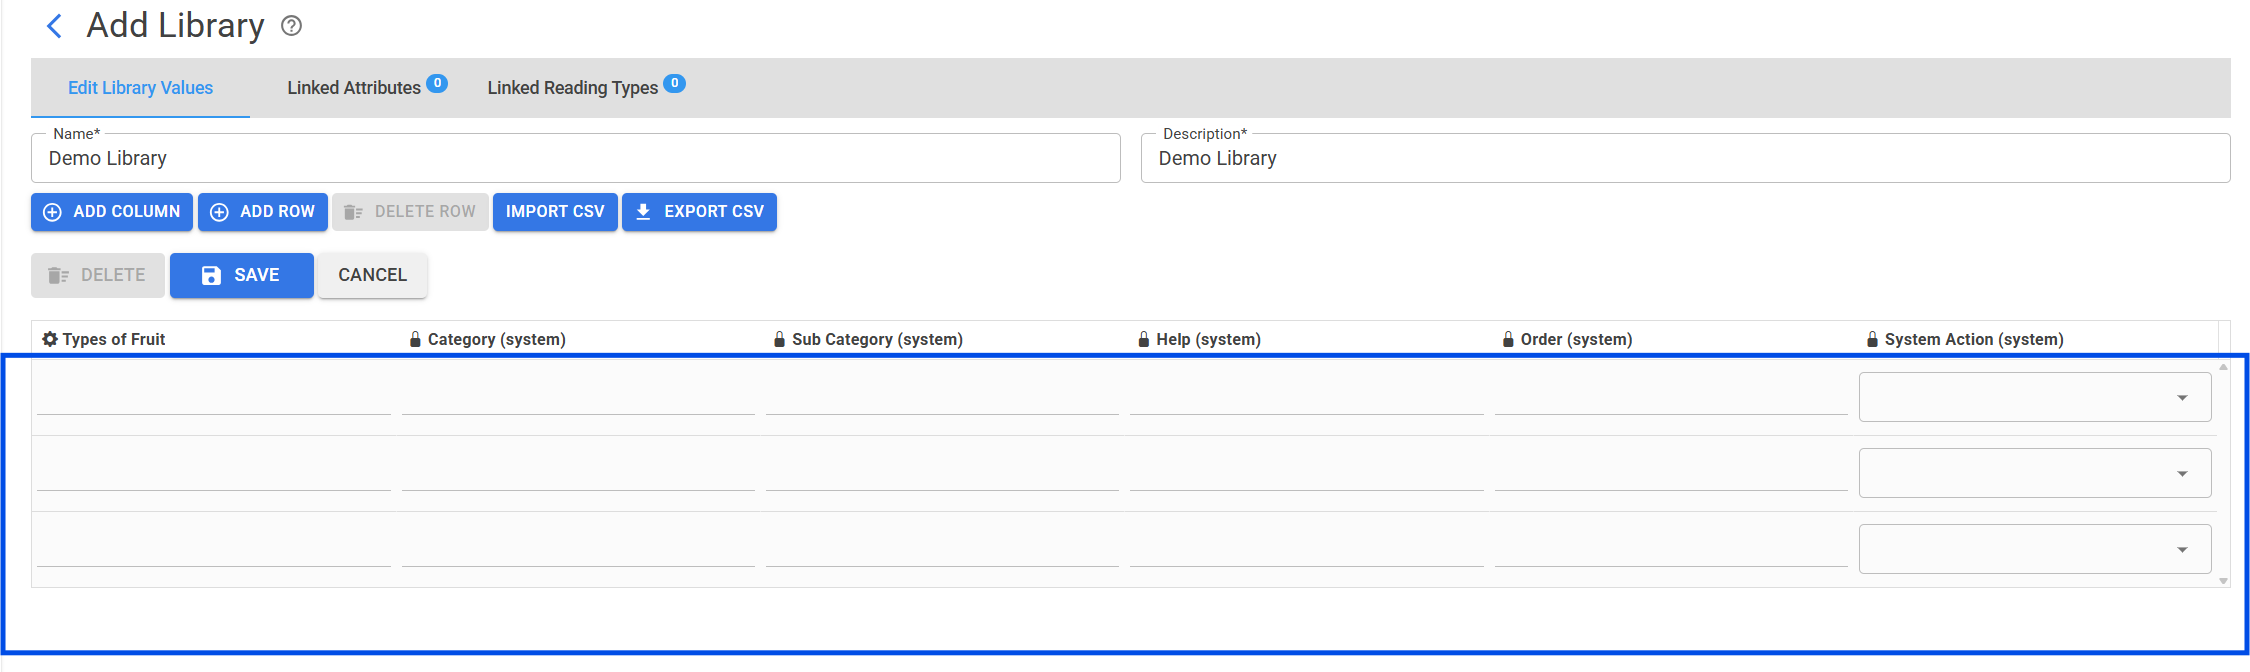
Populate Data for Library.
Choose IMPORT CSV to import data to place in rows.
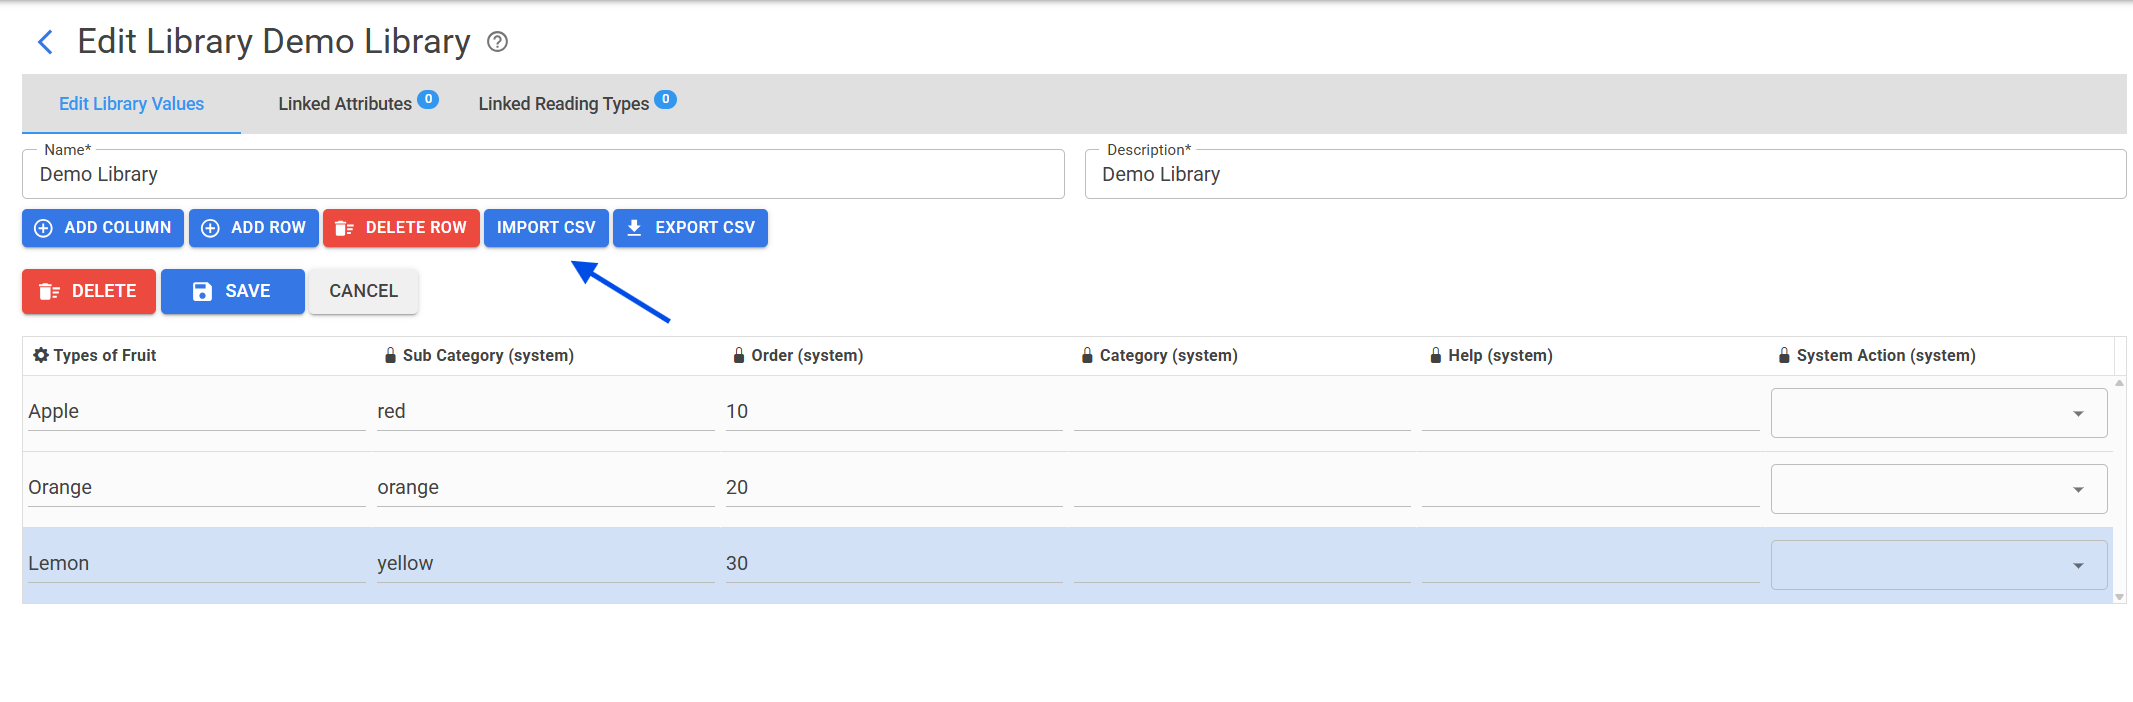
Hit Save when Library creation is complete.
Library may now be added to an Attribute or Reading Types
Pathfinder Creating a New Event Template with Web Layout
Creating a New Event Template with Pathfinder
Pathfinder is an Administration tool used to manage Administration processes.
All template management requires Job Plan Role identified as an Admin Privilege in the Desktop/Admin application.
New Event templates are built in the desktop application.
Tab Management within templates may be managed in the admin application ie: Safety, Instructions, Tasks etc.
Creating a NEW Event Template with Pathfinder
Open the desktop application and open Event Templates grid from the Admin menu on the left.
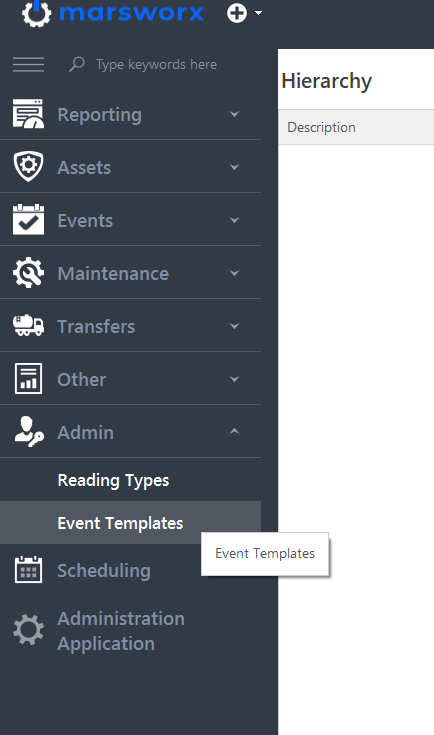
Right click on any Event Template and choose create New and choose the template format you require.
Give your template a Template Description, if desired. Some Templates may require Description not populated until User is creating Work.
Add any additional details you require.

On the right, in tab management, Admin User is able to define which details to appear, if any, in the Details tab on a Rover Work Order using this Template.
Tasks, Instructions, Safety, and Notifications if defined here when creating a new template will be required fields for the User completing the work in marsrover.
Documents added here will be available to view under the Documents tab for the User completing the work in marsrover.
Testing Equipment, Tools, Costs, and Materials, if defined here will be located in the Details Tab in an event in marsrover to provide information and/or MAY require the User populate fields
Simply close the editor when done creating the template and it is saved.
Open Pathfinder. hit REFRESH. Event template will appear in Grid.
NOTE: It is recommended Users new to Event Template creation familiarize themselves with Support Pages on Reading Types, Reading Groups, and Details Tab BEFORE adding a Web Layout to an Event Template for the first time.
Use column chooser on right to manage your grid view which is saved next time Pathfinder is opened.

Above grid is filtered to include column IdWebLayoutV. Templates with Web Layouts attached will have a WebLayout Id. Templates that do not have Web Layouts attached will have a blank WebLayout Id. This column may be used to quickly find Templates with or without Web Layouts.
Event templates have Web Layouts assigned to them.
Web Layouts have Reading Groups applied.
Reading Groups contain Reading Types.
First, navigate to Reading Types from menu on left.
Manage the grid with column chooser on the right.

Confirm the Reading Types to be used to create Reading Group exist. If not, see Pathfinder Reading Types to create a new Reading Type.
Once all required Reading Types have been located, open Reading Groups from menu on the left.
Use column chooser to manage grid view which saves when re-opened.
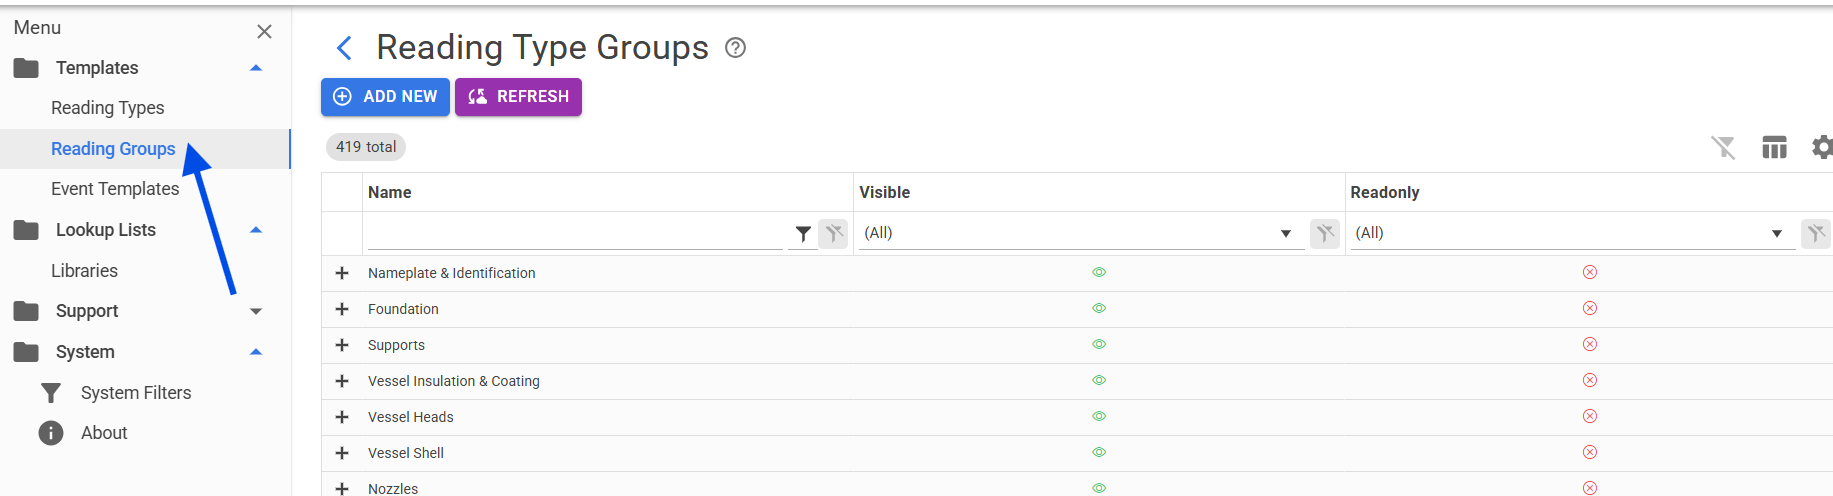
Confirm desired Reading Group does not already exist. See Pathfinder Reading Groups to create new Reading Group.
Locate newly created Event Template (from Desktop) in the Event Template grid and open using the plus + icon on the left.
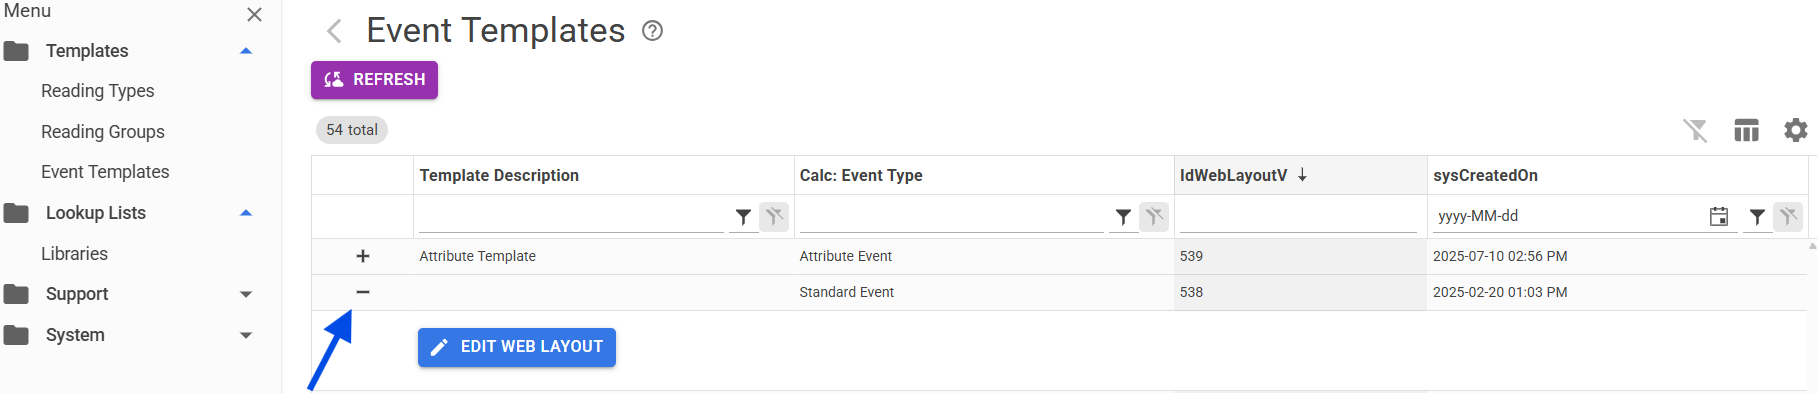
Edit Web Layout screen will look similar to below:

Show Tabs:
Choose which Tabs to include in Template. A Template may have all Tabs included, being Event, Details, Documents, Readings, and Finish Tab.
NOTE: Please see Simple Mode Templates page for creating Simple Templates with only one tab.
All Templates need to contain the ability to complete Readings and change Statuses and Finish/Upload the Event.
Show Actions:
Allows for Equipment and or Location Details to populate at top of page in an Event/Work Order created with ths template.
Choosing the Action Add Document allows for an additional ability to Add a Document viaa paper clp icon at bottom of screen in a Work Order. Note: this is in addition to the ability to add Documents via the Documents tab.
Choosing Add Child Event allows for an icon to appear at bottom of screen in a Work Order taking User directlly to the choose Event Template screen to create a Child Event.
Details Panel:
If Safety Plans, Tasks, or Instructions are identified at the initial Event Template creation ( in Desktop) , then those Details would need to be populated at the Web Layout level here to appear in the Work Orders created using that Template.
Additionally, the ability to populate Tools, Materials, Costs, or Test Equipment housed in the Details Tab in a Work Order is determined here. Please see Pathfinder Details Tab page for more information on Details Tab.
Next up:
Adding Reading Group(s) to a newly created Event Template.
NOTE: It is recommended Users new to Event Template creation familiarize themselves with Support Pages on Reading Types, Reading Groups, and Details Tab BEFORE adding a Web Layout to an Event Template for the first time.
Adding Reading Group(s) to a New Event Template
To the right of Readng Type Groups, click on the plus + button to open Reading Group grid. Filter by Name to find the desired Reading Group.
Double click on Reading Group to add to Template.
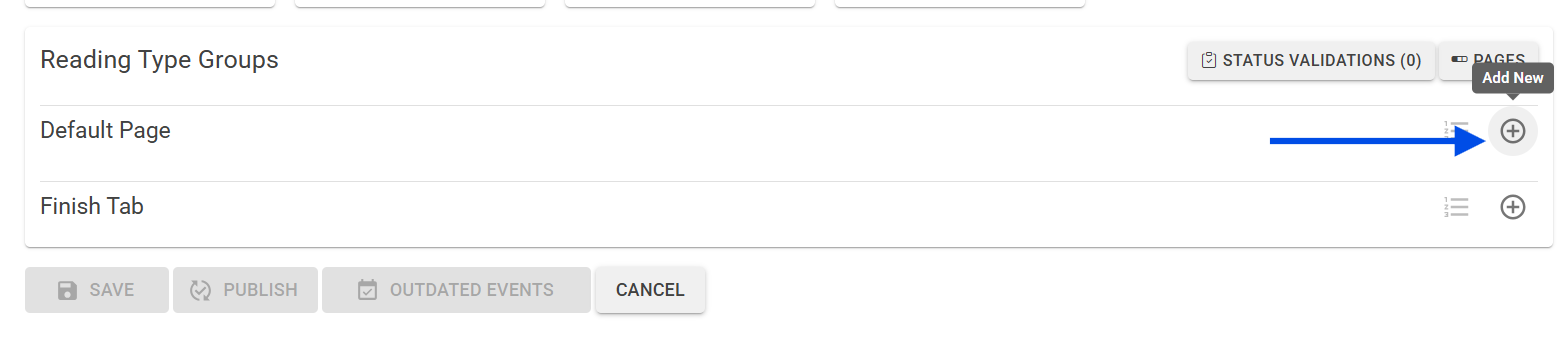
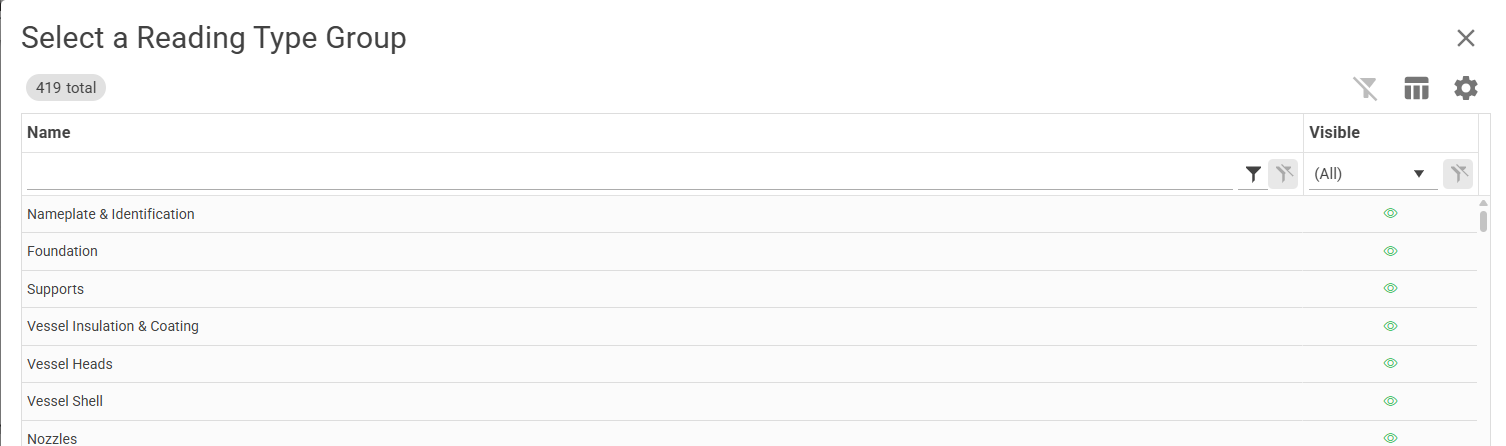
Beside each Reading on the left, is an icon defining the Type of Reading. In the below case, these are all Library Type Readings.
Press the drop down on right side to open Reading Group to view, if desired.
On bottom right, User may enter ? to view logic if User has Support Mode turned on.
The garbage can allows to remove a Reading Group.
Press the pencil icon to open and edit Reading Group. See Pathfinder Reading Groups for tips on managing.
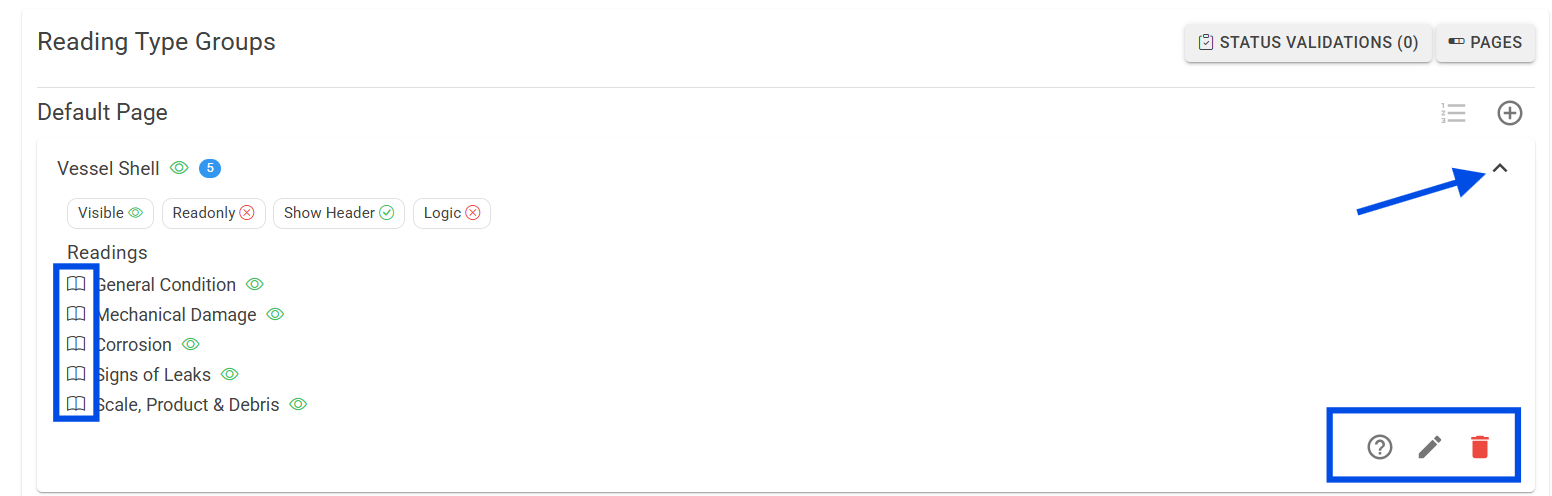
Press the plus + button to add as many Reading Groups as required.
Press the plus + button to the right of Finish Tab if a Reading Group is requred here. Signature and Completion Summary would be an example.
Next step is adding Status Validations, if desired. Click here to open window containing Statuses as per Flow attached to Template.
As example, often Completed is checked. This ensures a User completing an Event on Rover, cannot change Status to Completed without first populating all REQUIRED Readings.

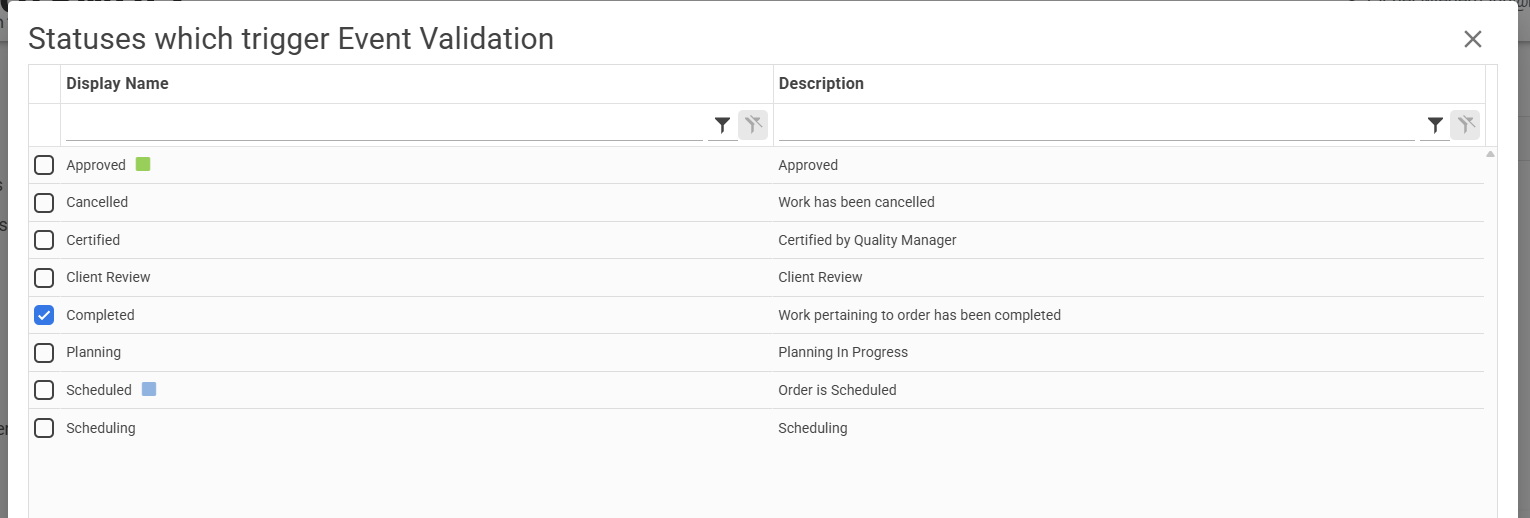
When done, simply press X in top right to close window.
Press SAVE to save changes made to a Template. This saves this version of this Template on Pathfinder only.
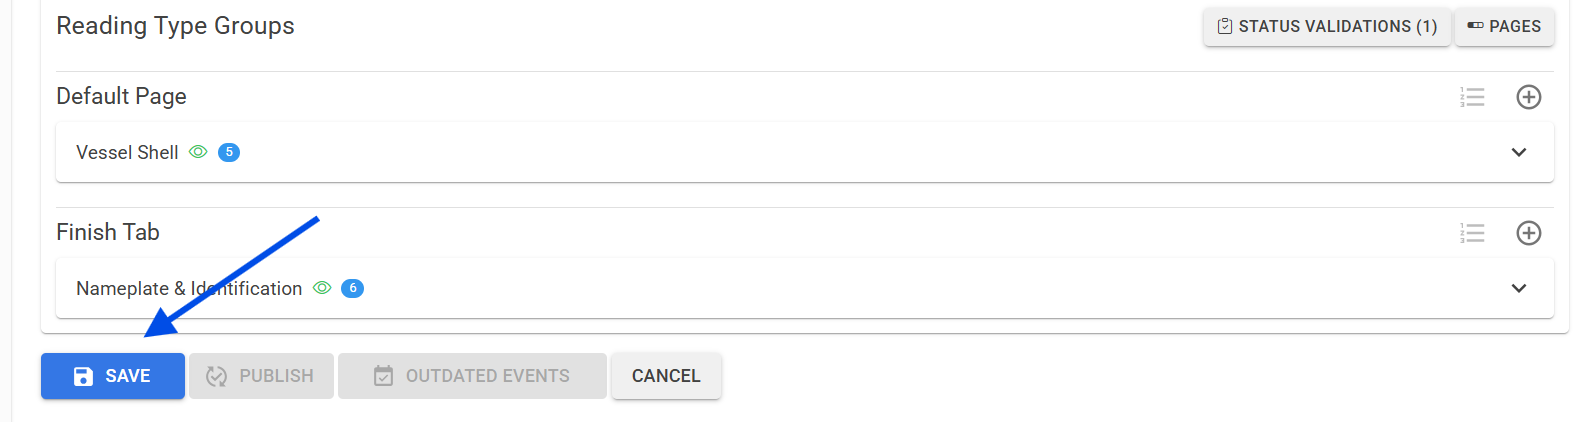
In order to see this Template with all the changes, User MUST PUBLISH. Choosing Publish makes the Template available for use in Rover and/or Desktop.
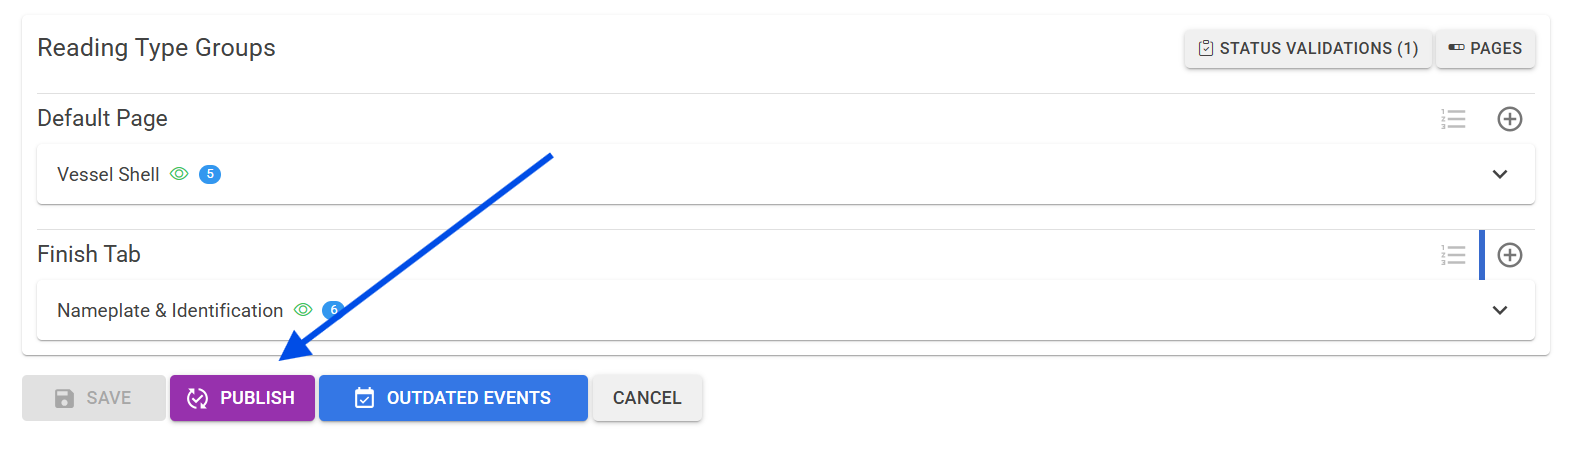
User may now see this new Template in Desktop and/or in Rover IF this Template is to be identfied as a device intiated Event at the Template Level in Desktop.
Please see Support Page named Linked Groups Can Create New via Templates for more information managing Templates a User may create on a device.
Pathfinder Features
Linked Groups can Create New
The ability to control Templates a User may use to create Work on Rover is managed in Desktop in Event Template Grid.
Managing Templates requires Administrator privileges.
NOTE: Administrator may need to create new Group(s) for the sole purpose of allowing User(s) to create new Work from device if User does not already belong to a Group.
Navigate to EVent Templates in Desktop.
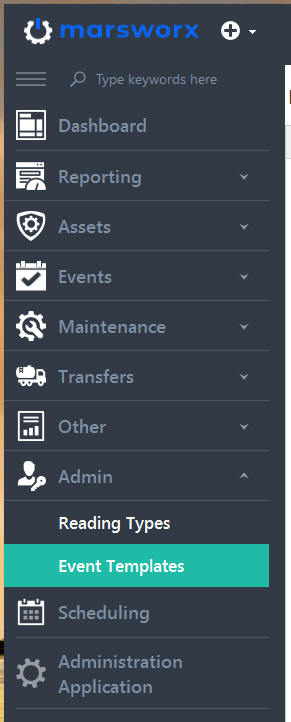
Open Template Editor for managing.
Tab over on right side to Linked Groups (Can Create New)
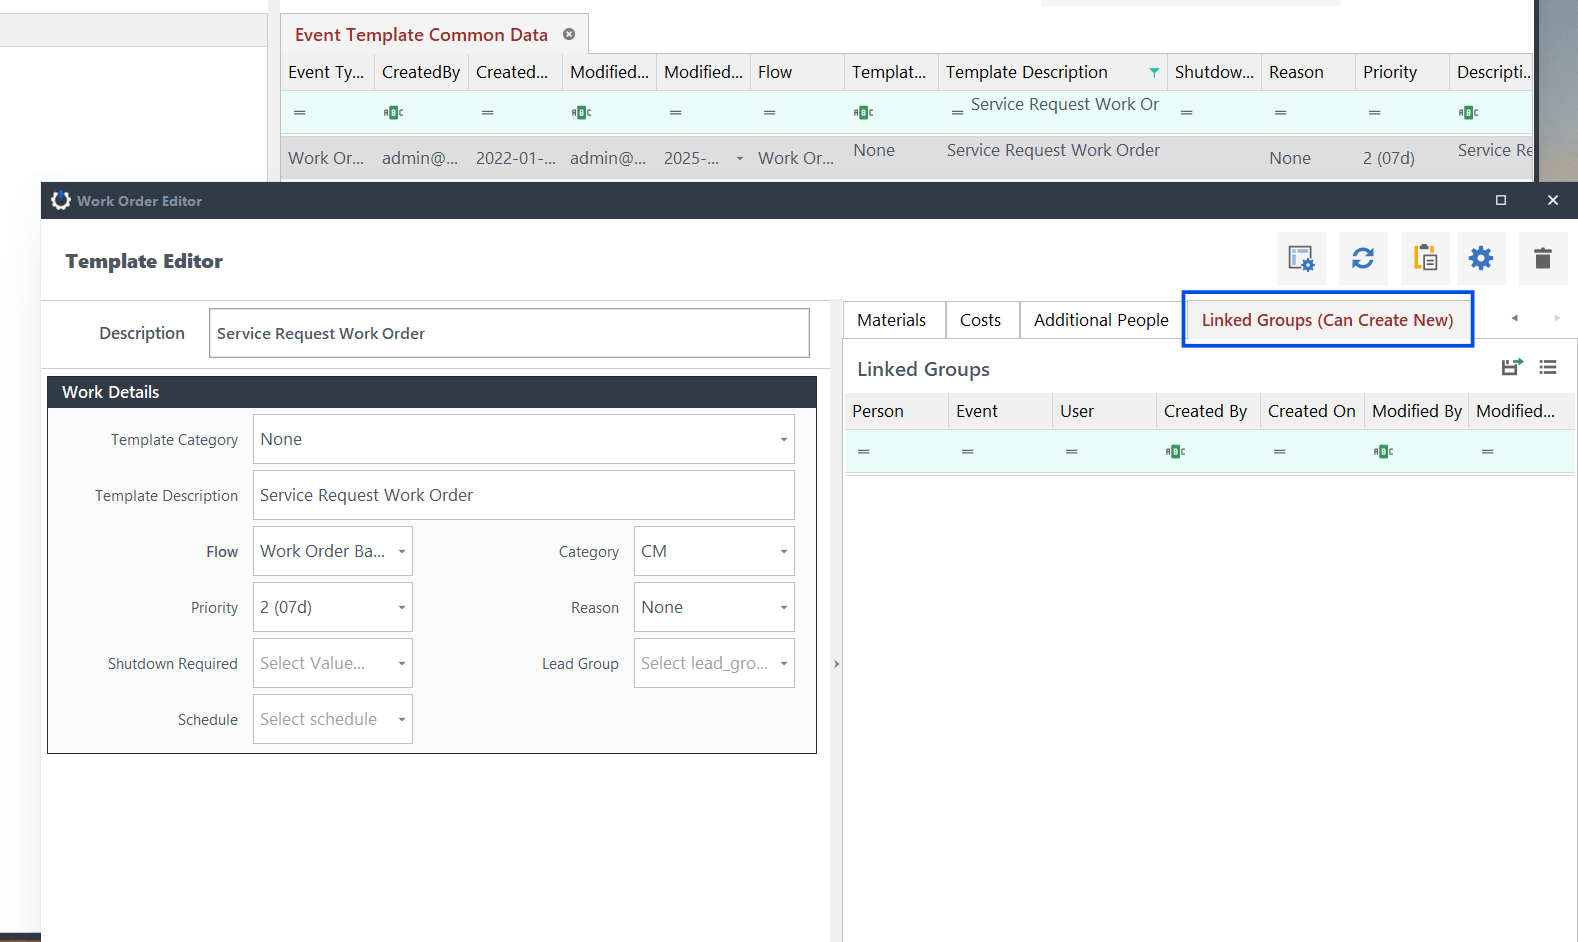
Right click in open grid space and choose Add New
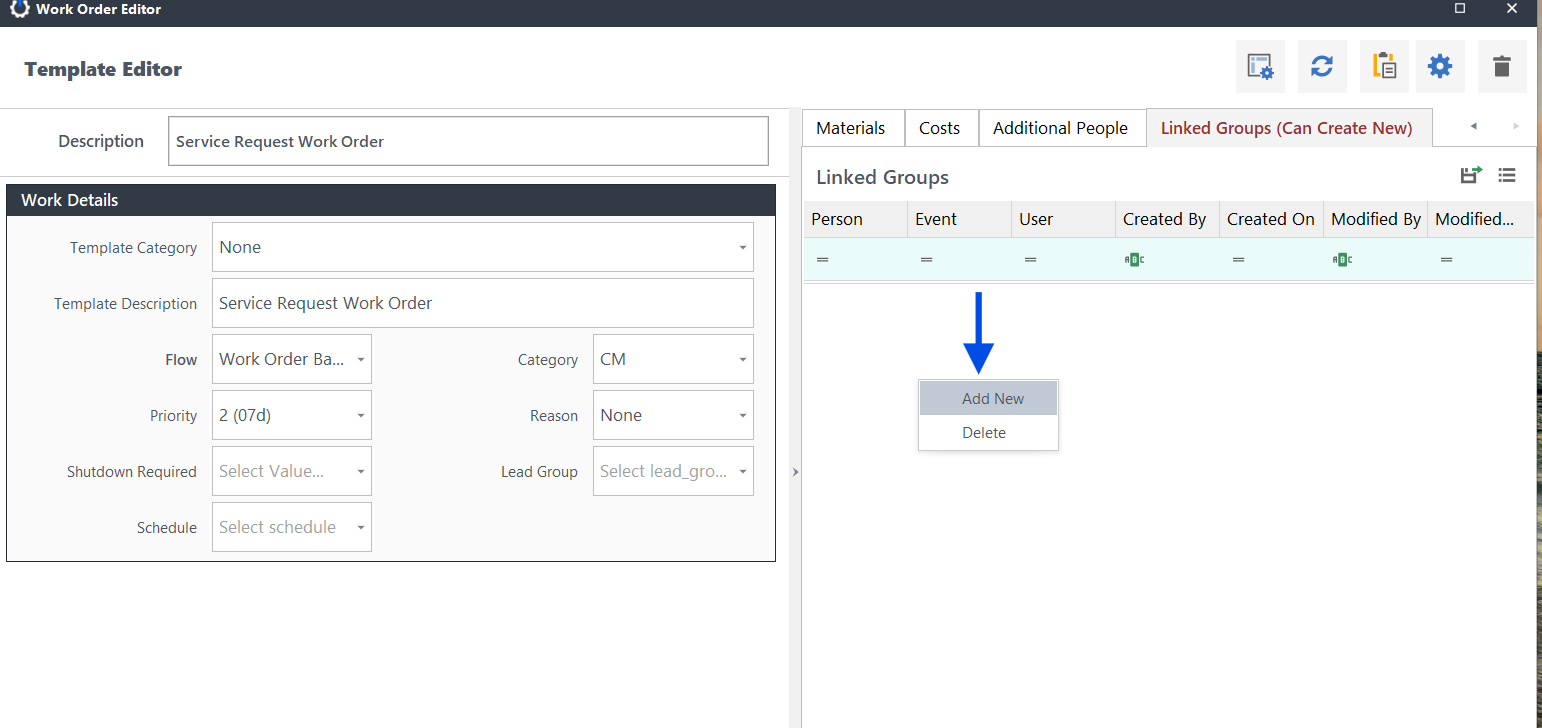
Window will appear similar to below.
Check box for Group(s) to allow any members of that Group the ability to create a device initiated event with this Template.
Press Select to close window.

Group now appears in Grid. Right click to add new again or delete a selection.
Mobile
Access information below or in menu on left.
Everything from downloading the app to managing your work.
Loading the Mobile App on Your Device
LOADING THE SOFTWARE ONTO YOUR DEVICE
FIRST, before downloading the marsworx mobile app, you need a User Account to be created for you by your administrator. They will give you access to desktop and mobile applications.
AFTER you have your own user account with mobile account made active, follow the below steps.
For IOS (Iphones, Ipads)
Go to the App Store, search for "marsworx mobile client"
You should see the following:
Download the app and open it!
For ANDROID
Go to "play store" and search for "marsworx "
Download the app and open it up!
DESKTOP AND WINDOWS TABLETS
The windows version of the software is not registered, so your virus software will likely complain about it, but it is safe.
Go to the following link using your browser:
https://secure.appenate.com/Files/WinApp/MARSworx
When complete, launch the resulting file. Your computer may give you the following message on download:
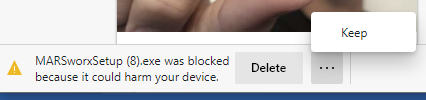
Press the 3 dot button on the right and select "keep"
The following dialog may appear
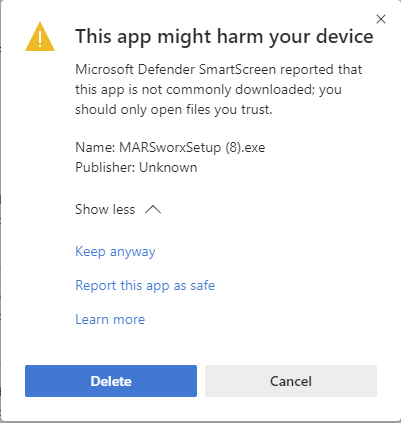
Click on SHOW MORE then open that file. Windows Defender will present a dialog window.
Click on MORE INFO then RUN ANYWAY.
Logging into the app
When your User Account was created, you should have received an email from marsworx. If you did not get it, check your junk folder, or contact your marsworx administrator. The email contains a numerical code for your first login.
Your user name should be your email address:
The password should be the number specified in the email. There may be a drop-down box below the password box – if it is there, select the company for which you are doing the work.
You should now see the following screen. It may be slightly different depending on your permissions within the system.
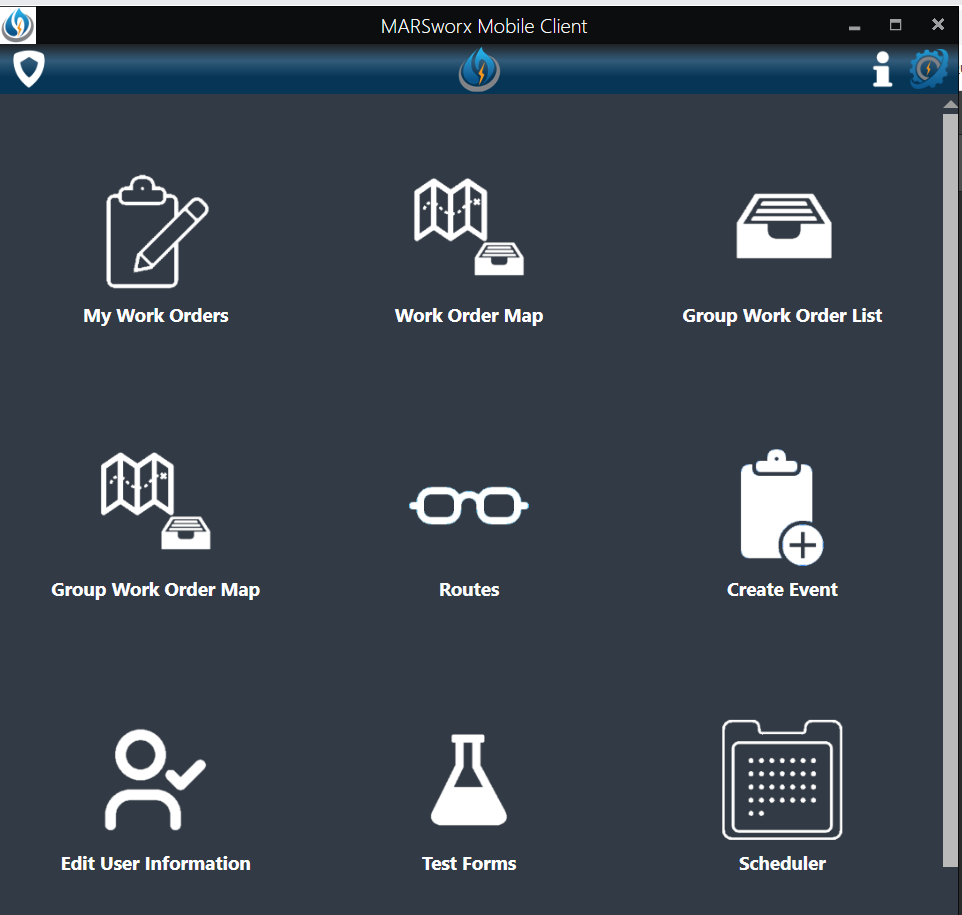
The main screen has 6 basic icons, and may have a few more depending on how your system is configured.
The major Icons are:
EDIT USER INFORMATION - Edit your qualifications and other pertinent information including your signature. NOTE: You must hit save!
MY WORK ORDERS: Your personal assigned work orders, in a list. This screen has filter and search features.
WORK ORDER MAP: Your assigned work orders shown on a map
GROUP WORK ORDER LIST: Work orders assigned to a GROUP you are a member of.
CREATE EVENT: Create a work order
TEST FORMS: View and complete test forms sent to you. This is used for form development.
TASKS OUTSTANDING: At bottom of home screen. This will the the amount of any outstanding task you have overdue.
Mobile Work Orders
Access information below or in menu on left.
My Work on Mobile
🔵Firstly, if there is a banner at bottom of your screen as shown below, click on it to view and complete overdue work assigned to yourself first.
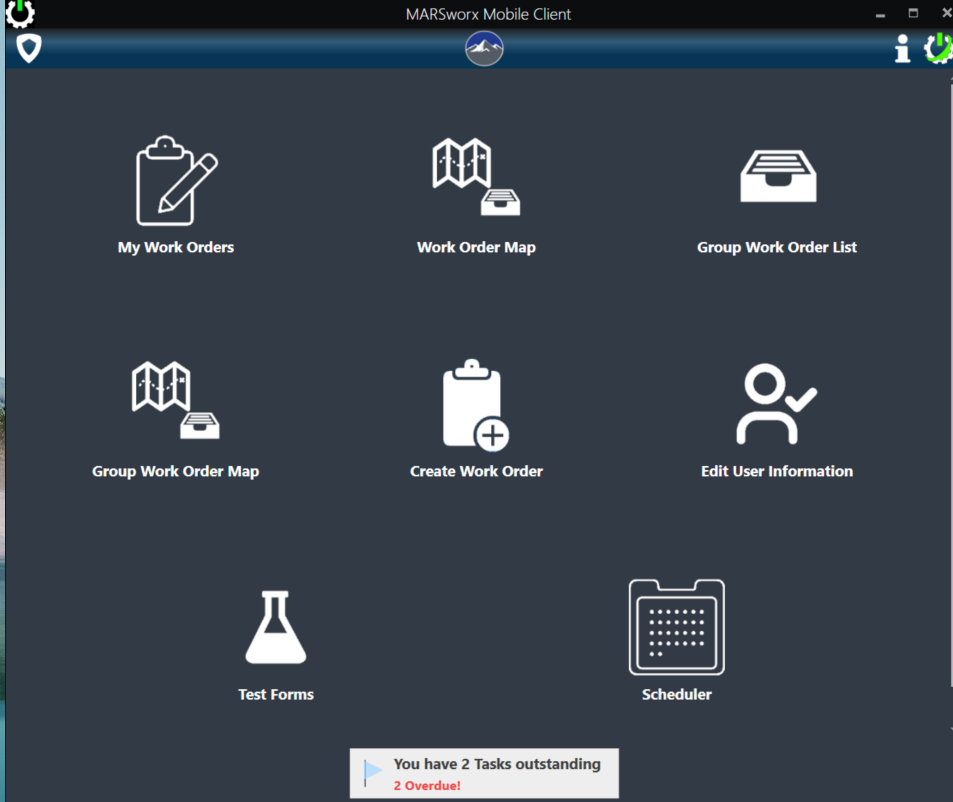
🔵Click on My Work Orders icon.
Work assigned to you will appear in list form.
🔵Verify static data then on right hand click forward arrow to choose that work to complete.
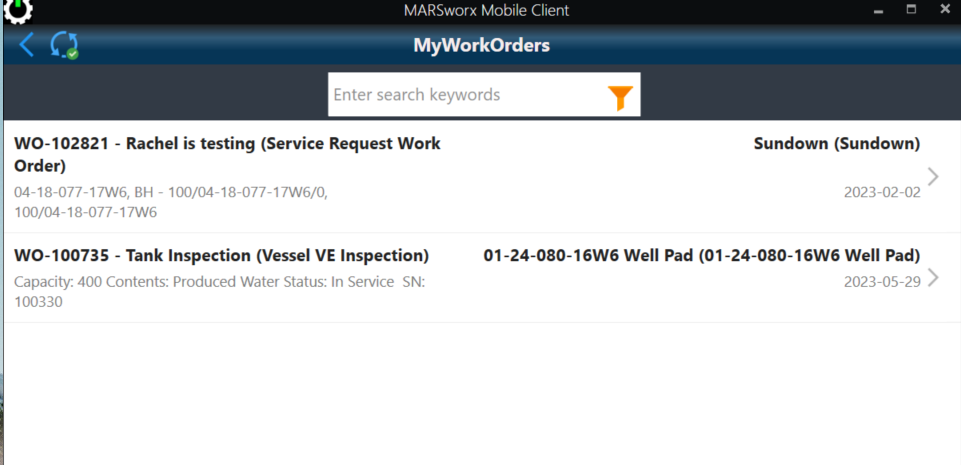
Verify the work details and click in blue box on right as shown below to begin the work.
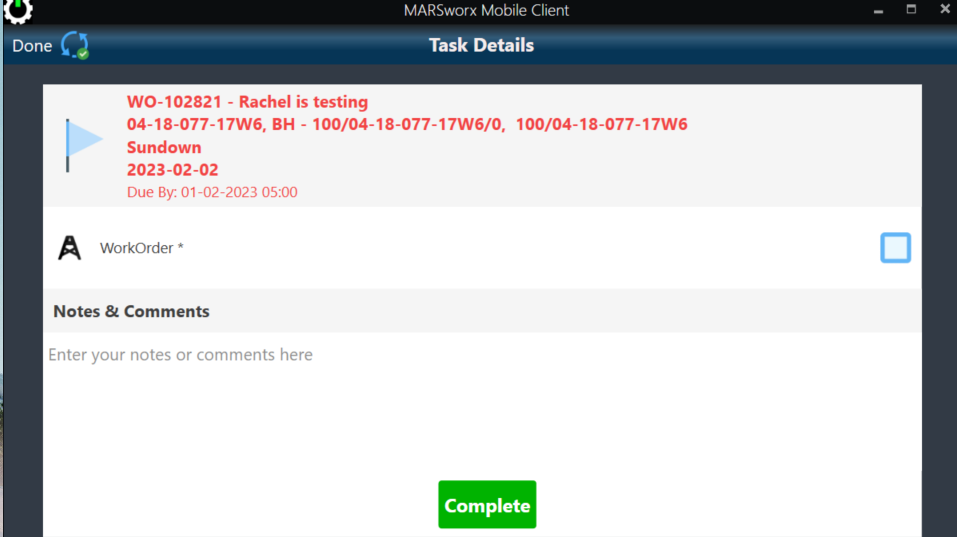
🔵Verify static details before pressing the arrow at top right of screen to begin your work.
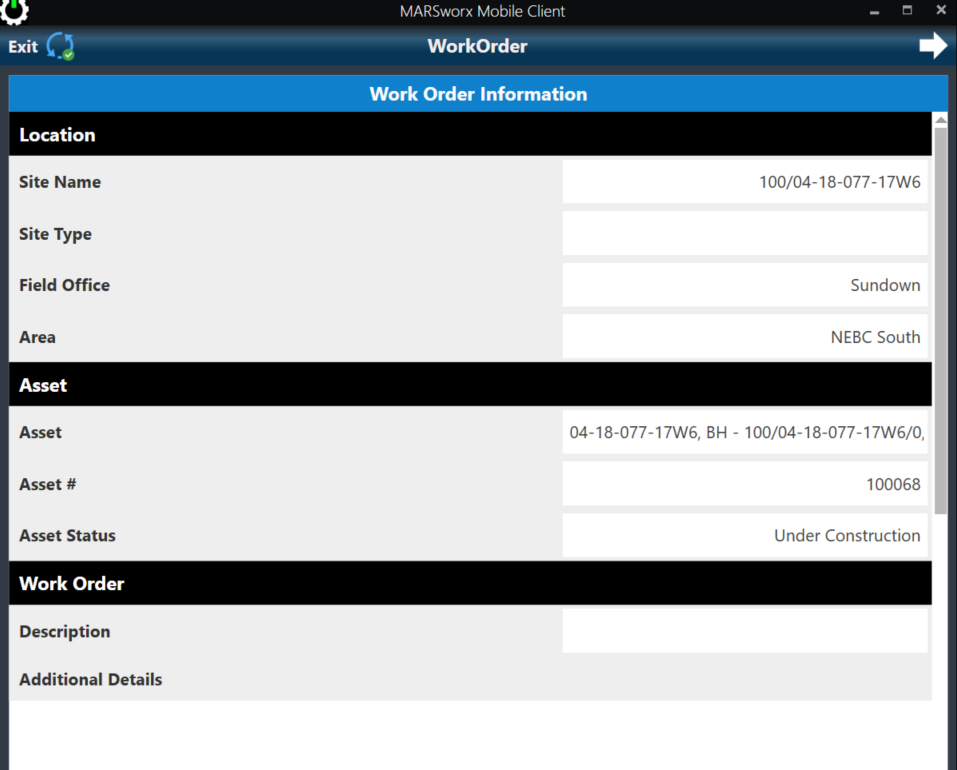
Clicking on the forward arrow at top right of screen advances to next page.
Mandatory fields are marked with *
Please view Photo Capture support page for additional information with photos and documents.
🔵ALWAYS PRESS UPLOAD
Assign Group Work Order to Yourself on Mobile
This can only be completed when connected to the internet.
Open up the Group List screen from main page.
Select one of the work orders from the list.
Once chosen, your screen should look similar to below:
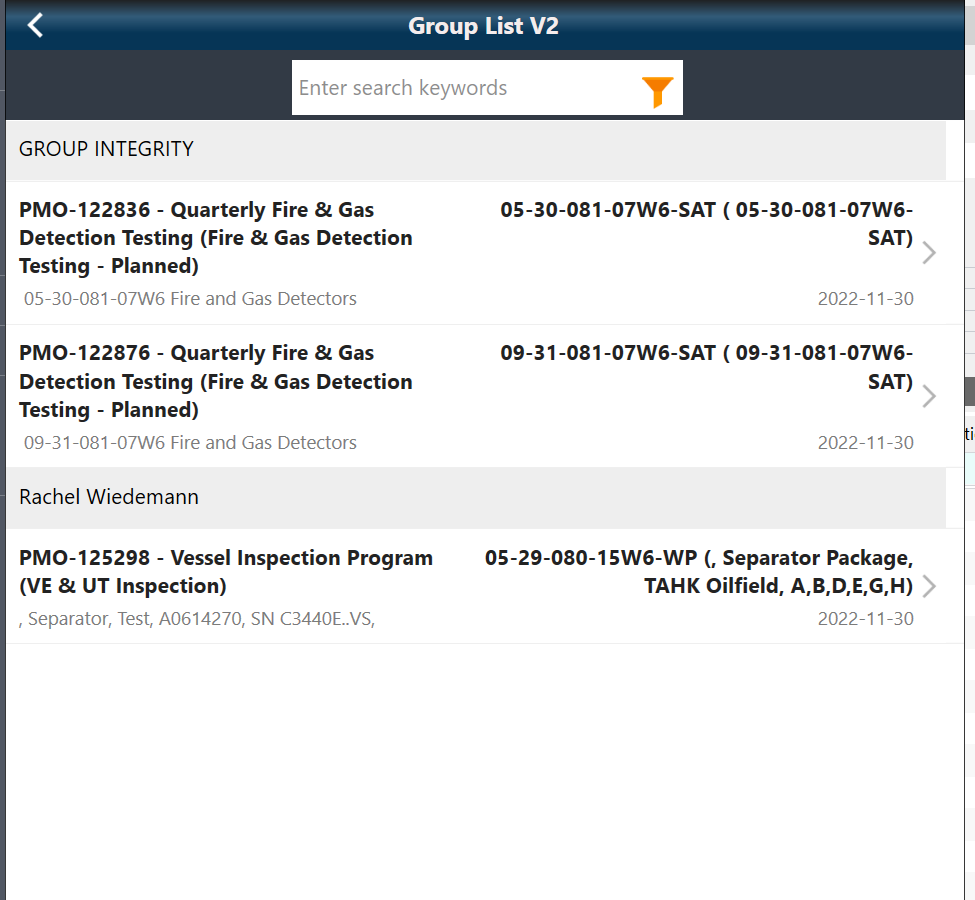
Here is the step that will remind you that internet connection is required. If you are connected, you will see this green bar.

Press the “Assign to me” button OR assign back to the group if needed. Choose the group from the drop down menu as shown below.
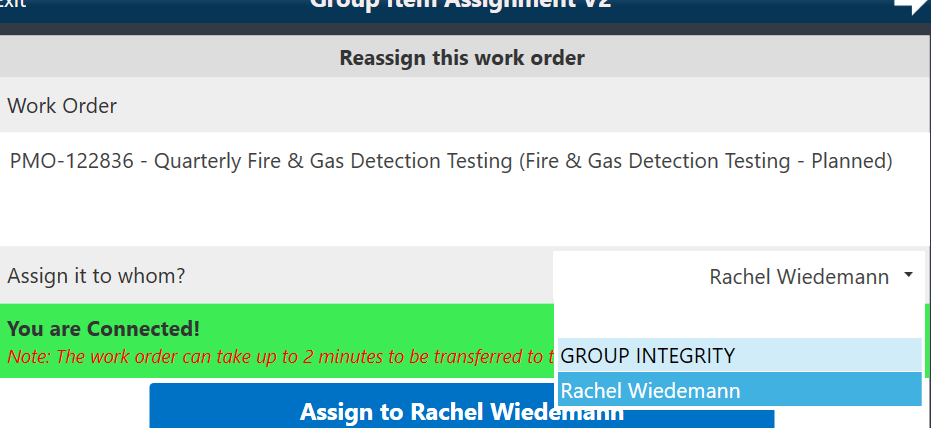
Once it’s finished processing, the “Done” button will appear.
You must press the “Done” button in order for the work order to appear in the “My Work Orders” screen.
REMEMBER: Do not press the Exit button here.
You are now able to view this work order you chose for yourself in MY WORK ORDERS.
Mobile Event Management
Access information below or in menu on left.
Create an Event
The three ways to create an event are:
Through the Create Event icon from your home screen
While performing a Work Order ie: remedial action
After completing a Work Order, which allows flexibility when a timely manner is required.
NOTE: the Create Work Order screen is configurable by the system administrator.
Choose Create Event icon on home screen
Device-initiated work order:
The screen will look similar to this:
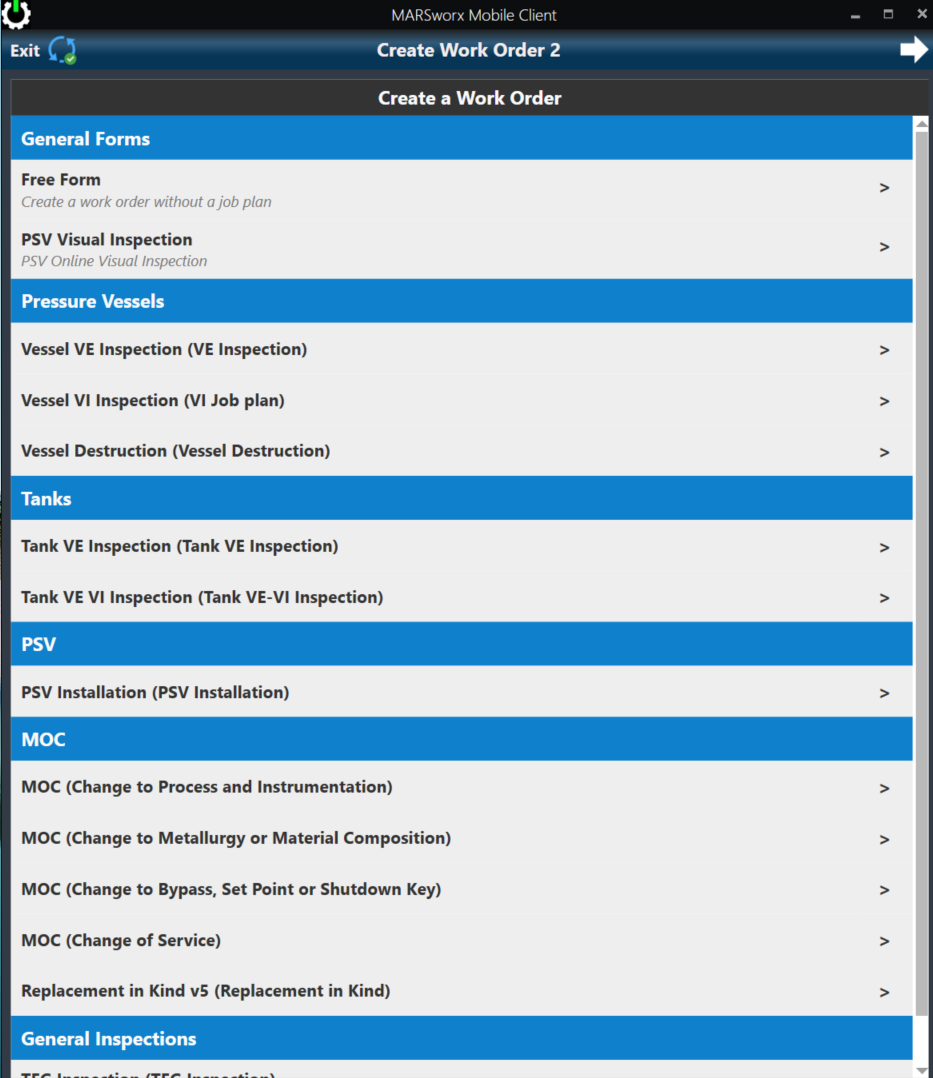
When choosing Free Form, your screen will appear as below:
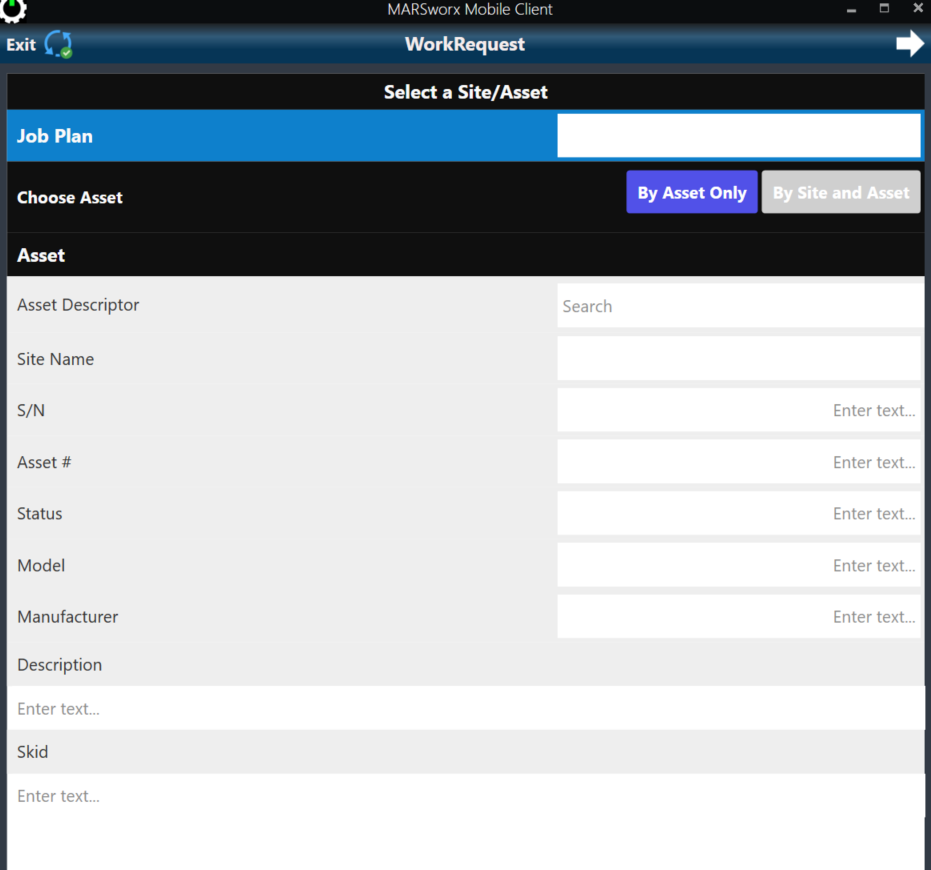
NOTE: Job Plan does not need to be populated in a free form.
First, choose your asset. NOTE: choosing by Site and Asset allows for finding your asset easier.
Begin typing in letter of your location and a menu will appear to choose from as below.
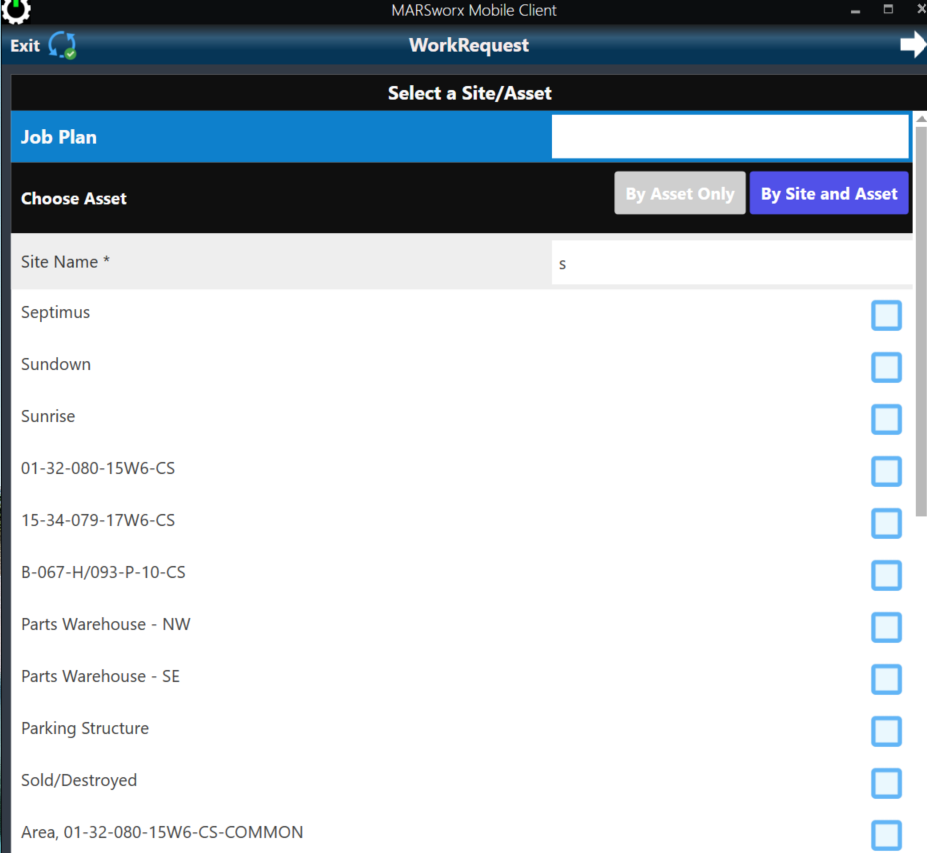
Additional Info
Most of the forms contain many pages that may be hidden or exposed depending on how the particular form is configured.
Static data defines the work order, location and asset and may vary widely based on type of work being done.
The METRIC/IMPERIAL button can be used to switch units for any appropriate numeric items, such as pressure. Please note that the unit button converts units ONLY on the static screen.
There is a separate Unit button for the readings pages, which denotes the units that are being recorded.
The associated assets presents a list of assets that are associated with the asset for which the form is being filled out. For instance, if a pressure vessel is being inspected, the associated PSV may also be shown. This form is read-only.
Reading pages
This is where you collect your data. The pages vary depending on how your forms are configured. can Text, numeric, date and picklists may be collected.. Items may be mandatory or optional, and depending on how they are answered, may require a comment.
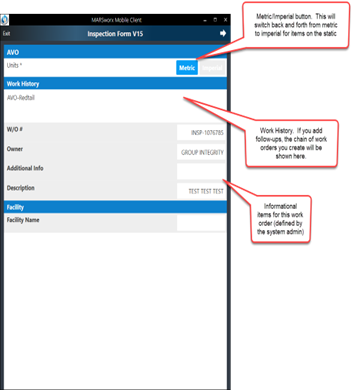
*denotes mandatory fields
Always choose upload
FORCING SYNC IS USEFUL WHEN A TIMELY MANNER FOR WORK BEING PERFORMED IS PREVALENT.
Follow up Forms
Forms created either during or after completing a Work Order.
If remedial action was required while performing a Work Order, a Follow up Form can be completed either to schedule the Work or as a record that the action was already taken.
After performing a Work Order, choose the option Follow Up.
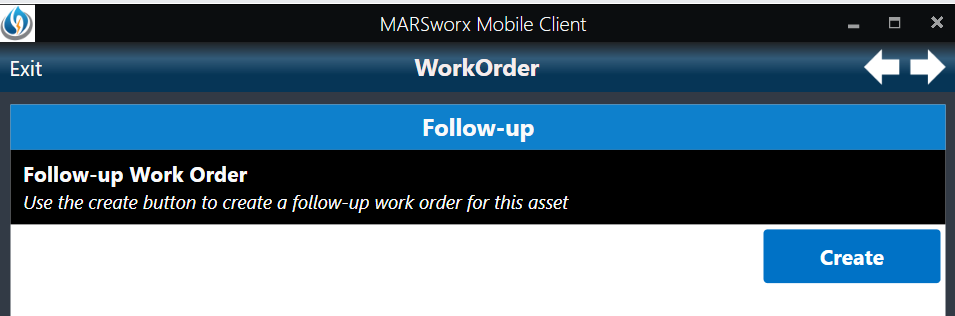
Click Create. This screen appears.
Choose from your list of work or choose Free Form. This screen appears.
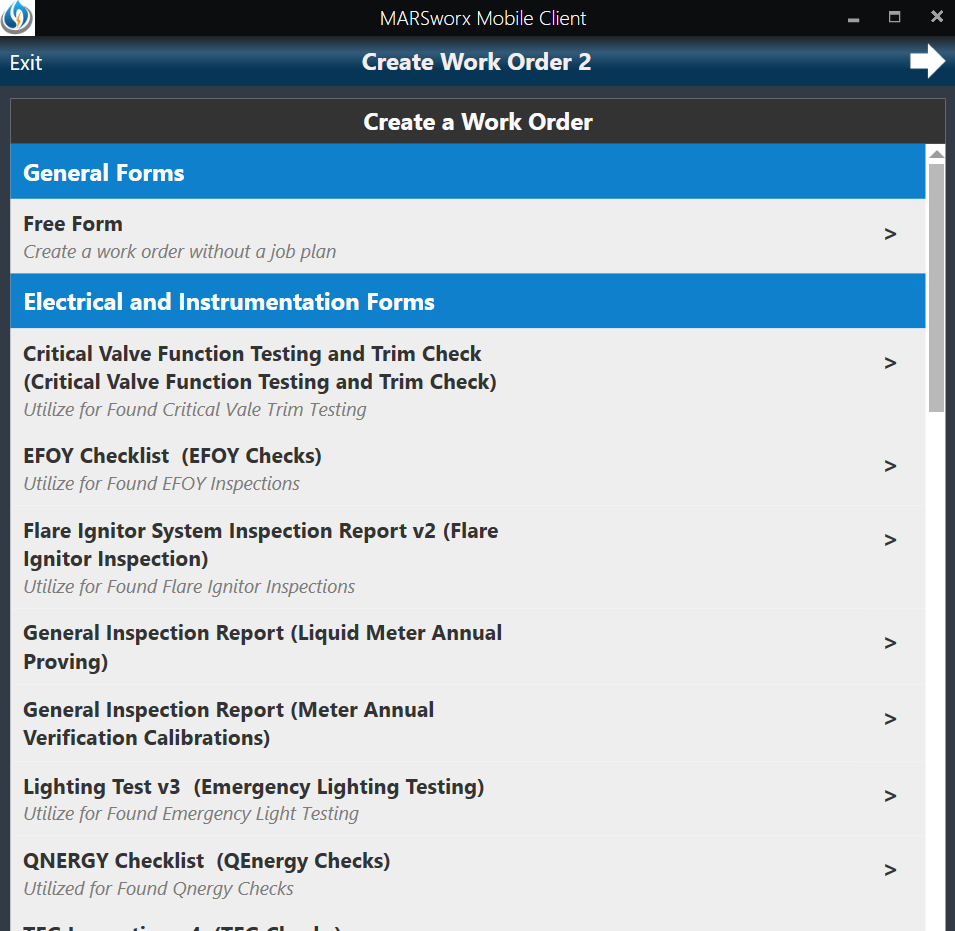
Type in your known information which will prompt drop down menus for you to choose from where applicable.
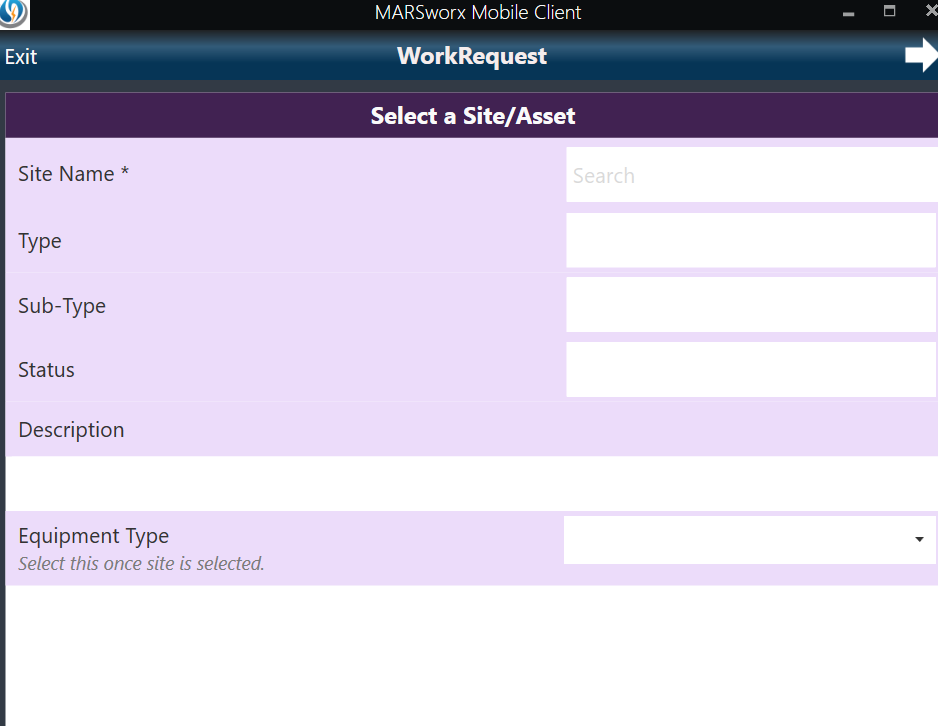
Mobile Features
Recalling Mobile Events in Desktop
Please see the below video on recalling mobile events in desktop while ensuring no data is lost on form entries.
Photo Capture
Take photos and save, edit and upload. Importing documents.
Nearing the end of completing your work order, you will come to the photo capture screen like this
🔵Choose capture and take your photo.
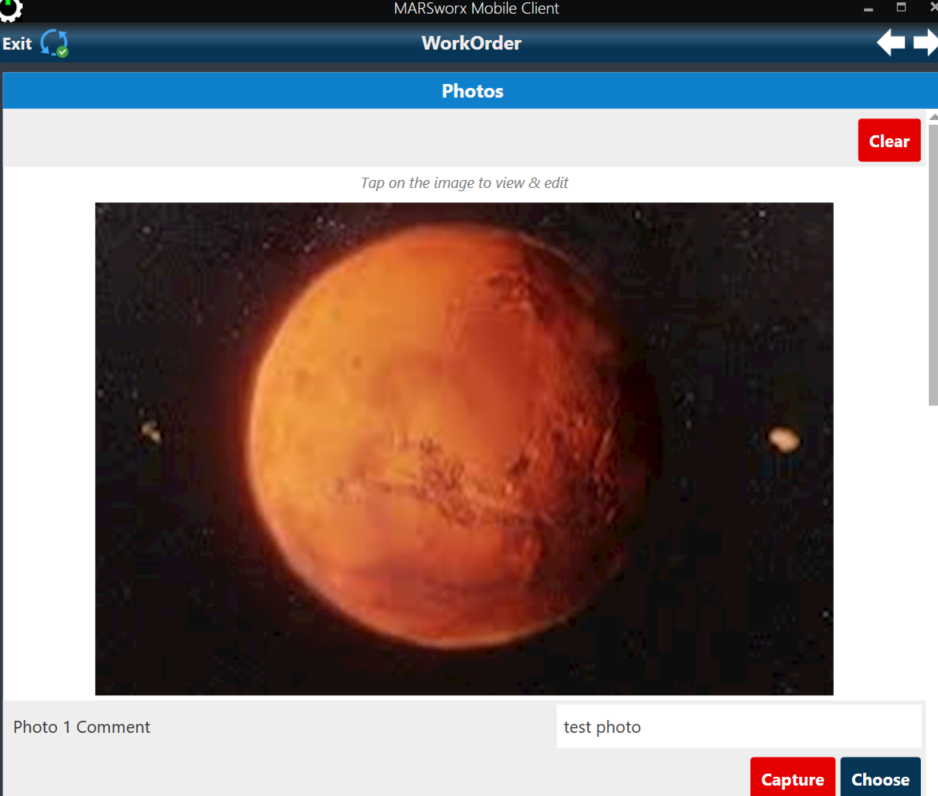
🔵Name your photo.
🔵Press on the photo to view and/or edit if desired.
The image below is how the edit screen will appear
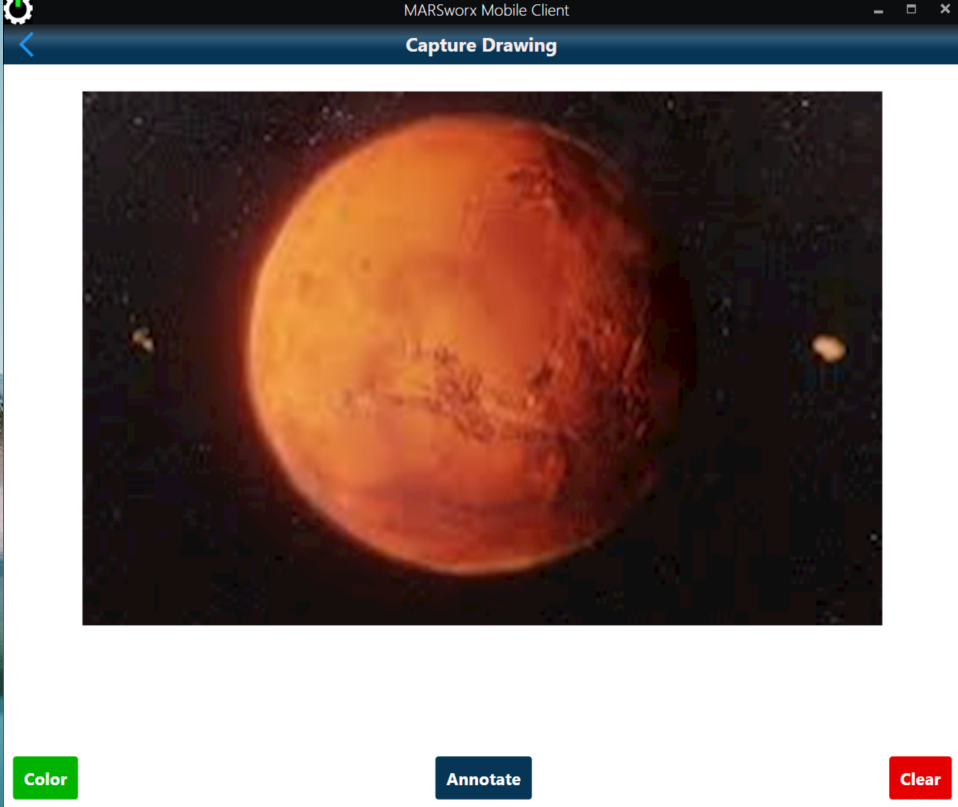
🔵Choose Annotate to allow editing options including adding text or shapes to your photo to help define your image.
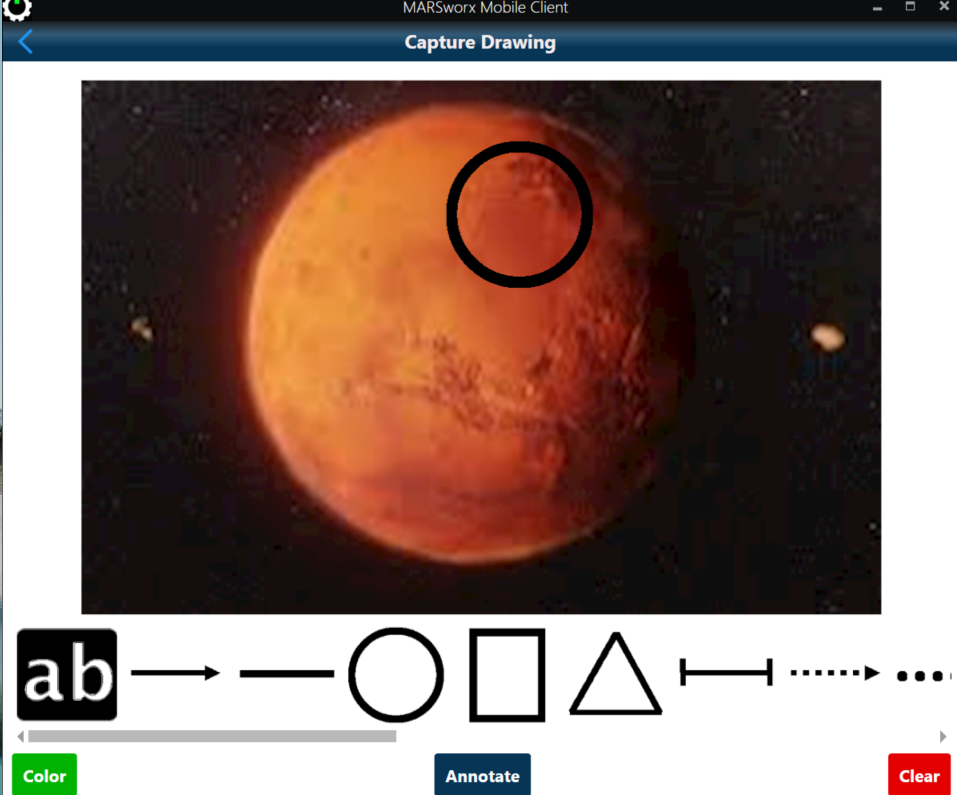
🔵When you complete your editing, press the forward arrow at top of your screen and you will come to this screen:
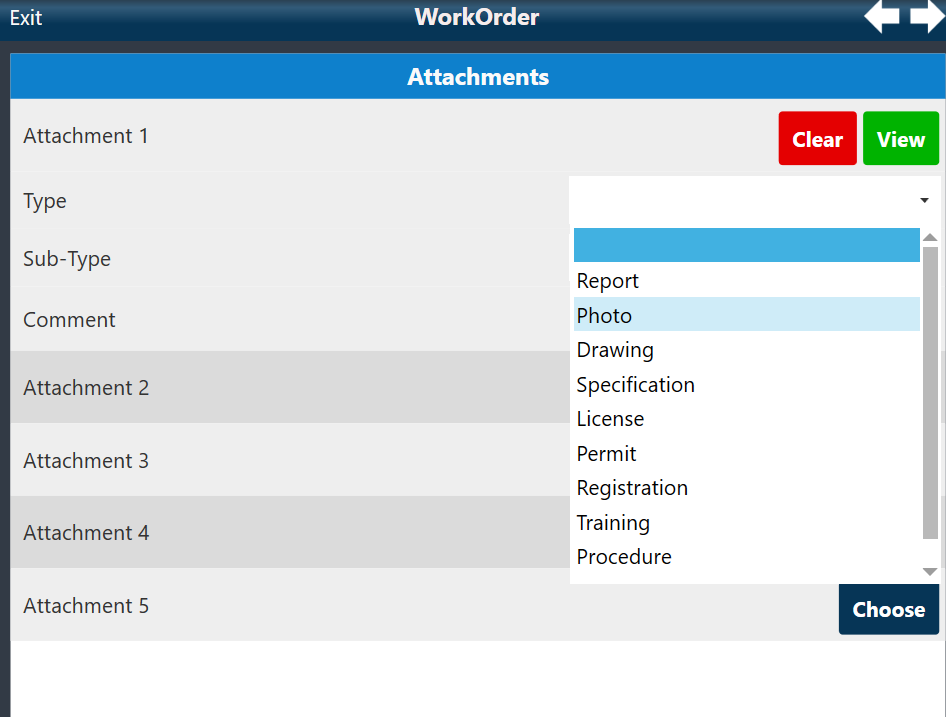
🔵Here we STRONGLY recommend you categorize any attachments you add which assists in finding and tracking your data.
🔵Choose your type of attachment from the drop down menu.
🔵Press right arrow at top to advance when done.
Maps
Use mobile maps two ways.
1. Find all work orders assigned to yourself.
2.Find work orders assigned to you in groups you belong to.
Plan your day and week. Save travel time.
Choose either Work Order Map OR Group Work Order Map from your home screen.
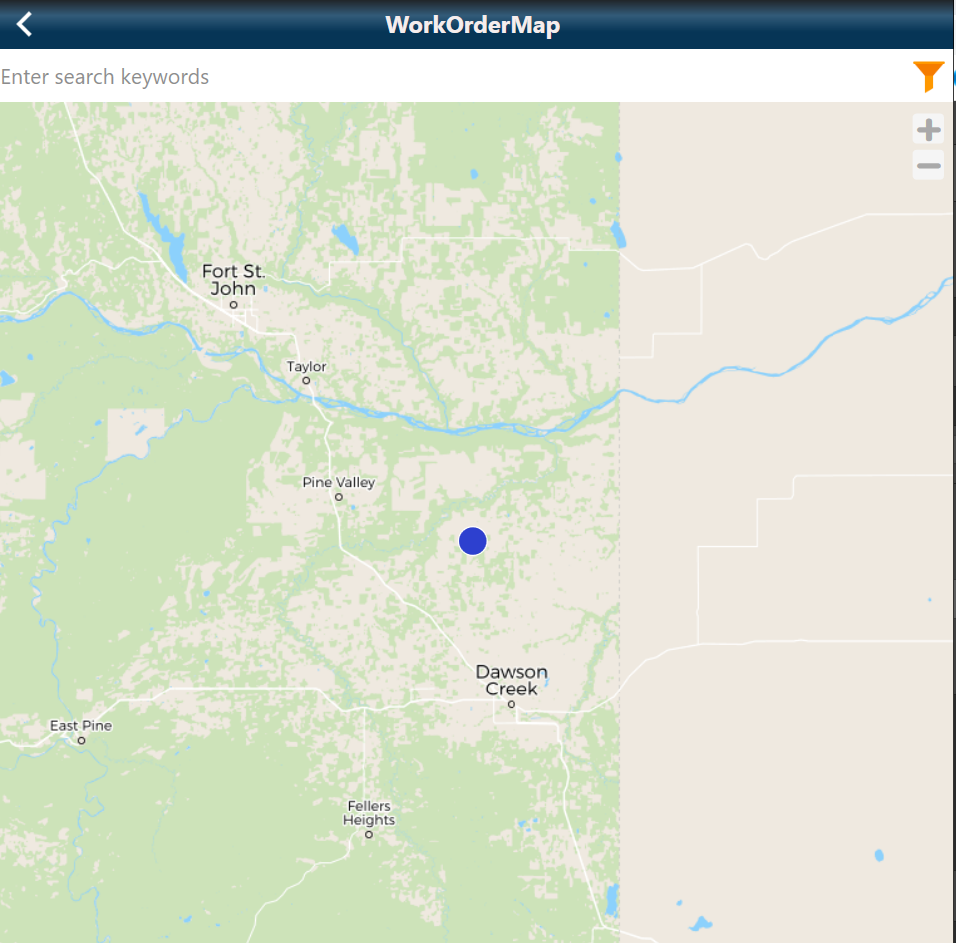
🔵Click on any location which will bring up the details of the Work Order.


🔵Once you view and confirm this is the Work Order you want to perform, click the box beside the description and complete your work.
🔵In the group work order map, once you select a location from the map, a window appears asking for confirmation assigning that work to yourself.
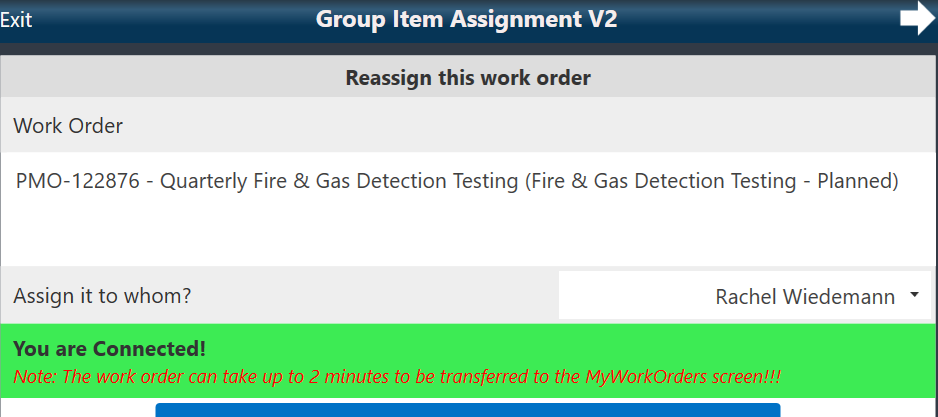
🔵If connected, you can load to your Mobile device now.
🔵ANY GROUP WORK ORDERS you assign to yourself MUST BE DONE WHILE CONECTED TO THE INTERNET.